Manual Cleansing Page
|
Topics: |
Manual Cleansing issues involve the resolution of problems with missing or invalid data and the review of changes suggested by an automated data quality process (like incorrect, ambiguous, missing data, and so on).
A cleansing case consists of a record which attributes require manual editing. Each edit can be sent through workflow separately because different attributes of the record may be in different states.
You can also leave a comment on particular attributes or view and resolve issues/errors that arrive from an automated cleansing process.
Navigation Options
There are three options you can use to navigate to the Manual Cleansing page:
- From the Master Comparison page, to create a new cleansing case through the Edit menu item.
- Using a link from the Issues dialog to view already created Manual Cleansing cases. The appropriate icons are displayed on the Details 360, Master Comparison, and Home pages.
- From the Issues page, to view already created Manual Cleansing cases.
Note: Manual Cleansing cases can be opened only for Instance records. Any record currently under Manual Cleansing remediation may not be remediated under any other Manual Cleansing case.
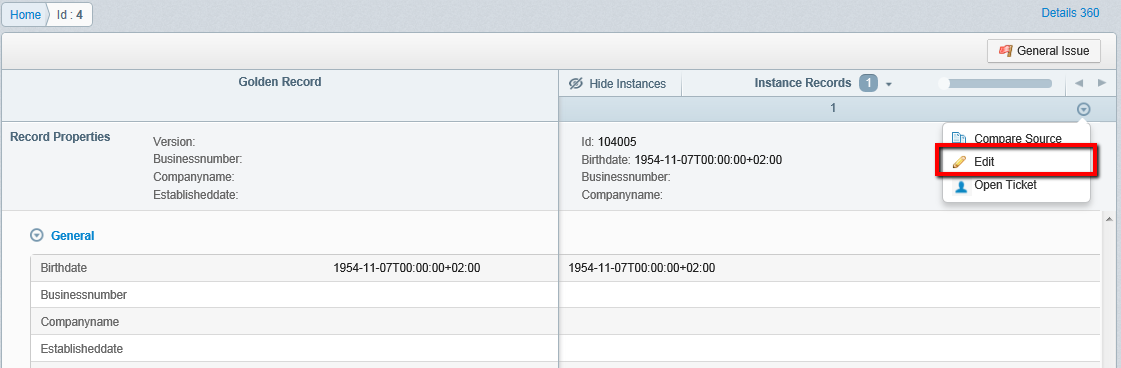
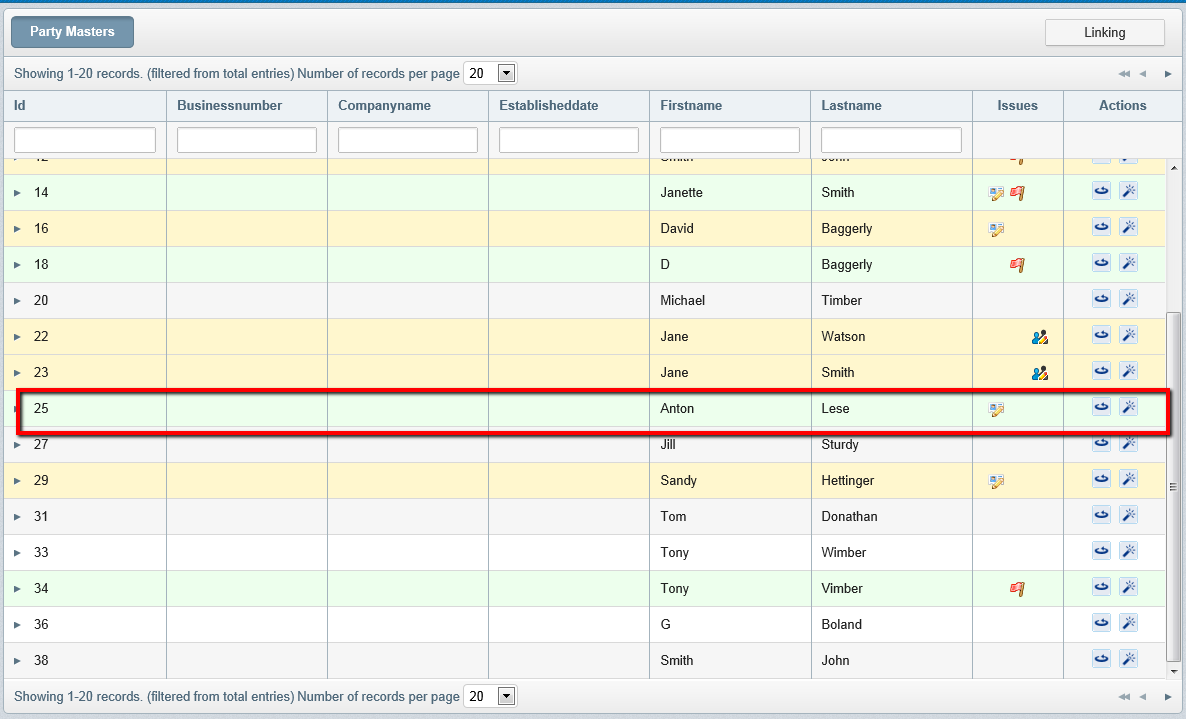
If a you want to open a cleansing case, navigate to the Master Comparison page of that record, expand the Instance records section and select Edit from the menu list for or appropriate Instance, as shown in the following image.
Another way to navigate to the Manual Cleansing page is through links in the Issue pop-up window (if the cleansing case already exists in the system), as shown in the following image.
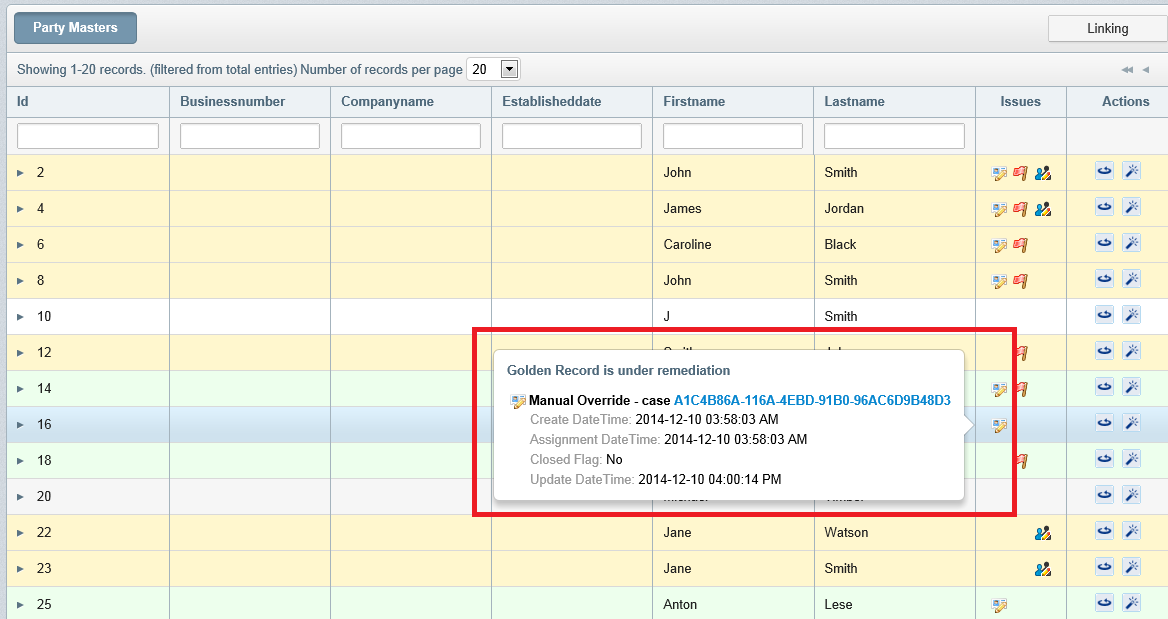
In order to see the pop-up window, use the pointer over any cleansing remediation icons that are displayed on Details 360, Master Comparison, or Home pages, and then click the appropriate link.
Note: For User roles, the Cleansing link is disabled, because the user has no permissions to view or work with cleansing cases.
If a case is assigned to the current user, the Manual Cleansing page will be displayed in Update mode, so that the user can continue working with it. If it is not assigned to the current user, it will be set to Display mode, where the user can make no changes.
The last way to navigate to an already created cleansing case is to select the appropriate link on the Issues page.
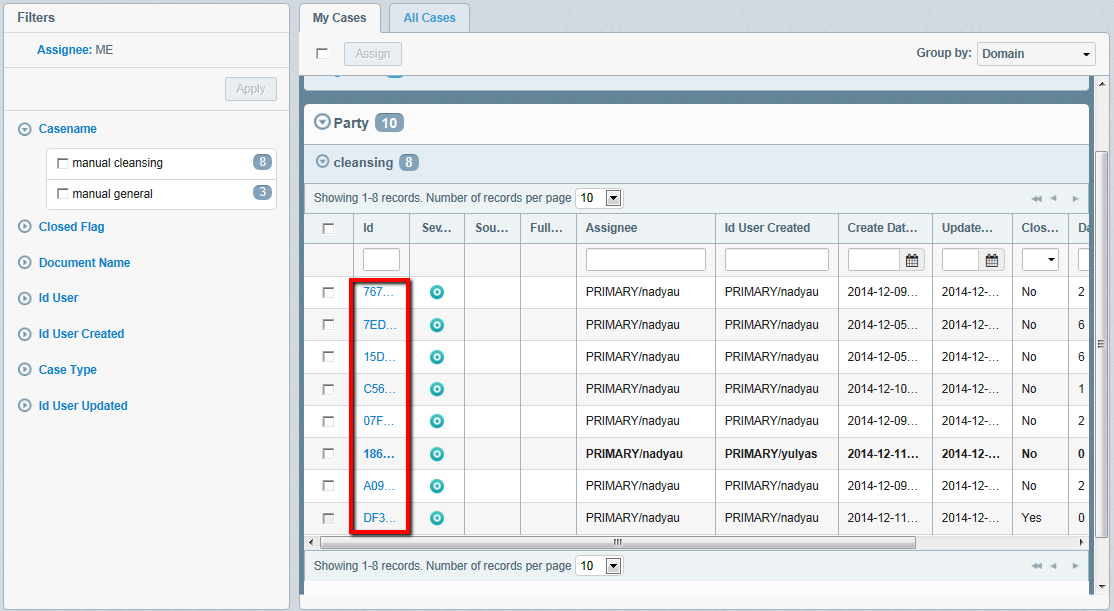
The same method applies as with links in pop-up windows. If a case is assigned to the current user, the Manual Cleansing page will be displayed in Update mode, so that the user can continue working with it. If it is not assigned to the current user, it will be set to Display mode, where the user can make no changes.
Note: Closed Cleansing cases are displayed on the Issues page and in Remediation pop-up windows. Those cases can be opened in Display mode only.
Page Structure
The Manual Cleansing Case page is composed of the following main blocks:
- Bread crumbs
- Workspace
- Expand/Collapse Workspace control
- Activity Stream
- Case Properties
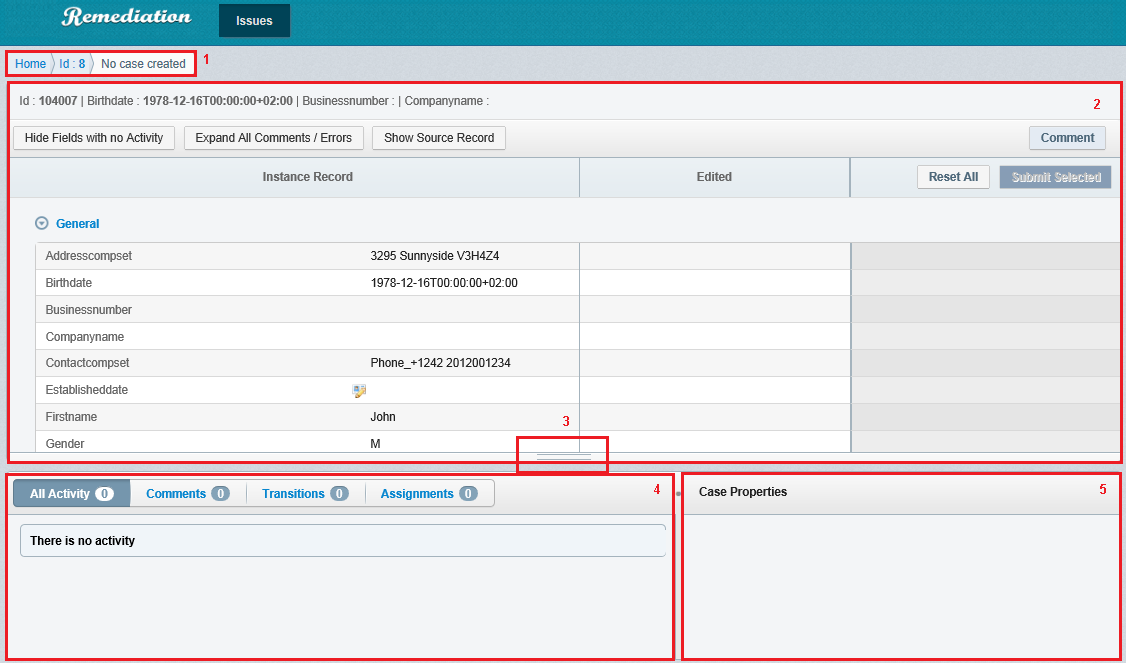
Using bread crumbs (1), you are able to navigate to the previous visited pages.
In the Workspace (2), you can edit the values of attributes, add comments to attributes, and send the changes through a workflow.
For manual cleansing cases in the Workspace, the Instance record attributes are displayed as well as Edited values columns and workflow actions. The fields of the Workspace panel can be configured using the Administration module.
For more information, see Workspace Panel.
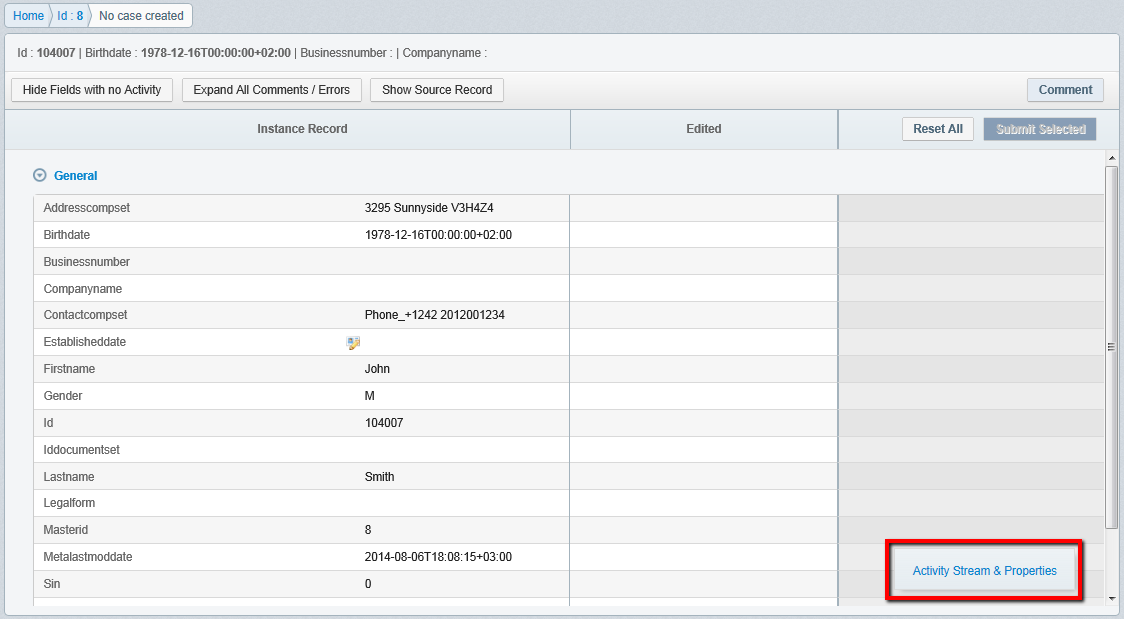
By default, the workspace is collapsed and only first main important attributes are displayed.
The Expand/Collapse Workspace control (3) hides and shows Activity stream and Case properties and expands/collapses the Workspace. When the workspace is expanded, the Activity Stream & Properties link is displayed in the bottom-right corner of the page to open Activity stream and Case properties sections.
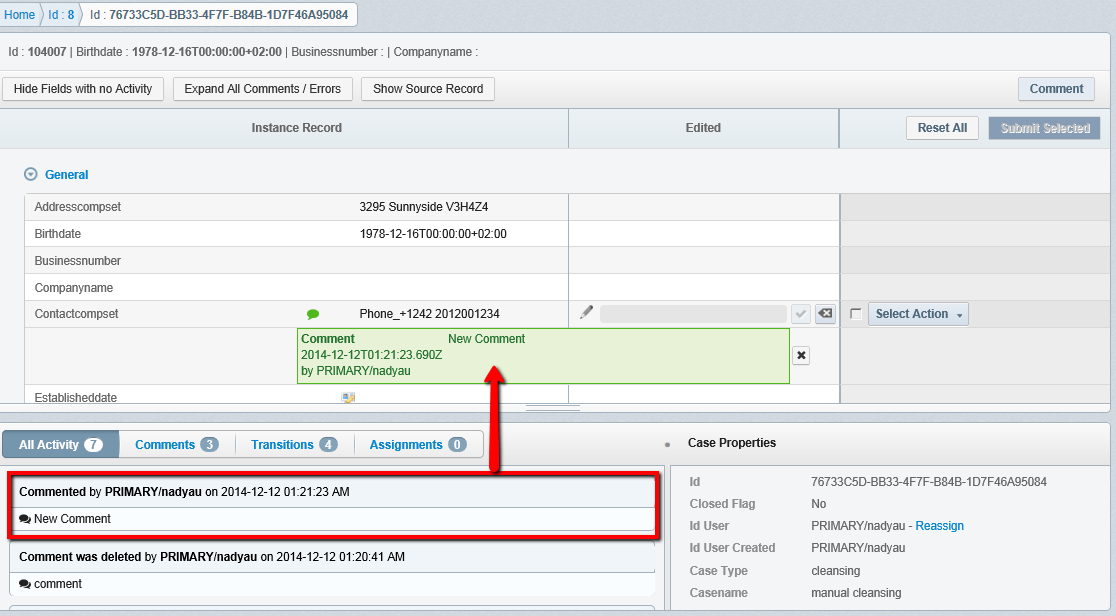
Below the Workspace, Activity stream (4) is displayed. All activities such as comments and transitions through the workflow for every attribute, general comment, and reassignment issues are tracked in Activity stream.
Case properties (5) include information on the case (assignee, created dates, and so on).
Creating a Case
|
Topics: |
In order to create Manual cleansing, case comments should be added, and attributes should be edited. After the case is created, the Activity Stream and Case Properties sections gets refreshed and display relevant information. IDs of the case are set in the bread crumbs as well.

The fields of the Case Properties section are configurable through the Administration portal.
For more information, see Case Properties Panel.
Adding Comments on Attributes and the Whole Case
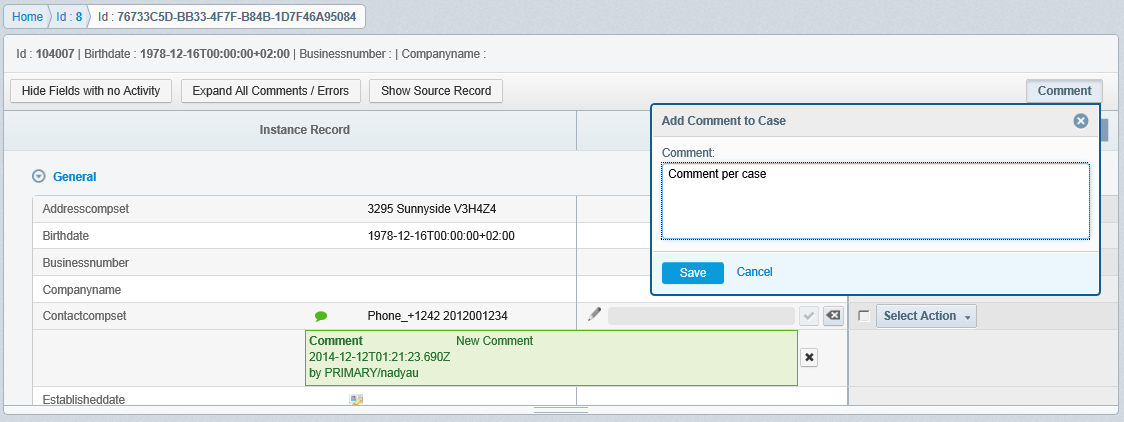
You can comment on any data attribute. When you move the pointer over the Original Data value or label, the Add comment icon appears. When you click on the icon, the Add comment overlay is displayed.
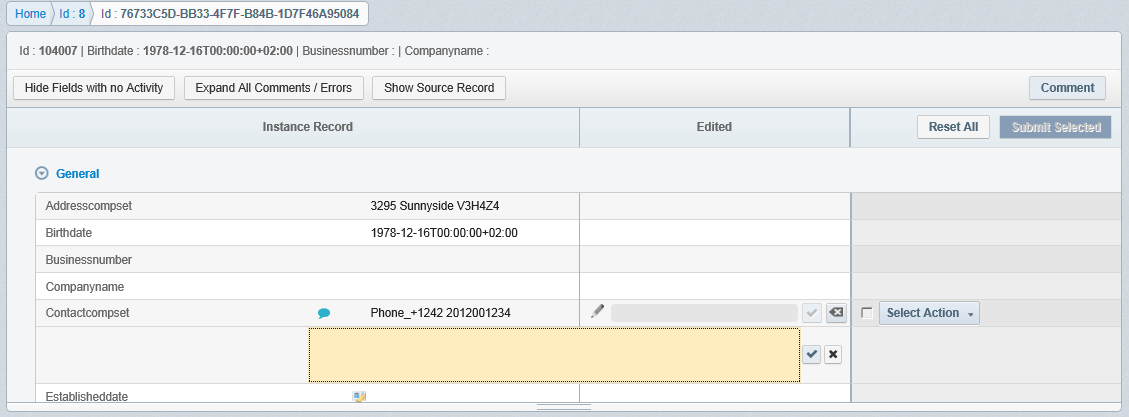
You can enter text and save a comment by clicking on the appropriate Save icon. The comment will then be displayed in the Activity Stream and can be viewed when clicked on the Add a comment icon. The comment will be displayed in the expandable area below the row, as shown in the following image.
Note: When a comment is not yet saved, the Add comment icon is blue and the comment box is yellow. When the comment is saved, the icon and box are both green.
Comments for attributes can be updated or deleted. In order to update the already saved comment, click anywhere in the Comment box, and the comment text will be editable again. If you want to delete an in-line comment, just click the Delete (X) icon.
Note: Every comment creates a ticket that is saved in the database. Tickets cannot be deleted manually, and can only be closed by the workflow. As a result, the Delete option only erases the value of the edit, but does not delete the ticket itself.
You can optionally enter a global comment for the whole case by clicking the Comment button. It will appear in the Activity stream.
Editing Attributes
Edit column by default is empty until you edit the values manually. The edit functionality is immediately seen when you move the pointer over the editable fields. The fields are highlighted and the tooltip (Click to edit button) is displayed.
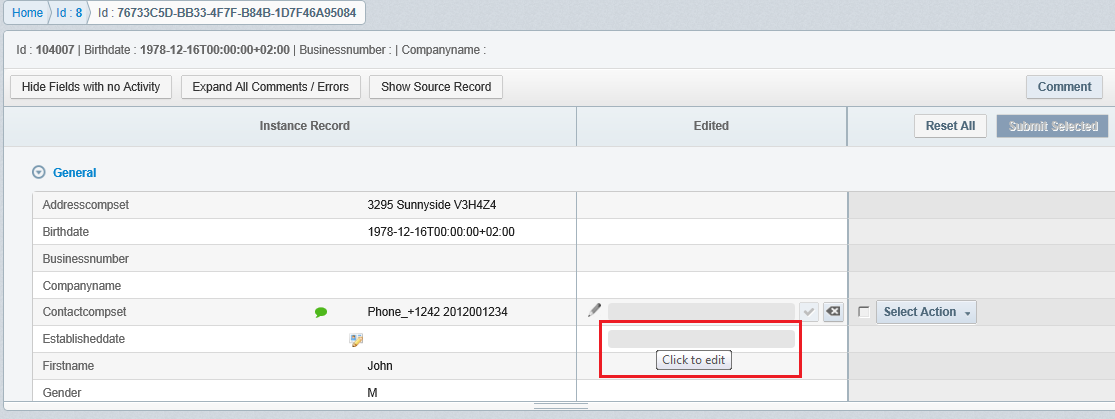
When the button is clicked, the edit text field is displayed instead of the empty cell. You can close the text fields without any changes made, just by clicking outside the field.
When you click the Save icon for the edited field, the Workflow actions drop-down list appears, as shown in the following image.
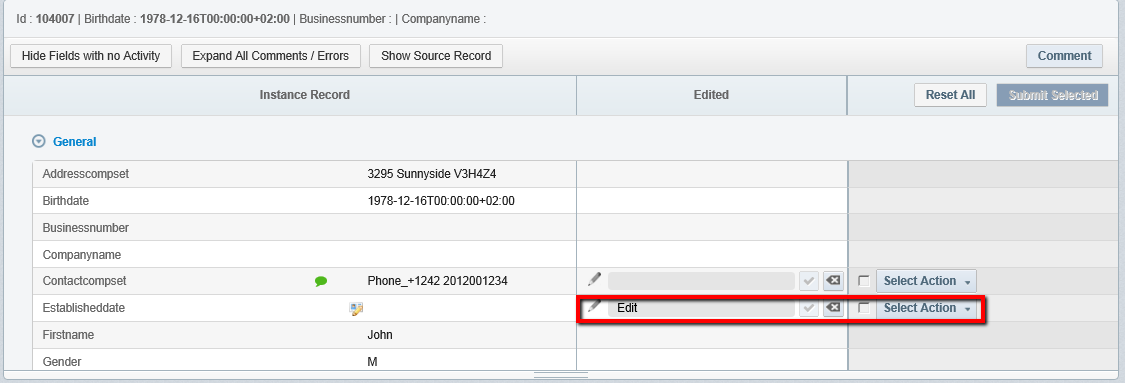
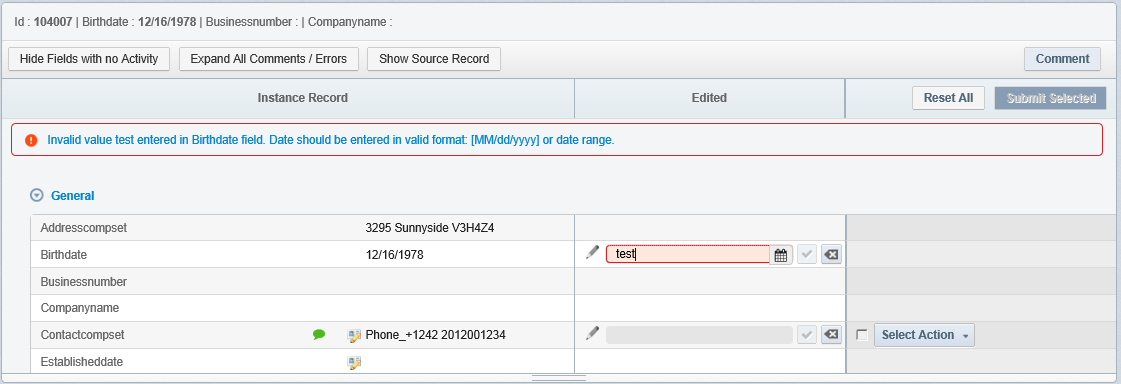
Before saving the changes, the edit must first get validated. If validation fails, the appropriate message is displayed and edits cannot be saved.
You can also prohibit the editing of certain fields. It can be done using the Administration portal. For more information, see Case Properties Panel. When the field cannot be edited, it is disabled, and the appropriate message is displayed, as shown in the following image.

A single edit may be reverted with the Revert Edit option. However, the last made change may be undone.
These options are accessible from the context menu which appears when the Delete (X) icon is clicked. Also, the value of the edit may be deleted, when the Delete option is selected.
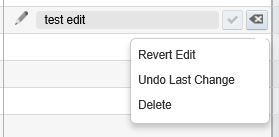
Note: Every edit creates a ticket that is saved in the database. Tickets cannot be deleted manually. They can only be closed by the workflow. As a result, the Delete option only erases the value of the edit, but does not delete the ticket itself.
Submitting Comments/Edits to the Workflow
The comments/edits are not sent to workflow until you select a necessary workflow action in a row and click the Submit button. To select an action, you must select a value from the drop-down list, and then click Submit when it appears. To clear the action, you can select the Select action value (the Submit button will disappear).
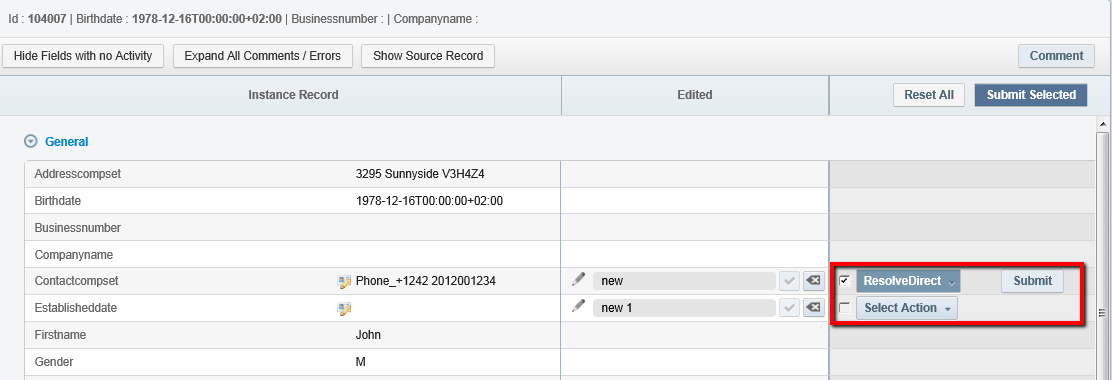
You can use the Submit buttons to make transitions one-by-one. When the action is selected, the check box next to the action is selected. It is used for bulk transitions. When workflow actions are selected for several edits, the Submit Selected button becomes available and can be used to submit several values at once. When actions are submitted, the appropriate notification is displayed in the upper right corner of the screen.

All selected transitions that have not been submitted yet can be reverted with the Reset All button. The Reset All action does not apply to changes made to the values.
Fields in the Edited column are displayed differently according to the workflow state they are in:
 |
When the field is being edited and not sent to the workflow yet. |
 |
When the edited field is sent to the workflow and is waiting for approval or rejection. It cannot be edited. |
 |
When the edited field is approved. It cannot be edited. |
 |
When the edited field is rejected and goes back to the creator of the edit, so it can be edited. |
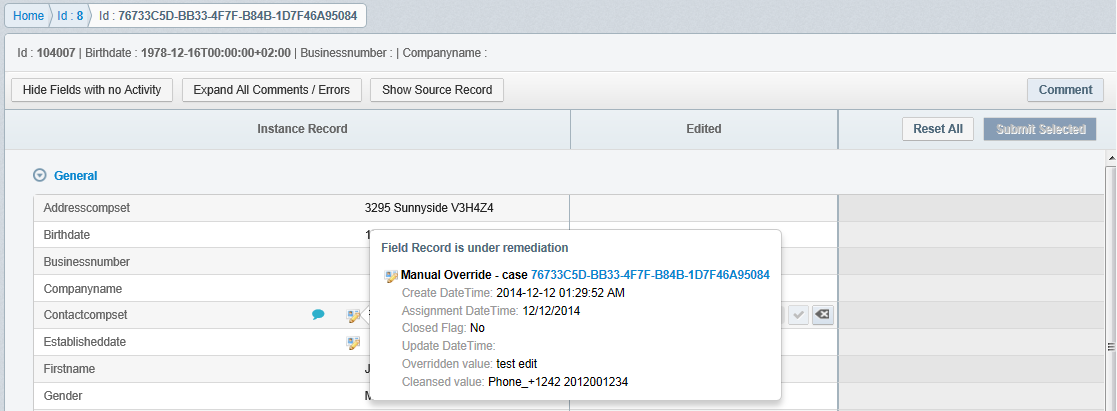
After comments and edits are saved, and the page is refreshed, the remediation icon appears for the appropriate field(s). A pop-up window with short information appears when you move the pointer over the icon, as shown in the following image.
Viewing Comments/Edits/Source Record
To view only attributes that need actions from a user, you may use the Hide Fields with no Activity switch. When this switch is activated, only those attributes are displayed that:
- Have manual edits.
- Have comments.
- Have issues (errors) from automated processes.
For convenience, you can expand all the comments, errors, and notifications for all attributes using the Expand all Comments/Errors button.
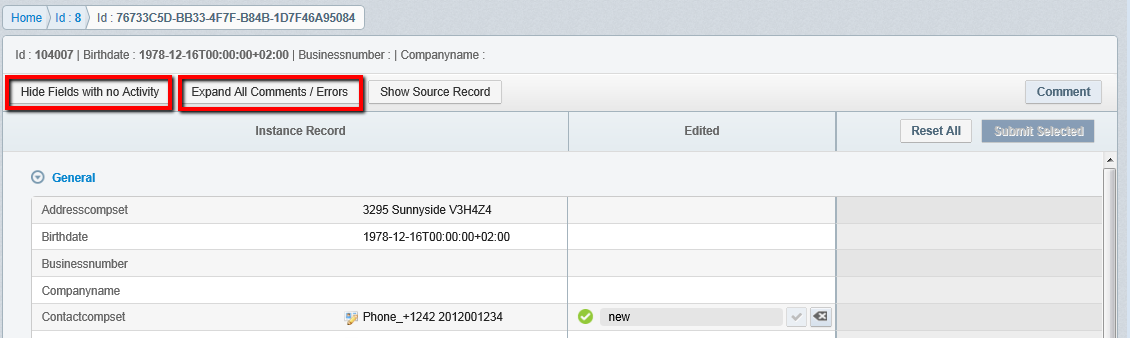
Once clicked, the buttons change their names, from Hide fields with no Activity to Show All fields, and from Expand all Comments/Errors to Collapse all Comments/Errors, so you can decide what information you wish to see.
You can use the Show Source Record button when you want to compare values of Instance and Source records. Once clicked, the values of the Source records appear to the right of the values from the Instance record, and the button changes its name to Hide Source Record. Values of the Source record that differ from values of the Instance record are highlighted in pink, and standardized values are highlighted in amber, as shown in the following image.
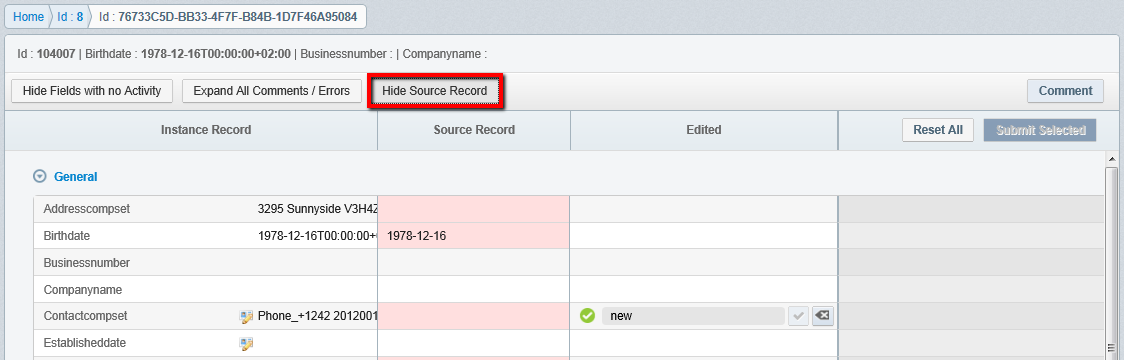
Note: Values of a Source record cannot be overridden. Only values of the Instance record are included in the workflow.
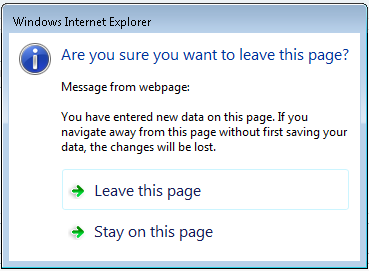
When you have some unsaved changes made on the page, and try to navigate outside of it, a warning dialog will appear, as shown in the following image.
The created Manual Cleansing case is displayed on the Home page accordingly, as shown in the following image.
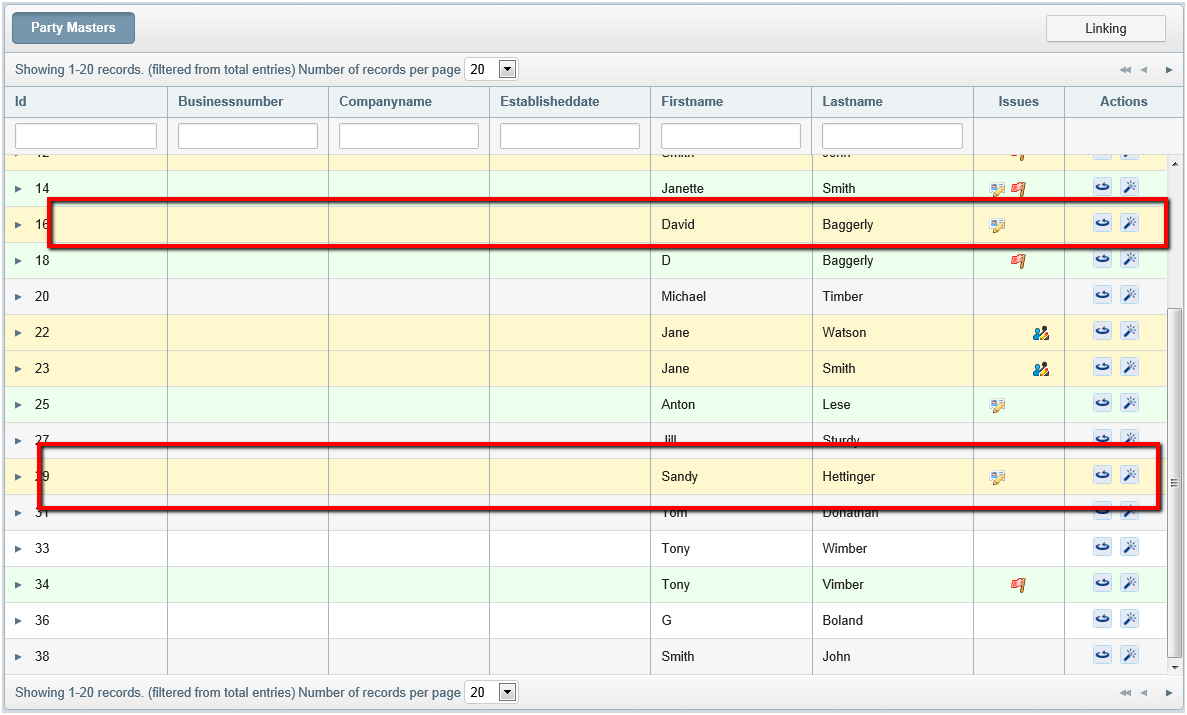
The row with an open case is highlighted in amber, color and the appropriate icon is displayed.
Reassigning a Case
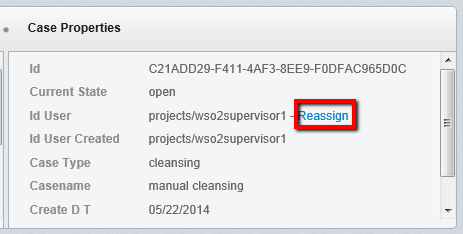
If you want to reassign the case to someone else, you can click the Reassign link in the Case Properties panel.
Note: The Reassign link is not available for closed cases.
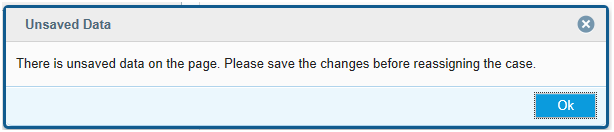
If there are any unsaved changes on the page and the Reassign link is clicked on, then the warning dialog appears, indicating that the case with unsaved changes could not be reassigned.

If there is no unsaved data and the link is clicked, the Reassign dialog appears. Functionality of it is similar to the Assign dialog on the Issues page.
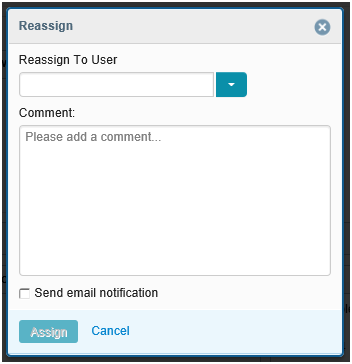
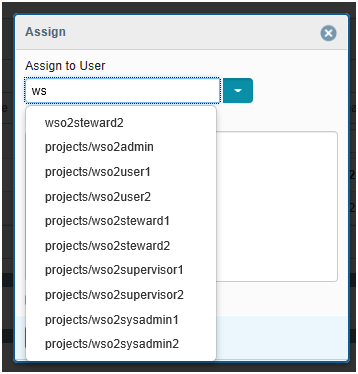
A list of users is available in the Assign to User drop-down list. When you start typing in the field, data is filtered dynamically to display only the relevant information.
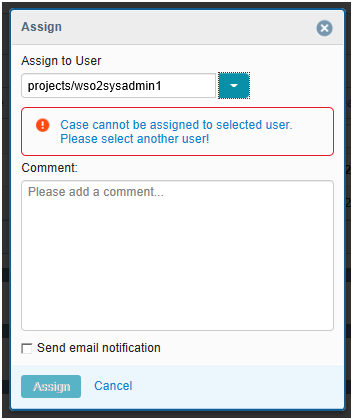
If a case cannot be assigned to the user selected from the list (for example, because the selected user has no permissions to resolve cases, and so on), or if the entered data finds no matches in the database, the appropriate validation message is displayed.
 |
 |
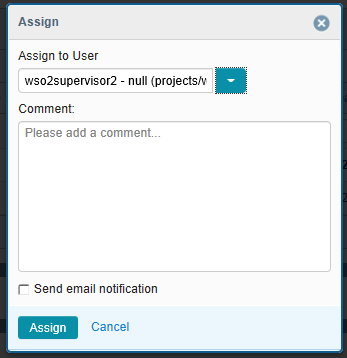
If the selected user is valid, the Assign button becomes available and case(s) can be reassigned.
After the Assign button is clicked, you are redirected to the Issues page because the case is no longer your own.
Note: If you want an assignee to be notified about the reassign activity, the Send email notification check box should be selected.
Workflow Schema
The Workflow actions available for each edit are dependent on the User Role and the current status of the edit. The following image shows the Workflow schema.
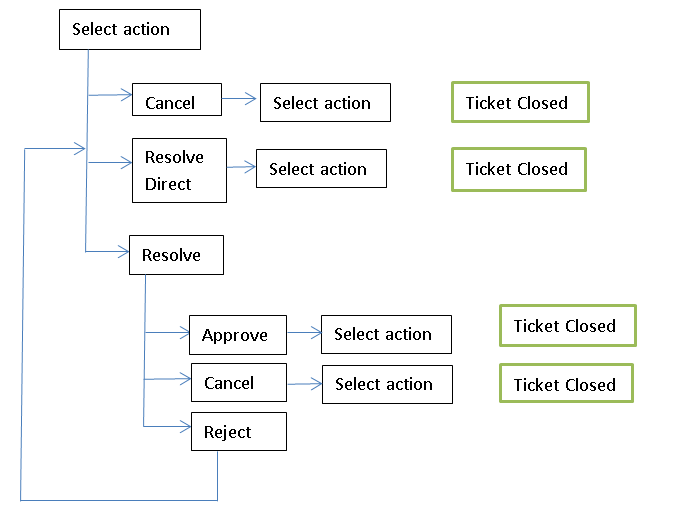
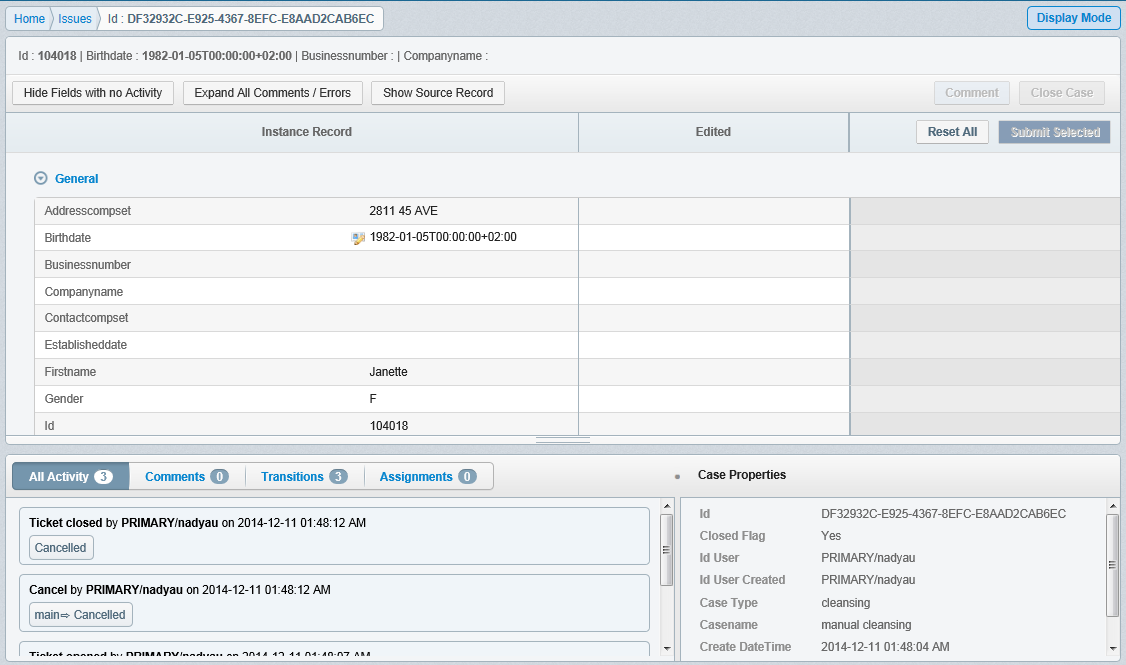
When ticket the is closed using the Resolve Direct or Resolve -> Approve workflow actions, the Edited value overrides the Original one in the appropriate Instance record.
If the ticket is closed using any other workflow action, then the override process will not start.
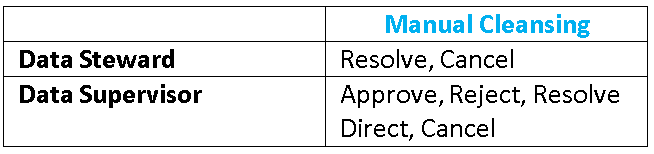
Workflow actions available per role are displayed below:
When the case is closed, records that were under the cleansing remediation process are highlighted on the Home page in green color. The new cleansing remediation process can be started for them.
You can close the whole case using the Close Case button. It appears only after all tickets are closed, as shown in the following image.
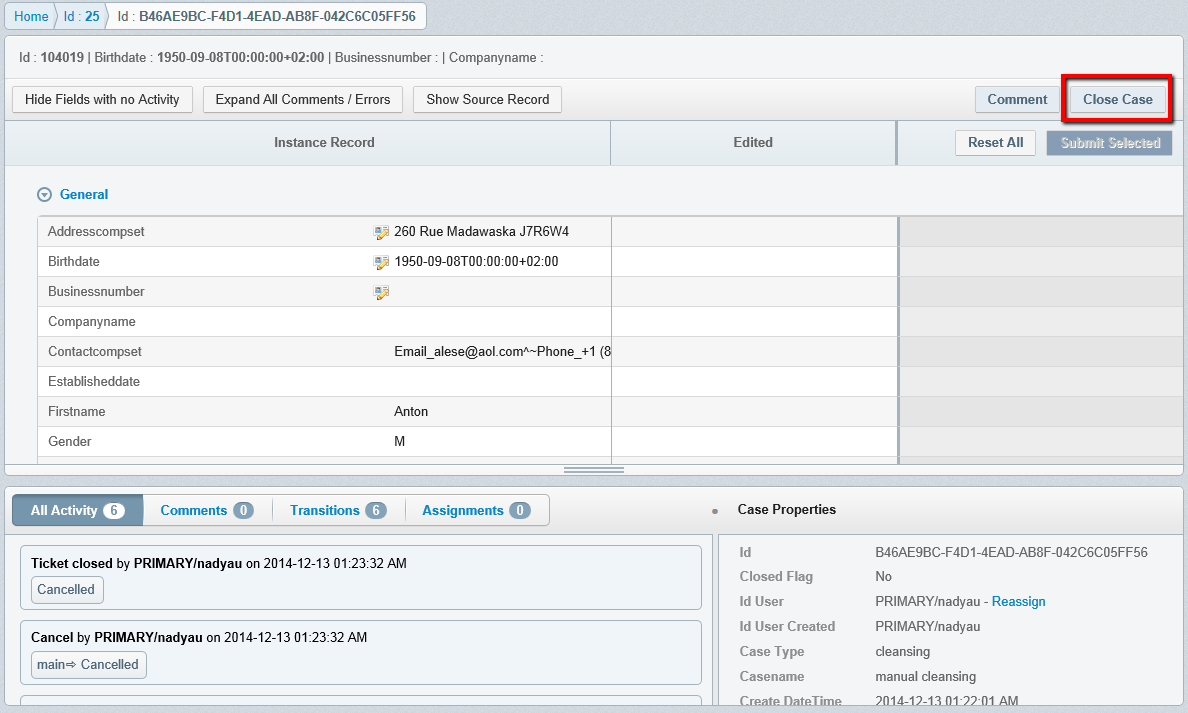
Note: A case can be closed only by an assignee of the whole case.
If there are any unsaved changes on the page, and the Close Case button is clicked, then the warning dialog appears, indicating that the case with unsaved changes could not be closed, as shown in the following image.
After the case is closed, it is displayed in Display mode and cannot be edited or reassigned.