Understanding and Creating Batch Statements
|
Topics: |
Batch statements enable you to execute multiple SQL and/or parameterized SQL statements within one transaction. This section provides an overview of batch statements and describes how to create them using iWay Explorer.
Creating a Batch Statement and an Iterative Process Using EDIT Batch
|
Topics: |
|
How to: |
Iterative processes are batch type processes that reference other processes, including stored procedures, statements, and table functions. In an iterative batch statement, each statement, procedure, or function can be called multiple times. This differs from a regular batch statement, in which a statement, procedure, or function can be called in a single batch. Instead, an iterative batch statement allows you to iterate the batch itself.
All iterative processes reside within the Batches node. All prepared statements created in the Statements node are automatically imported into the Iterate container. However, you can import processes from Tables or stored procedures as well.
When editing a batch statement and iterative process, full schemas are produced. These schemas include the statement name, location, parameters, and datatypes. This is useful if the batch schema is used in a transformation.
Procedure: How to Create a Batch Statement
To create a batch statement:
- If you are not connected to a defined target, connect to one, as described in How to Connect to a Defined Target.
- In the left pane, select the Batches node.
- In the right pane, move the pointer over Operations and
select Create A Batch.
The Create A Batch pane opens on the right.
- Type a name for the new Batch and click Create.
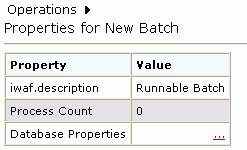
The batch properties information appears in the right pane containing Property and Value columns. The Value column contains a description of the batch, the process count, and an ellipsis symbol that enables you to access database properties as shown in the following image.
- Move the pointer over Operations and
select Edit Batch.
The Node Type drop-down selection appears in the right pane.
- From the drop-down list, select the statement, table, or procedure and click Next.
- Select Iterate if you want to make the procedure, statement or table iterative.
- To add more statements or procedures, select the batch node in the left pane, and then select the appropriate option from the Operations menu in the right pane.
Procedure: How to Create An Iterative Process
To import tables or processes into an iterative process:
- If you are not connected to a defined target, connect to one, as described in How to Connect to a Defined Target.
- Expand the Batches node.
- Select Iterate.
By default, the Iterate node contains all the statements created in the Statements node.
- In the right pane, move the mouse pointer over Operations and
select Import Process
The Import Process pane appears on the right.
- Select either Tables or Procedures to import and click Next.
- Select schema and click Next.
- Select the tables or procedures you want to import and click Next.
If you import tables, the GET, INSERT, UPDATE, DELETE, and UPSERT (but not CURSOR) functions are imported for each table you select. The following image shows the addition of the table functions for the STUDENT table added to the Iterate node:
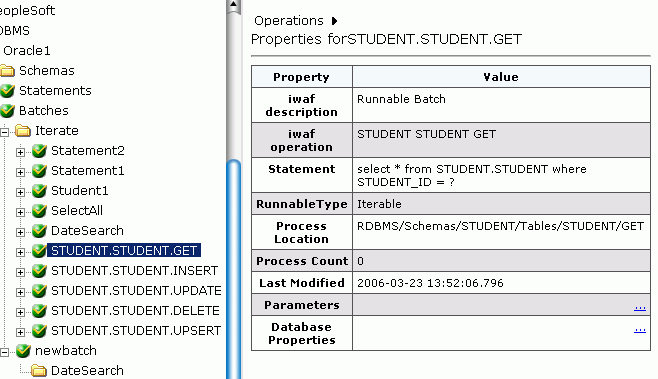
The stored procedures you import will appear the same way.
Example: Creating an Iterative Process
The following is an example of the input XML for a batch statement named batchtest. Two parameterized SQL statements were added to this statement, one named ParamSTMT1, with an INSERT accessing TableA, and another named ParamSTMT2, with an INSERT accessing TableB. When the SQL statements were added to the batch statement, the Iterate check box was selected.
In this input XML document, two different statements are being called, with two different sets of values for each statement.
Note: Added statements or procedures to a batch must be included in the input document.
<?xml version="1.0" encoding="UTF-8"?>
<RDBMS xmlns:xsi="http://www.w3.org/2001/XMLSchema-instance"
  xsi:noNamespaceSchemaLocation="C:\schemas\ora013_request.xsd">
    <BATCH location="RDBMS/Batches/batchtest">
     <ParamSTMT1 location="RDBMS/Batches/Iterate/ParamSTMT1">
       <PARAMS>
         <lname>Chunnulal</lname>
         <age>30</age>
       </PARAMS>
       <PARAMS>
         <lname>Doe</lname>
         <age>31</age>
       </PARAMS>
     </ParamSTMT1>
     <ParamSTMT2 location="RDBMS/Batches/Iterate/ParamSTMT2">
       <PARAMS>
         <fname>Neena</fname>
         <empid>4</empid>
       </PARAMS>
       <PARAMS>
         <fname>John</fname>
         <empid>5</empid>
       </PARAMS>
     </ParamSTMT2>
    </BATCH>
</RDBMS>
The following is an example of the input XML for a regular ITERATE process.
<RDBMS>
    <ITERATE location=”RDBMS/Batches/Iterate/ParamSQL1">
          <PARAMS>
               <param0>a</param0>
               <param1>b</param1>
          </PARAMS>
          <PARAMS>
               <param0>c</param0>
               <param1>d</param1>
          </PARAMS>
    </ITERATE>
<RDBMS>
Procedure: How to Add Processes to a Batch Process
You can add a new process to a batch statement after you create it. The adapter also allows you to add a process to a batch even if the batch already contains it, allowing you to make limitless calls to the same process.
- If you are not connected to a defined target, connect to one, as described in How to Connect to a Defined Target.
- Expand the Batches node.
- Select the batch statement you want to edit.
- In the right pane, move the mouse pointer over Operations and
select Edit Batch.
The Edit Batch pane appears on the right.
- Select Add Process.
- Select the type of process you want to add from the Node Type
drop-down box, and click Next.
- If you select Tables, select the schema and then the
particular table, and then the table function, clicking Next after
each selection. After selecting the table function, select Iterate to
iterate the table function, and then click Add.
The iterate setting determines whether the table function you choose will be iterative. If so, the adapter searches for the process node in the Iterate node. If not, the adapter will search for it within the Schemas node.
You can only add table functions if the table is listed under the Schemas node. If the table is not listed, you must first find it, and then edit the batch to add the function. This same rule applies for stored procedures.
- If you select Statements, select the statement you want
to add from the Prepared Statement drop-down box, select Iterate if
you want the prepared statement to be iterative, and click Add.
You have the option of viewing the details of the statement you are adding by clicking View Details.
The iterate setting determines whether the prepared statement you choose will be iterative. If so, the adapter searches for the process node in the Iterate node. If not, the adapter will search for it within the Statements node.
- If you select Procedures, select the schema from the Schema
drop-down list, and click Get Stored Procedures. Select
the stored procedure you want from the Stored Procedure drop-down
box, select Iterate if you want the Procedure
to be iterative, and click Add Stored Procedure.
You have the option of viewing the details of the procedure you are adding by clicking Show Details.
The iterate setting determines whether the Procedure you choose will be iterative. If so, the adapter searches for the process node in the Iterate node. If not, the adapter will search for it within the Procedures node
- If you select Tables, select the schema and then the
particular table, and then the table function, clicking Next after
each selection. After selecting the table function, select Iterate to
iterate the table function, and then click Add.
Procedure: How to Reorder Processes in a Batch Process
You can reorder the processes within a batch statement:
- If you are not connected to a defined target, connect to one, as described in How to Connect to a Defined Target.
- Expand the Batches node.
- Select the batch statement you want to edit.
- In the right pane, move the mouse pointer over Operations and
select Edit Batch.
The Edit Batch pane appears on the right.
- In the right pane, click Reorder Processes.
A table listing the processes appears in the right pane. Each row includes a position column.
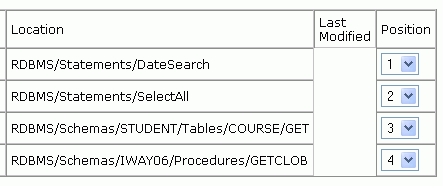
- Select the position for each row as appropriate and click Reorder to review the new order.
- Click Commit to save the changes.
Procedure: How to Test a Batch Process
To test a batch process:
- If you are not connected to a defined target, connect to one, as described in How to Connect to a Defined Target.
- Expand the Batches node.
- Select the batch statement you want to edit.
- In the right pane, move the mouse pointer over Operations and
select Test Run.
The Test Run pane appears on the right. You can edit parameter names and data types for the test.
- Click Test.
The results appear in the right pane.
LUW for Batch Iterate
There are times when a section of the iterated process fails. For example, if you have inserts into two separate tables, the second process in the second statement can fail. In this case, you may want to roll back the entire Batch. To do so, you will need to set the following Java Property in the iWay Service Manager Administration Console:
iwaf.rdbms.iterate.commit=false
For more information on setting Java Settings in the console, see the iWay Service Manager User’s Guide.
After this property is set, you must restart iWay Service Manager for the change to take effect. Once this is done, the iWay Technology Adapter for RDBMS looks for this property and the iterate will not commit if it is set to false. This occurs only if the iterate is called within a batch. If the iterate is called directly, this property is ignored. If you do not want the transaction to be rolled back, do not add this Java setting. By default, Edit Batch does not roll back.
Creating a Batch Statement Using the AnyBatch Process
|
How to: |
The AnyBatch process is used to execute a batch if you require flexibility with your batch process. Instead of editing the batch at design-time, you can modify the batch process at run-time, which provides additional flexibility. AnyBatch still enables you to execute multiple transactions in a given request; however, with AnyBatch these transactions can change according to your needs at runtime.
When using AnyBatch, a batch name is the only thing that is required during design-time. If the batch is going to use statements, you must ensure that all statements are created prior to creating the batch name. During run-time, each request is added for each transaction. As a result, if you want to iterate a single Statement, you must add that statement multiple times. This same rule applies for stored procedures and table functions.
Using AnyBatch, an AnyBatch schema is generated, which is a scaled-down schema. However, the transactions that are added to the batch during run-time must adhere to a valid request schema. In addition, with AnyBatch, LUW is built into the process, which means that the entire batch is considered as a single transaction. If an error occurs, the entire transaction will be rolled back.
Procedure: How to Create an AnyBatch Process
To create an AnyBatch process:
- If you are not connected to a defined target, connect to one, as described in How to Connect to a Defined Target.
- Expand the Batches node.
- In the right pane, move the pointer over Operations and click Create A Batch.
- Provide a name for the batch.
Note: You must ensure that all statements, procedures, and table functions that will be used in the batch at runtime are available before the batch is created.
Example: Creating an AnyBatch Process
You can generate an AnyBatch request from its corresponding request schema by using an XML editor, such as XMLSpy. The request will have the following format:
<RDBMS xmlns="RDBMS/Batches/Any:55012SP2:Request">
     <BATCH  location="RDBMS/Batches/Any:55012SP2">
          <probably_invalid_for_strict_wildcard/>
     </BATCH>
</RDBMS>
Note: In this example, Any is the name of the batch.
After you modify your batch request for run-time execution, it has a structure as shown in the following example.
<?xml version="1.0" encoding="UTF-8"?>
<!--Sample XML file generated by XMLSpy v2008 rel. 2
(http://www.altova.com)-->
<RDBMS xmlns="RDBMS/Batches/Any:55012SP2:Request">
       <BATCH  location="RDBMS/Batches/TestAny:55012SP2">
           <AdapterParams location="RDBMS/Statements/x_insert_char">
               <param0>f</param0>
           </AdapterParams>
           <AdapterParams location="RDBMS/Statements/x_insert_char">
               <param0>g</param0>
           </AdapterParams>
           <AdapterParams location="RDBMS/Schemas/SCOTT/Procedures/Packages/MY_PKG/raisePrice">
           <prod>Soup</prod>
           <times>2</times>
           </AdapterParams>
           <AdapterParams location="RDBMS/Schemas/SCOTT/Tables/CHARS/INSERT">
           <FLDA>a</FLDA>
           </AdapterParams>
       </BATCH>
</RDBMS>
In this example, the x_insert_char statement is being iterated since it is called twice in the batch. The raisePrice stored procedure and INSERT table function for the CHARS table is also being called. If you need to iterate the stored procedure or the table Function, simply add everything from AdapterParams for that process again within the BATCH element. Any modifications to the batch must be made within the BATCH element and must conform to a valid schema. The above insertions are all generated from their respective request schemas. The location attribute must also be present.