Creating a Channel
|
Topics: |
|
How to: |
A channel binds a port to a listener managed by an iWay adapter. A defined port must be associated with a channel in order for you to listen for events that take place in an application system.
The procedures in this topic describe how to create, edit, or delete a channel using the Events node in iWay Explorer.
Procedure: How to Create a Channel
- Connect to the Events node in iWay Explorer and expand the
node for the application system (for example, ConnectDirect).
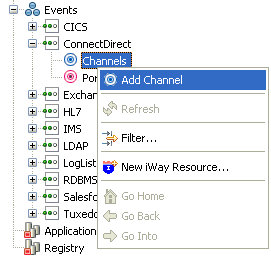
- Right-click
the Channels node, and click Add
Channel from the menu.
The following image shows the Add Channel dialog box that opens, where you supply information about the channel.

- In the Name field, type a name for the channel, for example, ConnectDirect_Channel.
- In the Description field, optionally type a brief description.
- From the Protocol drop-down list, select ConnectDirect Listener.
- Under Port Name, select the check box for each port that this channel will bind to a listener.
- Click Next to
open the Define Channel Properties dialog box. The Connect:Direct
Connection tab is displayed by default, as shown in the following
image.
The Define Channel Properties dialog box opens, as shown in the following image.
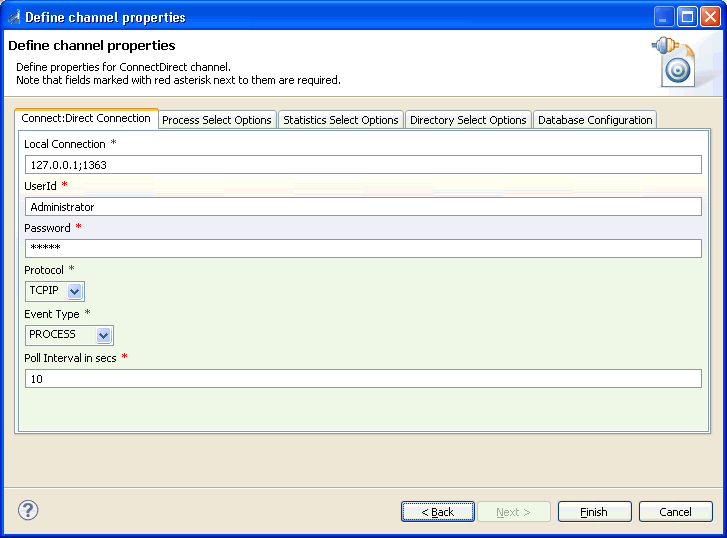
The following tabs are available:
- Connect:Direct Connection tab (displayed by default)
- Process Select Options tab
For more information, see Configuring the Process Select Options Tab.
- Statistics Select Options tab
For more information, see Configuring the Statistics Select Options Tab.
- Directory Select Options tab
For more information, see Configuring the Directory Select Options Tab.
- Database Configuration tab
For more information, see Configuring the Database Configuration Tab.
- Supply the
values for the parameters on the Connect:Direct Connection tab as
listed and described in the following table.
Parameter
Description
Local Connection
The name of the machine or IP address (and port) where the Connect:Direct server is being hosted.
UserId
The user name used to connect to the Connect:Direct server.
Password
The password that is associated with the user name.
Protocol
The type of protocol to use for the connection between the adapter and the server. The default protocol is TCP/IP.
Event Type
Select one of the following event types (command) that is expected to be handled by the channel:
- PROCESS
- STATISTICS
- LSDIR
Poll Interval in secs
Enter the desired poll interval (in seconds). This poll interval is the frequency at which the adapter will invoke the selected commands to the Connect:Direct server.
- Click Finish when you are done.
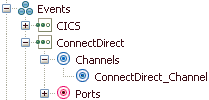
The following image shows the channel that you added, which appears beneath the Channels node in the Events area of iWay Explorer. In this example, the channel is named ConnectDirect_Channel.
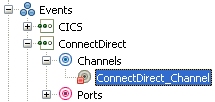
You are ready to start the channel to listen for events.
- Right-click
the channel, for example, ConnectDirect_Channel,
and click Start from the menu.
The channel is now active and will poll the Connect:Direct system with the configured commands to generate events.
- To stop the channel at any time, right-click the channel, and click Stop from the menu.
Procedure: How to Edit a Channel
After you create a channel, you can edit the information that you provided during the creation procedure.
- In the Events node of iWay Explorer, locate the name of the channel that you want to edit, for example, ConnectDirect_Channel.
- Right-click
the channel, and click Edit from the menu.
The Edit Channel dialog box opens. It displays the values that you supplied when you created the channel.
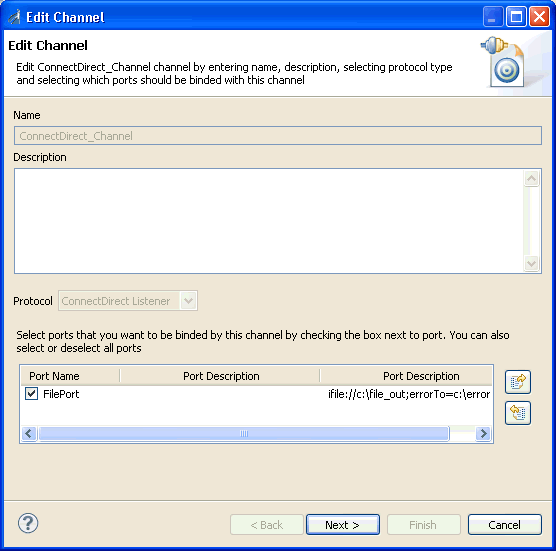
- Use the fields on the dialog box to modify the properties as desired. You cannot change the name of the channel or its protocol.
- Click Next on the Edit Channel dialog box to open the Define Channel Properties dialog box.
- Use the tabs and fields on this dialog box to modify the properties as desired.
- Click Finish on
the Define Channel Properties dialog box when you have made your
edits.
The modified properties are applied to the channel.
Procedure: How to Delete a Channel
- Expand the Channels node in the Events area of iWay Explorer to locate the name of the channel that you want to delete, for example, ConnectDirect_Channel.
- Right-click
the channel, and click Delete from the menu.
iWay Explorer displays a prompt, asking you to confirm the deletion of the selected channel, as shown in the following image.
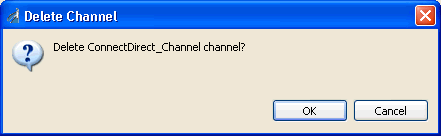
- Click OK to proceed with the deletion.
Configuring the Process Select Options Tab
This section describes how to configure the Process Select Options tab during the channel configuration process, which is shown in the following image.
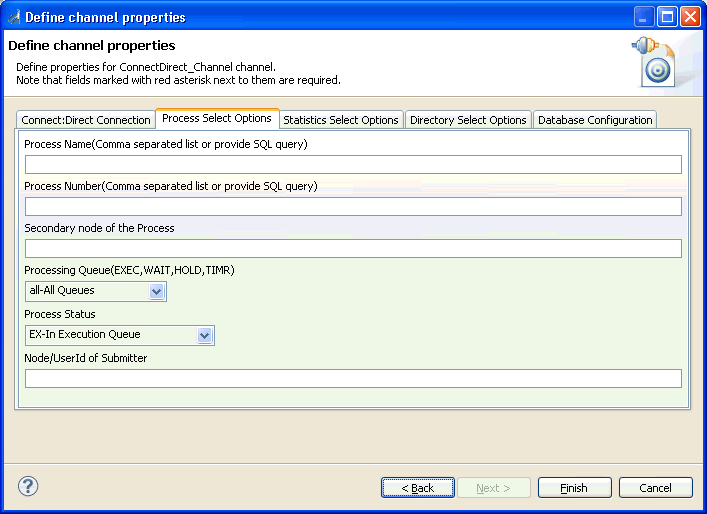
The parameters available in this tab are similar to the parameters for the Select Process API command. This configuration enables the adapter to poll the Connect:Direct system for the status of submitted processes based on the specified criteria listed and described in the following table:
|
Parameter |
Description |
|---|---|
|
Process Name |
The name of the process. A single name, comma separated list of names, or an SQL query can be defined. |
|
Process Number |
The number of the process. A single number, comma separated list of numbers, or an SQL query can be defined. |
|
Secondary node of the Process |
This is the secondary node of the process. |
|
Processing Queue |
The type of processing queue where status is checked. Select one of the following queue types from the drop-down list:
|
|
Process Status |
The status of the process. Select one of the following status types from the drop down list:
|
|
Node/UserID of Submitter |
The node or user ID of the submitter. |
The Process Name and Process Number parameters can be retrieved from a database table by using an SQL query. For example:
Select process_name from mytableSelect process_num from mytable
These queries are resolved by the adapter during every poll cycle.
Configuring the Statistics Select Options Tab
This section describes how to configure the Statistics Select Options tab during the channel configuration process, which is shown in the following image.
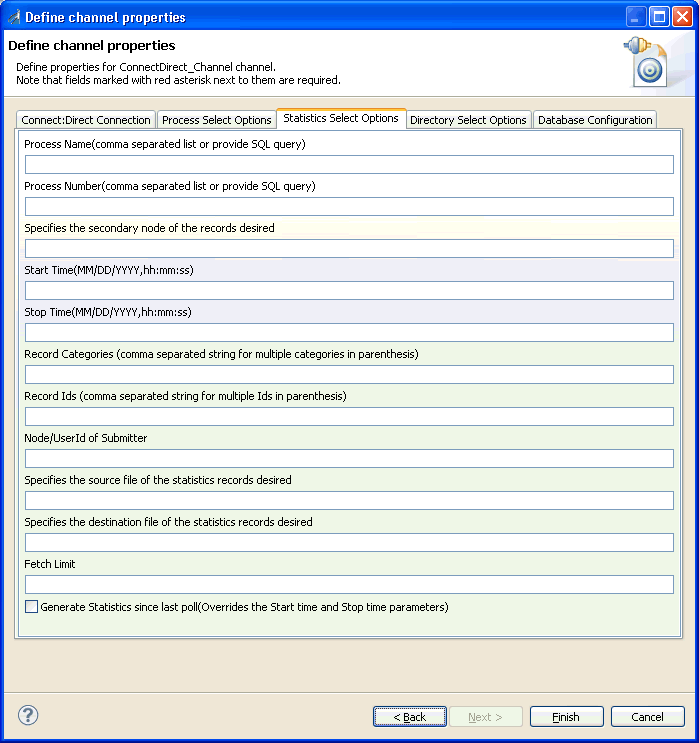
The Statistics Select Options tab enables the adapter to poll the Connect:Direct system for server activity based on the supported criteria listed and described in the following table:
|
Parameter |
Description |
|---|---|
|
Process Name |
The name of the process. A single name, comma separated list of names, or an SQL query can be defined. |
|
Process Number |
The number of the process. A single number, comma separated list of numbers, or an SQL query can be defined. |
|
Specifies the secondary node of the records desired |
This is the secondary node of the records. |
|
Start Time |
Start time of the activity specified using the following format: MM/DD/YYYY,hh:mm:ss |
|
Stop Time |
Stop time of the activity specified using the following format: MM/DD/YYYY,hh:mm:ss |
|
Record Categories |
The record categories, which can be specified as a comma-separated string for multiple categories in parenthesis. |
|
Record IDs |
The record IDs, which can be specified as a comma-separated string for multiple IDs in parenthesis. |
|
Node/UserID of Submitter |
The node or user ID of the submitter. |
|
Specifies the source file of the statistics records desired |
The source file name for the desired statistics records. |
|
Specifies the destination file of the statistics records desired |
The destination file name for the desired statistics records. |
|
Fetch Limit |
The maximum number of records to be retrieved. |
The Generate Statistics since last poll check box enables the adapter to only retrieve statistics in the time frame since the last poll cycle. If set, this option overrides the Start Time and Stop Time parameters.
Configuring the Directory Select Options Tab
This section describes how to configure the Directory Select Options tab during the channel configuration process, which is shown in the following image.
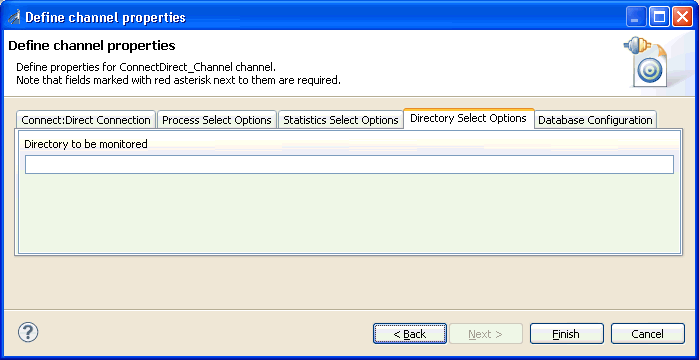
The Directory Select Options tab internally uses the LSDIR command to monitor remote directories for the existence of files.
The Directory to be monitored parameter is used to point to the target directory.
Configuring the Database Configuration Tab
This section describes how to configure the Database Configuration tab during the channel configuration process, which is shown in the following image.
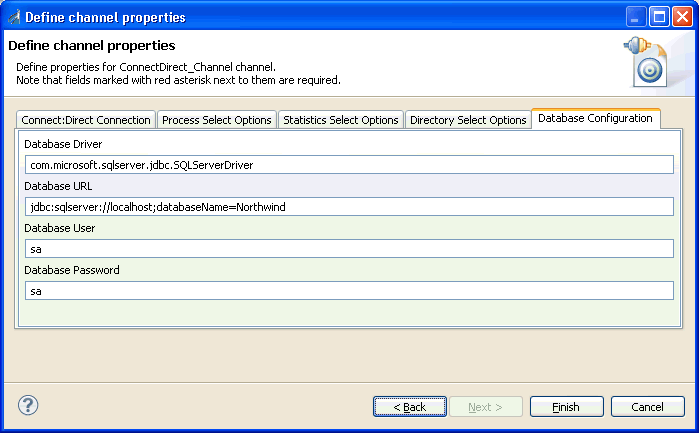
The database configuration is defined during the adapter activation. Ensure that the database drivers must be included in the iway7 classpath.
The following table lists and describes the parameters in the Database Configuration tab.
|
Parameter |
Description |
|---|---|
|
Database Driver |
The driver of the database. For example: com.microsoft.sqlserver.jdbc.SQLServerDriver |
|
Database URL |
The URL of the database. jdbc:sqlserver://localhost;databaseNameDBName |
|
Database User |
A valid user name to access the database. |
|
Database Password |
A valid password to access the database. |