Working With Functions
|
Topics: |
The iIT Transformer interface offers an integrated set of useful functions, which are used to perform a variety of operations, such as calculation and manipulation of input data, or retrieving data from a database. You may use functions to modify the output node value to match your requirements. You can build complex expressions for output values using the combinations of functions via the Mapping Builder.
In addition, iIT Transformer enables you to implement your own algorithms for producing output values by adding custom functions according to the specific format. For more information, see Custom Functions.
Using the Mapping Builder
|
Topics: |
|
How to: |
The Mapping Builder is a tool available in iIT Transformer as part of the Mapping Builder facility. It allows you to construct an output node using various methods and formulas implemented in iIT Transformer as functions. You can access the predefined functions and the custom functions that you defined, or build the statement containing several functions if needed.
In iIT Transformer, the predefined functions are subdivided into the following categories:
- All Functions
- Custom Functions
- EDI Functions
- Miscellaneous Functions
- Numeric Functions
- Processing Functions
- Runtime Functions
- SWIFT Functions
- Security Functions
- String Functions
- Time Functions
Setting Function Parameters
After selecting a specific function, typically you will need to define the set of parameters associated with it. The number and the names of the parameters for the particular function can be determined in either of the following ways:
- The function
expression in the list of functions.
@SUBTRACT (number1, number2)
- The function description area located below the list of functions.
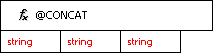
- The right pane of the Mapping Builder. For example, the @CONCAT function shown in the following image accepts three parameters of type string.
For more details on the parameters to specify for each particular function, see Predefined Functions for a complete reference. If dealing with custom functions, you may consult the author of the function.
Generally, the functions can take four types of values as their parameters:
- Input nodes
- Nested functions
- Constant values
- Expressions
A function of a parameter can take the value of a specified input node. For information on how to set an input node, see How to Set an Input Node.
You can nest functions within functions, which means the output result of a certain function can serve as the input parameter for another function. For more details, see How to Nest Functions.
You can also set a specific invariable value as a constant function parameter. For information on how to set a constant value, see How to Set a Constant Value for a Function.
Another option for a function parameter type is an expression which is a basic combination of operators, input nodes, and/or constants. For information on how to set an expression, see How to Set an Expression for a Function.
Predefined Functions
The Mapping Builder enables you to set the output node values using a combination of functions and/or input nodes. Both custom and predefined functions can be utilized. When specifying a function through the Mapping Builder, you must know what the specific function does and how to specify the parameters for it. For more information, see Predefined Functions.
Procedure: How to Open the Mapping Builder
The following image shows the Mapping Builder interface in iIT Transformer.
To open the Mapping Builder:
- In the Mapping Values pane of the Mappings tab, select an output node.
- Click the ellipsis
 button.
The Mapping Builder displays as shown in the following image.
The left pane of the Mapping Builder dialog box provides you with the option of switching between the following areas:
- Functions (selected by default)
- Input
- Variables
- JDBC Data Source
- @REPLACE Input
- @REPLACE JDBC
Click the name of the corresponding pane to expand its content. Click New to add new values to the Variables and JDBC Data Source panes.
This feature allows you to drag and drop any available configuration that was specified using the Project Properties dialog box into the workspace area of the Mapping Builder. You can switch between the available panes by clicking on the corresponding button, for example, Variables, JDBC Data Source, and so on.
Procedure: How to Select a Function
To select a function:
- From the Category drop-down list in the Functions pane of the
Mapping Builder, select the function category you want to use, for
example, String.
For a list of function categories, see Using the Mapping Builder.
The following image shows String Functions selected in the Category drop-down list, which is located in the Functions pane.
Optionally, you can skip to step 2 and select your function from the whole list of available functions.
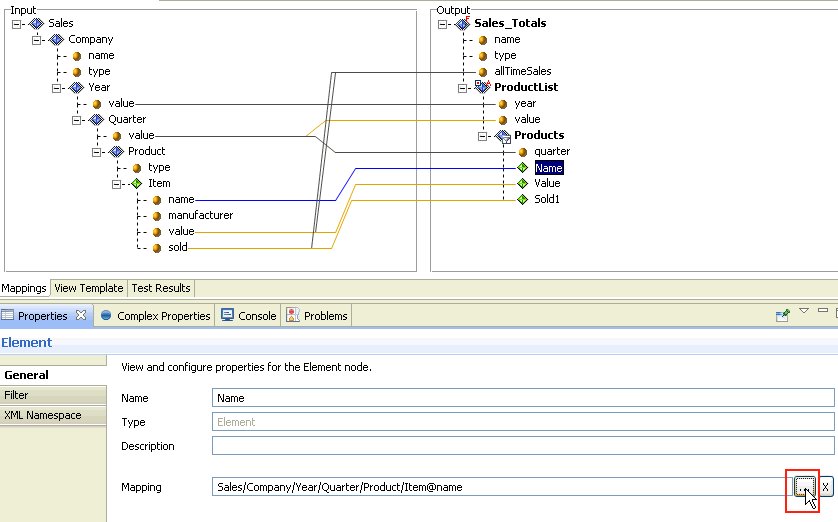
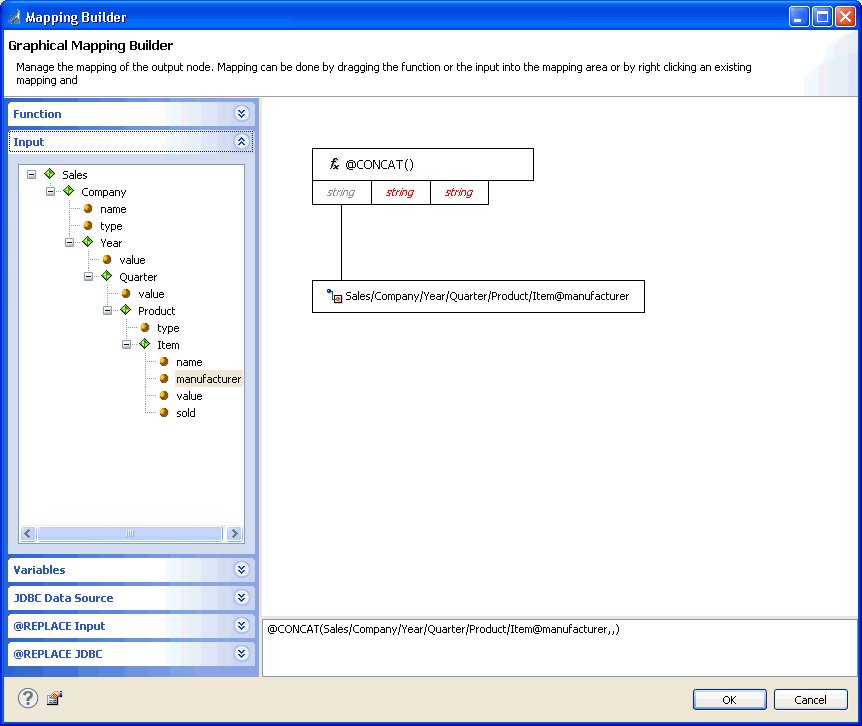
- Select the specific function you want to use, for example,
@CONCAT(string, string, string), and drag it into the workspace
area of the Mapping Builder as shown below:
Note: You can drag and drop functions above or below the existing mapping tree in the workspace area as needed to create a combination of output values.
The function you choose becomes your working function.
- To replace the working function, drag a new function on the workspace and drop it directly onto the working function.
Procedure: How to Set an Input Node
To set an input node as the value for a function parameter:
- Select an input node from the Input document tree area of the
Mapping Builder.
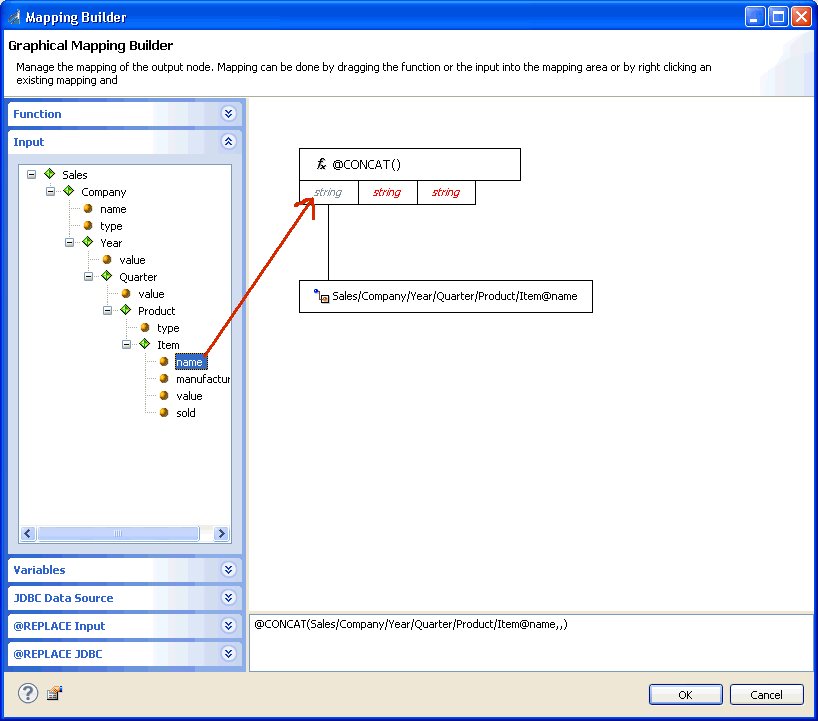
- Drag the input node onto the appropriate parameter in the workspace
area of the Mapping Builder.
An alternate way to perform this task is to use Set Selected Input option from the context menu, which appears when you right-click the parameter in the workspace area.
Note: Another method for editing the mapping formula of your node is to type it directly in the preview area located on the lower-right corner of the Mapping Builder window and press Enter. The tree structure will be refreshed. However, this option is recommended for advanced users only. Using the drag and drop interface instead is strongly encouraged.
Procedure: How to Nest Functions
To specify another function as a parameter for your working function:
- Select the function you want from the Functions pane of the
Mapping Builder.
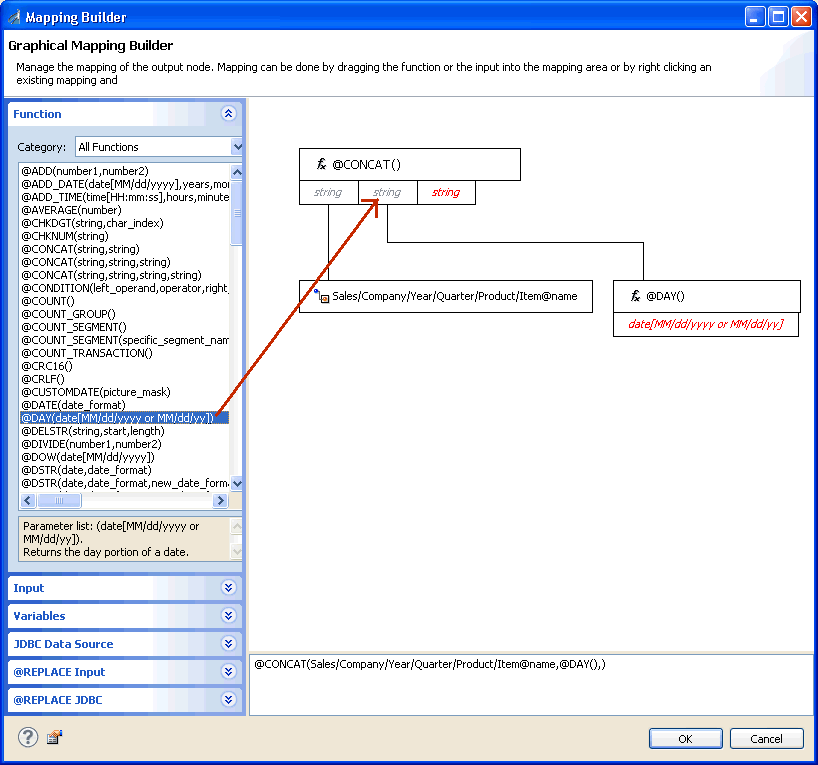
- Drag the function and drop it on the appropriate parameter
of the working function on the workspace area of the Mapping Builder.
An alternative way to perform this task is to use Set Selected Function option from the context menu, which appears when you right-click the parameter in the workspace area.
You must set the parameters for the nested function as well.
Note: You can nest functions multiple times.
Procedure: How to Set a Constant Value for a Function
To set a constant value:
- Right-click the appropriate parameter box in the workspace
area of the Mapping Builder and select Set Constant from
the context menu.
You can also double-click the parameter box to set a constant.
The following image shows the Constant option selected and a field where you can enter a value.
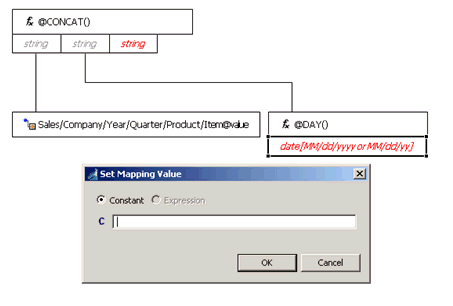
- Type the value for your constant and click OK.
Procedure: How to Set an Expression for a Function
To set an expression:
- Right-click the appropriate parameter box in the workspace
area of the Mapping Builder and select Set Expression from
the context menu.
You can also double-click the parameter box and select the Expression radio button to set an expression.
- Type the value for your expression and press Enter.
An expression concatenation is typically used for any number of input items and constant values in any order, in the following format:
<input item>+'constant'+...
For example:
'For '+tree/fruit+tree/fruit/year+': '+tree/fruit/apple/yield+
' bushels, '+tree/fruit/apple/avgweight+' grams avg.'
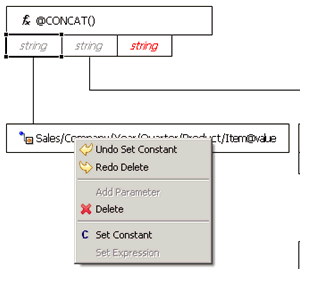
Procedure: How to Remove a Function Parameter
To remove a value for a function parameter:
- Right-click the parameter in the workspace
area of the Mapping Builder.
A context menu opens as shown in the following image.
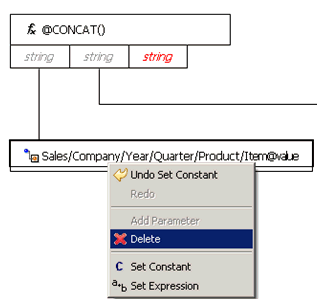
- Select Delete.
The parameter is removed from the function.
Procedure: How to Cancel and Restore an Action
To cancel and restore an action within the Mapping Builder:
- To cancel your last action, right-click any component in the
workspace, for example, the working function.
A context menu opens as shown in the following image.
- Select Undo or use the keyboard shortcut Ctrl+Z.
The last action is removed from the workspace.
- If you decide to restore an action, right-click any component
in the workspace, for example, the output item.
A context menu opens as shown in the following image.
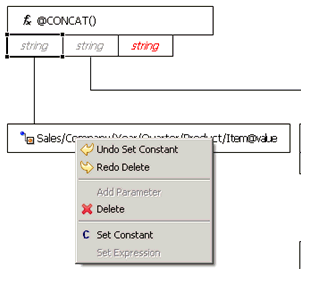
- Select Redo or use the keyboard shortcut Ctrl+Y.
The last removed action is returned to the workspace.
Note: Multiple levels of undo and redo are supported. You can select Undo/Redo or use the corresponding keyboard shortcut (Ctrl+Z/Ctrl+Y) multiple times until you have achieved the desired result.
Customizing @CONCAT Functions
|
How to: |
You can customize the signature of your @CONCAT function for a specific output node by adding or removing parameters as required using the Mapping Builder. This functionality adds flexibility to the design of mapping values, which involve complex string concatenations; it also eliminates the need to use expressions for the concatenation of strings in iIT Transformer.
Procedure: How to Add Parameters for @CONCAT Functions
To add parameters for @CONCAT functions:
- In the Mapping Builder, right-click the @CONCAT function in
the workspace area.

- Select Add Parameter from the context
menu.
The parameter is added to the parameter list, and the number of parameters for this function definition will increase by one.
Procedure: How to Remove Parameters for @CONCAT Functions
To remove parameters for @CONCAT functions:
- In the Mapping Builder, right-click a parameter to delete from
the @CONCAT function in the workspace area.
- Select Delete from the context menu.
The parameter is removed from the parameter list, and the number of parameters for this particular function definition will decrease by one.
Configuring Properties for JDBC
|
Topics: |
A JDBC replace function is a replace function in which the match and replace values are taken from columns of the specified database table or from the results of an SQL statement run on the specified database. For example, you can configure iIT Transformer to use a database customer information table, reading the value from the "Full Name" column and replacing it with the value from the "Nickname" column. Unlike the regular replace functions where the match and replace pairing is static, the JDBC replace functions read the data from the specified columns of the next database row each time the transformation processing loops past the JDBC replace function while producing your output document.
Replace functions are similar to custom functions in that you must first define the function and then, apply it to the output node mapping value definition that you want to affect. In the case of replace functions, this can be accomplished using the @REPLACE and @SIMPLE_REPLACE functions.
For more advanced database functionality, such as matching across multiple input nodes or running complex SQL queries, see Using the @JDBCLOOKUP Function.
The process of defining a particular replace function accounts for setting up the value to match, but not the mapping of it. You must map the replace functions to the specific node using the Mapping Builder. For more information, see Using the Mapping Builder.
JDBC Replace Functions as Input Data Sources
|
How to: |
Since a JDBC replace function can be defined and used no matter what the data format of your input is, by using JDBC replace functions you can access multiple input data sources. For example, if the input data format of your transform is XML, your incoming document is likely an XML file. By defining and using JDBC replace functions, you can read additional input data from the database. In fact, if you define multiple JDBC replace functions, you can use as many database sources as you like.
Procedure: How to Define a JDBC Lookup
To define a JDBC lookup:
- Select the Transform component and then, Properties from
the Integration Project context menu.
The Properties dialog box opens.
- Expand Transform Properties in the left
pane and then select the @REPLACE Function category.
The following image shows the Project Properties dialog box with the @REPLACE Functions category selected in the left pane.
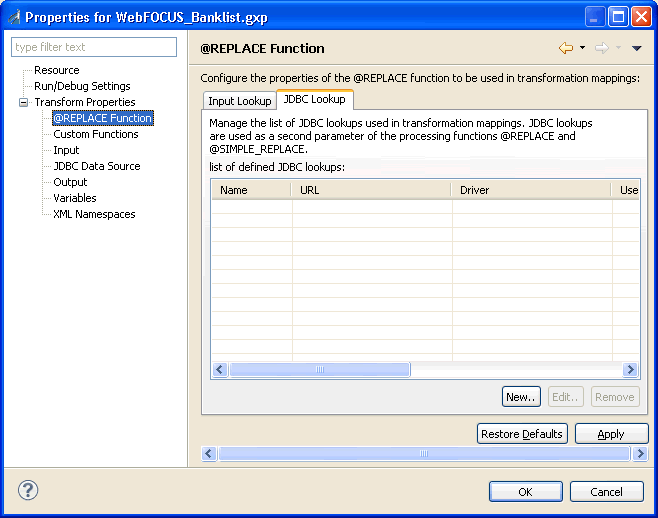
- Click the JDBC Lookup tab.
- Click New.
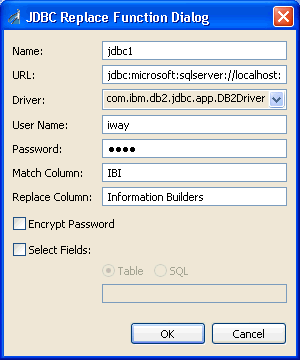
The JDBC Replace Function Dialog opens.
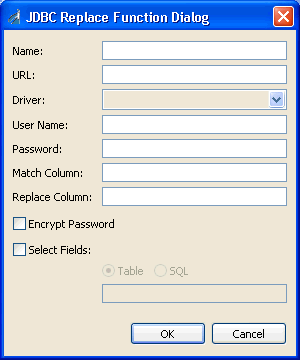
To access the particular database, you must provide the necessary information that is required for your JDBC lookup.
- In the Name field, specify a name for the JDBC lookup.
- In the URL field, specify the database URL.
Note: To define a predefined function (for example, @SREG) as the URL, click the Browse button to the right of the URL field, which opens the Mapping Builder.
- From the Driver drop-down list, select an available JDBC driver.
Note: iIT Transformer does not ship with any of the predefined drivers. The driver must be registered with iIT Transformer.
- Specify a valid user name and password for accessing the database.
- In the Match Column field, type the name of the source match column.
- In the Replace Column field, specify either a database table name or an SQL statement to run on the database.
- From the Select Fields drop-down list, select one of the following
methods to acquire the match and replace values:
If you select From Table, specify a database table name in the Table Name field.
If you select From SQL Query, specify an SQL statement to run on the database in the SQL Query field.
If you specify an SQL statement, the match and replace values are taken from the result of the SQL statement.
Procedure: How to Modify a JDBC Lookup
To change or update any information in your JDBC lookup:
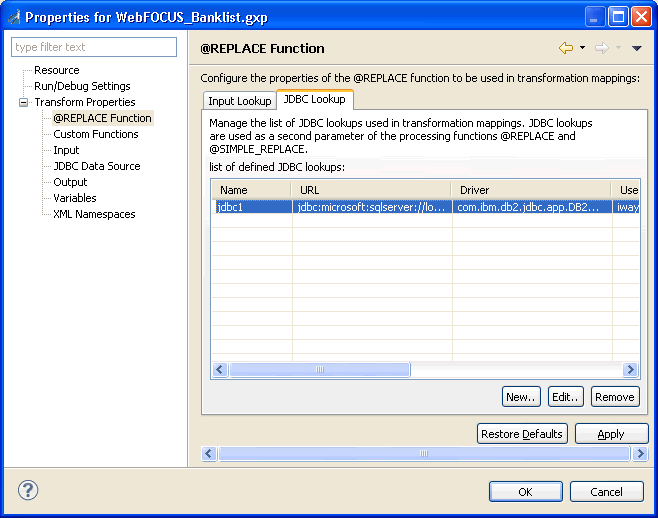
- Select the JDBC lookup, for example, jdbc1, and click Edit.
The JDBC Replace Function Dialog opens.
- Click OK once you have completed the necessary modifications.
Procedure: How to Delete a JDBC Lookup
To delete a JDBC lookup, select the JDBC lookup, for example, JDBC1, and click Remove.
The JDBC lookup is removed from the list.
Using the @JDBCLOOKUP Function
|
How to: |
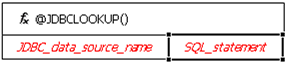
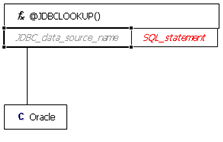
The @JDBCLOOKUP function returns a matched value from a database using an SQL statement. It takes the JDBC data source name and SQL statement in string form as parameters. The SQL statement can be set dynamically based on the input from other functions within iIT Transformer. If more than one value is matching the query, then the last matching value is returned.
When no result is found in the database, an empty string is returned. When more than one result is found, the last matching result is returned. Regardless of the number of columns in the result set, the value of the first column is always returned. During the transformation with multiple occurrences of @JDBC lookup, if the SQL statements are the same, then the returned result will be the same.
Parameters:
JDBC_data_source_name: String that represents a globally defined JDBC connection configuration.
SQL_statement: SQL statement that can be created using SQL Builder.
Example:
@JDBCLOOKUP('LOOKUP_TEST', {'SELECT field1 FROM LOOKUP_TABLE WHERE field2 ' = '+@QUOTE(Customer/Person/Name)})})where:
- LOOKUP_TEST
-
Is the name of a JDBC connection configuration.
- {'SELECT field1 FROM LOOKUP_TABLE WHERE field2 ' = '+@QUOTE(Customer/Person/Name)}
-
Is an SQL statement.
Procedure: How to Create an SQL Statement Using SQL Builder
To create an SQL statement, which can be used for the @JDBCLOOKUP function, you must follow the instructions below:
- From the menu bar, click Project and
select Properties.
The Properties dialog box opens.
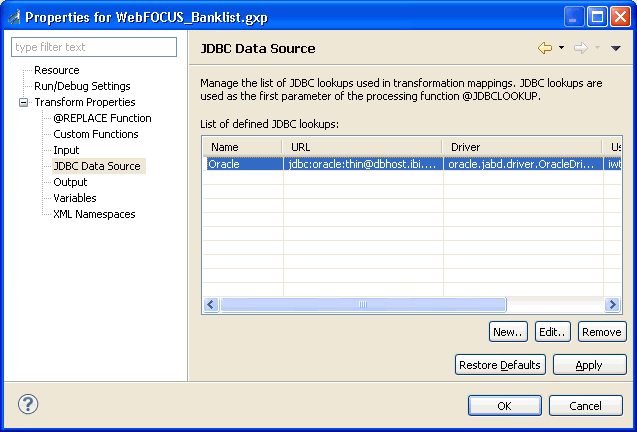
- Click the JDBC Data Source category
in the left pane.
The following image shows the Properties dialog box with the JDBC Data Source category selected in the left pane.
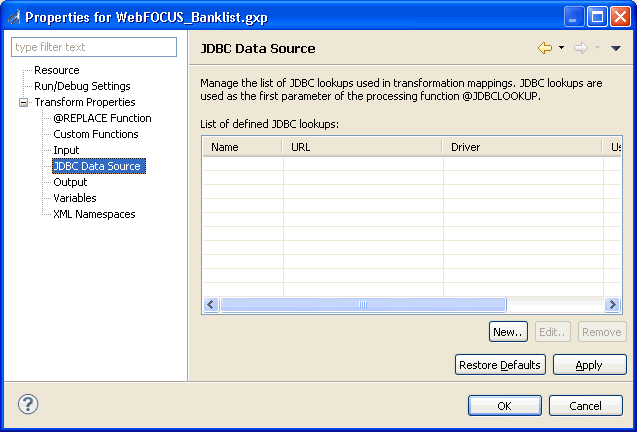
- Click New.
The JDBC Data Source Dialog opens.
Perform the following steps:
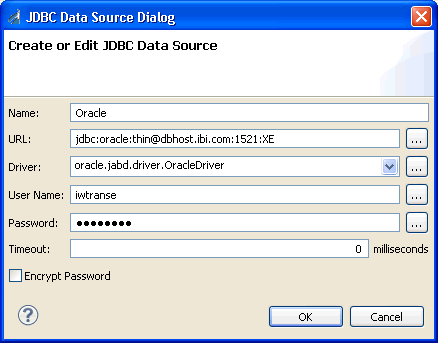
- In the Name field, provide a name for the JDBC connection.
This name is used as a string value for the JDBC_data_source_name parameter in the @JDBCLOOKUP function.
- In the URL field, type the URL to the database.
Note: To define a predefined function (for example, @SREG) as the URL, click the Browse button to the right of the URL field, which opens the Mapping Builder.
- From the Driver drop-down list, select an available JDBC driver
that is registered with iIT Transformer.
Note: iIT Transformer does not ship with any of the predefined drivers.
- Type a valid user name and password to connect to the database.
- Specify a timeout value in milliseconds.
Note: If the timeout value is omitted, or the value is 0 (default), then timeout is not enabled.
- In the Name field, provide a name for the JDBC connection.
- Click OK.
The JDBC lookup is added to the list of defined JDBC lookups.
- Click OK.
- In the Mapping Values pane of the Mappings tab, select an output node.
- Click the ellipsis button.
The Mapping Builder opens.
- From the Category drop-down list in the Functions pane of the Mapping Builder, select the Processing Functions category.
- Select the @JDBCLOOKUP function, and drag it onto the workspace
area of the Mapping Builder.
- Double-click the JDBC_data_source_name parameter.
The JDBC Data Source dialog box opens as shown in the following image.
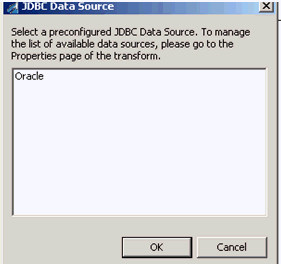
- Select the name of a defined JDBC lookup, for example Oracle,
and click OK.
The @JDBCLOOKUP function is updated as shown in the following image.
- Double-click the SQL_statement parameter.
Since the SQL statement is an expression, the Where clause can contain the following:
- Constant
- Transformer Function
- Input Node Context
- Unlimited AND & OR
Note: In the Column Name field, you can also type * or Count (*) to return more advanced data sets.
- Click OK once you have finished creating your SQL statement.
Configuring Properties for Replace
|
How to: |
Replace functions are used to match and replace specific values of the input data. For example, suppose your input data has a node called "car_age" with a value of either "new" or "used". If you decide to substitute the term "used" and want to use "pre-owned", you can define a replace function with match and replace value pairing where the match value would be specified as "used" and the replace value is "pre-owned."
Replace functions work similar to custom functions in that you must first define the function itself and then, assign it in the output node mapping value which needs to be modified. This task can be accomplished with the @REPLACE and @SIMPLE_REPLACE functions.
The process of defining replace functions accounts for setting up the values to match and replace, but not the mapping. You must map the replace functions using the Mapping Builder. For more information, see Using the Mapping Builder.
Procedure: How to Define A Replace Function
To define a replace function:
- Right-click a Transform component and select Properties from
the context menu.
The Properties dialog box opens.
- Expand Transform Properties in the left
pane and then select the @REPLACE Function category.
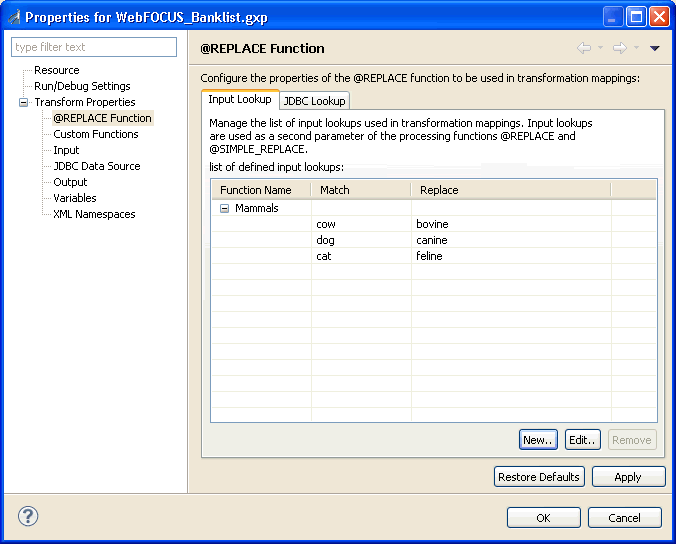
The following image shows the Project Properties dialog box with the @REPLACE Functions category selected in the left pane.
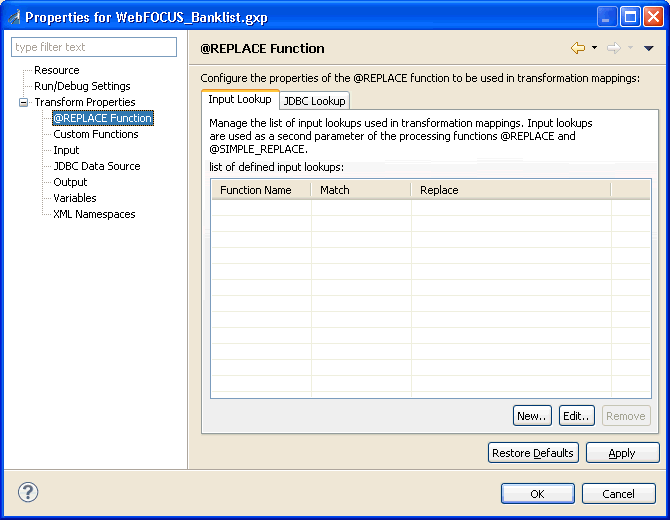
The Input Lookup and JDBC Lookup tabs contain the lists for the two types of replace functions available in iIT Transformer.
- To define the replace functions in which you define the permanent
or constant match and replace values, click the Input
Lookup tab. For more information, see How to Define
an Input Lookup.
To define replace functions in which the match and replace values are taken from the columns of the specified database table, enabling you to insert the input values from the different databases, use the JDBC Lookup tab.
Procedure: How to Define an Input Lookup
To define an input lookup for a replace function:
- Click New in the Input Lookup tab.
The Add/Edit Input Lookup dialog box opens.
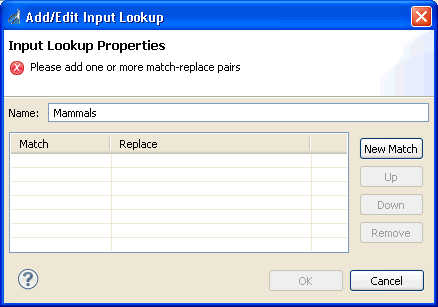
- Type a name, for example, Mammals, for the new input lookup group.
- Click New Match.
- Specify the match and replace values in the corresponding fields accordingly.
- Click OK.
You are returned to the previous Add New Input Lookup dialog box.
You can add multiple input lookups if required.
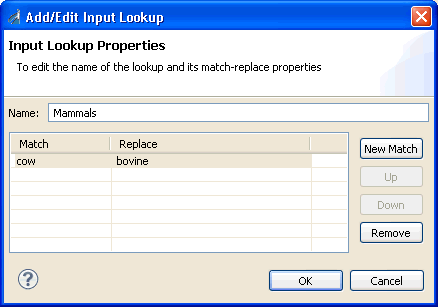
For example, the following image shows a replace function named "Mammals." The lower pane of the Add New Input Lookup dialog box has columns for Match and Replace node values for various mammals, for example, “cow” to "bovine.”

Procedure: How to Modify an Input Lookup
To modify an input lookup:
- Select the input lookup, for example, Mammals, and click Edit.
The Input Lookup Properties dialog box opens.
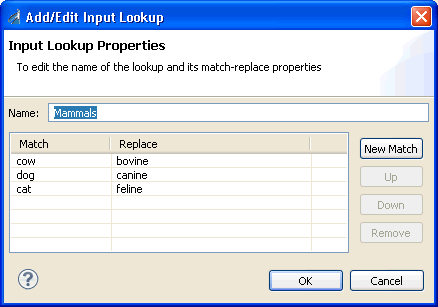
You can perform either one of the following modifications to an input lookup group:
- Define additional match and replace pairings by clicking New.
- Delete an existing match and replace pairing by selecting it and clicking Remove.
- Modify the values of an existing match and replace pairing by selecting it and typing the new value.
- Click OK once you have completed making the necessary modifications.
Procedure: How to Delete an Input Lookup
To delete an input lookup, select the input lookup, for example, Mammals, and click Remove.
The input lookup is removed from the list.
Custom Functions
Writing Custom Functions
|
Topics: |
The custom functions that can be used with iIT Transformer must be written in Java code, complying with the rules discussed in the following section. Custom functions can be stored as a class file or a jar file, either as part of your iIT project, or on the file system.
Note: The following section is written assuming that you are familiar with the Java programming language.
Each custom function you write must be a subclass of the AbstractFunction super class.
You must implement a constructor for your class and the two abstract methods, execute() and getReturnType(), which are inherited from the AbstractFunction class. You may also choose to add your own methods. The Java code for your custom function must conform to the following format:
import com.iwaysoftware.transform.common.function.AbstractFunction;
public class MY_FUNCTION_NAME extends AbstractFunction
{
     public MY_FUNCTION_NAME()
     {
        setName("MY_FUNCTION_NAME");
        setDescription("This is what my function does...");
     }
     public Object execute() throws Exception
     {
        // perform function's execution here
        // and return desired output value
     }
     public Class getReturnType()
     {
        return MY_FUNCTION'S_RETURN_TYPE;
     }
}
where:
- MY_FUNCTION_NAME
-
Is the name of your custom function.
- MY_FUNCTION'S_RETURN_TYPE
-
Is the data type of your custom function's return value.
Import Statement
You must include the following import statement in the beginning of your custom function implementation:
import com.iwaysoftware.transform.common.function.AbstractFunction;
This enables you access to the methods required for your custom function implementation.
Note: Optionally, you can utilize the logging capabilities of iIT Transformer in the code of your custom function by including the following import statements in the beginning of your custom function implementation:
import com.iwaysoftware.transform.common.log.LogUtil;
import com.iwaysoftware.transform.common.log.TransformLogger;
Class Declaration
As stated previously, a custom function is a subclass of the AbstractFunction super class. Therefore, you can declare your custom function as follows:
public class MY_FUNCTION_NAME extends AbstractFunction {
...
}
where:
- MY_FUNCTION_NAME
-
Is the name of your custom function.
Constructor
There are two methods you must call within the constructor of your custom function. They are the setName(String name) and setDescription(String description) methods, which are predefined in the AbstractFunction super class. The values provided as parameters for these methods are utilized when you access your custom function within iIT Transformer.
The name of the function used in iIT Transformer is the parameter that you set using the setName method, and the description of the function used by iIT Transformer is the message you type as the parameter in setDescription.
execute()
The method execute(), is one of two abstract methods declared in the AbstractFunction super class, which is supposed to contain the function procedures and instructions. Your custom function, which is a subclass of AbstractFunction, must therefore, implement the execute() method as follows:
public Object execute() throws Exception {
...
}
When you are writing the body of this method, you can follow the same style that is used to write any method in Java.
Getting Arguments
Retrieving arguments passed into your custom function is achieved through the methods getValueInstance(), getArgument(int index), and getFunctionContext(), which are the predefined methods from the functions package that your custom function is a part of. To store two arguments as String variables argOne and argTwo, write the following:
String argOne =
(String)getFunctionContext().getArgument(0).getValueInstance();
String argTwo =
(String)getFunctionContext().getArgument(1).getValueInstance();
Other methods that you may find useful for your custom function implementation are:
- getNumberOfArguments()
Returns an integer indicating the number of arguments passed to your function by the user, which is used in conjunction with method, getFunctionContext(), as follows:
int num = getFunctionContext().getNumberOfArguments();
- getArguments()
Returns an array containing all of the arguments passed to your function by the user. To store your arguments in an array of objects called myArray, use the following format:
Object[] myArray = getFunctionContext().getArguments();
getReturnType()
getReturnType() is one of the abstract methods declared in the AbstractFunction class. Therefore your custom function, which is a subclass of AbstractFunction, must implement this method. The value returned by getReturnType() indicates the type of value you return in method execute(). The choices for your return value are:
- java.lang.Boolean.class
- java.lang.Character.class
- java.lang.Double.class
- java.lang.Float.class
- java.lang.Integer.class
- java.lang.Long.class
- java.lang.String.class
- java.lang.StringBuffer.class
Associated Object Map
The custom function interface of iIT Transformer is now updated with the ability to utilize the data structure of customizable global parameters. This data structure is implemented as a Java Map object, which is an object that maps keys to values. This object can be accessed by any custom function within your project. As a result, it can contain global reusable data or information that can be cached, such as your database connection string. The Associated Object Map can also be used to track the usage of the custom functions in your project, if required. Use the following format to access the Associated Object Map:
Map objectMap = super.getAssociatedObjectMap();
Sample Custom Function
The following snippet of Java code is the implementation for a custom function that returns a string resulting from adding 25 to the input value of the function.
import java.math.BigDecimal;
import java.util.Map;
import com.iwaysoftware.transform.common.function.AbstractFunction;
import com.iwaysoftware.transform.common.log.LogUtil;
import com.iwaysoftware.transform.common.log.TransformLogger;
public class ADD25
            extends AbstractFunction
{
      private static final BigDecimal BD25 = new BigDecimal(25);
      public ADD25()
      {
           /* specifies the function name to be used within iAM */
           setName("ADD25");
           /* specifies the function description to be used within iAM */
           setDescription("Return a string resulting from adding 25 to input value.");
      }
      public Object execute()
                  throws Exception
      {
           /*
            * retrieves the first argument and assigns it to Double variable
            * 'input'
            */
// arguments are String always
String inputArg = (String)
getFunctionContext().getArgument(0).getValueInstance();
BigDecimal input;
try
{
input = new BigDecimal(inputArg);
}
catch (Exception e)
{
input = new BigDecimal(0);
}
// Gets the instance of the logger
TransformLogger logger = super.getLogger();
// Gets the debug flag
boolean debug = LogUtil.canDebug(logger);
// Fetches associate objects
Map objectMap = super.getAssociatedObjectMap();
/* creates a variable to hold the value that will get returned */
String answerString;
if (objectMap.containsKey(input))
{ // return stored result
String result = (String) objectMap.get(input);
if (debug)
{
LogUtil.debug(false, logger, "returning CACHED result: ");
}
return result;
}
else
{
answerString = input.add(BD25).toString();
objectMap.put(input, answerString);
if (debug)
{ LogUtil.debug(false, logger, "returning the value : "
+ answerString);
}
// return string
return answerString;
}
}
public Class getReturnType()
{
/* specifies that method execute() returns a String */
return java.lang.String.class;
}Defining Custom Functions
|
Topics: |
|
How to: |
If no predefined iIT Transformer function or their combination is sufficient to perform the task you require, you can write your own custom function containing the implementations of your task and returning the desired value. The custom functions must be written in Java code and compiled to produce a .class file, which then must be stored in the following directory to be available for use in design time with iIT Transformer:
<iWaySMHome>/tools/transformer/custom_functions
where:
- <iWaySMHome>
-
Is the directory where iWay Service Manager was installed.
Before using a custom function within iIT Transformer, test it to ensure it works properly. For more information on creating or writing custom functions, see Writing Custom Functions.
Defining a custom function in iIT Transformer creates a link to the actual custom function .class file stored in the custom_functions directory. Custom functions are defined using the Project Properties dialog box.
You can also import the custom functions from the other Transform components. For more information, see How to Import a Custom Function in iIT Transformer.
Procedure: How to Define a Custom Function in iIT Transformer
To define a custom function:
- Right-click a Transform component and select Properties from
the context menu.
The Properties dialog box opens.
- In the left pane, expand Transform Properties and
select Custom Functions.
The following image shows the Properties dialog box with the Custom Functions category selected in the left pane.
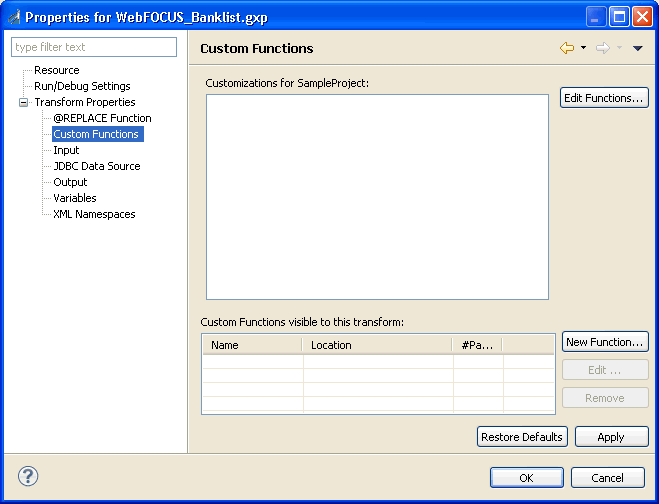
- Click Edit Functions.
The Edit Custom Function dialog box opens.
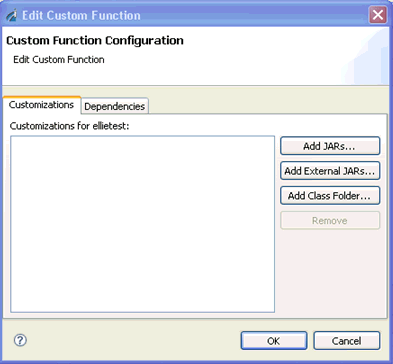
Several options are provided to add one or multiple custom functions if they reside in a .jar file.
- Click Add
External JARs, select the location of your .jar file,
and then click OK.
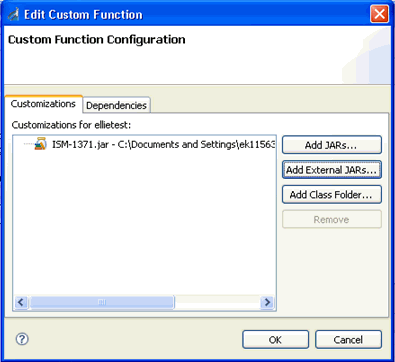
Note that your .jar file has been parsed and the list of custom functions contained in the .jar file now appears in the Customizations area, as shown in the following image.
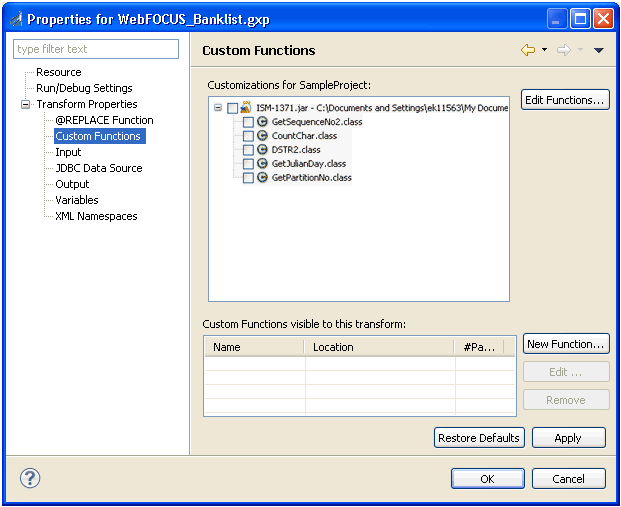
You can make any of the custom functions listed in the Customizations area available in Mapping Builder by clicking the check box next to it, for example, CountChar.class.
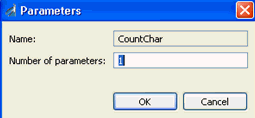
The Parameters dialog box opens, which prompts you to verify the name of the custom function. Enter the number of parameters that the custom function accepts as shown in the following image, and click OK.
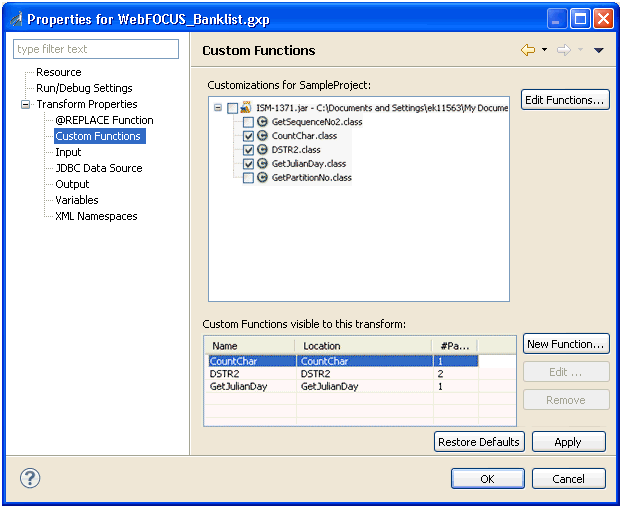
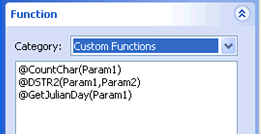
Note that every custom function that was defined by selecting the corresponding check box in the Customizations area is now included in the Custom Functions visible to the transform area, as shown in the following image.
- Click OK.
The custom functions now appear in the list of defined custom functions of the Mapping Builder. The name of the function is listed in the Function Signature column, and the location of the function is listed in the Location column.
Procedure: How to Import a Custom Function in iIT Transformer
To import or define a custom function, or to define a JDBC Lookup:
- Right-click a Transform component and select Properties from
the context menu.
The Properties dialog box opens.
- In the left pane, expand Transform Properties and select Custom Functions.
- Click New Function.
Compiling Your .java File
In order to make your custom function available for use within iIT Transformer, you need to compile the completed Java code of your custom function, integrating it with the Transformer engine code to create a .class file.
To compile custom functions, the %IWAY_HOME%/lib path must be part of your building environment. For example, you can use the following script to compile your custom function(s) with JDK version 1.6:
set IWAY_HOME=%IWAY7%
set LIB="%IWAY_HOME%lib/*"
set CLASS_FILES=%IWAY_HOME%etc/manager/transformations/custom_functions
set SOURCE_FILES=C:/temp/iway_custom_functions/src/*.java
javac -classpath %LIB%; -d %CLASS_FILES% %SOURCE_FILES%
@pause
where:
- C:/temp/iway_custom_functions/src/
-
Is the temporary location for your custom function(s) source files on your hard drive.
Migrating Custom Functions
|
How to: |
In early versions of Transformer, for example, 5.2.104, the Java code for a custom function had a format similar to the following:
import com.xmlglobal.goxmltransform.engine.functions.*;
public class MY_FUNCTION_NAME extends AbstractFunction
{
  public MY_FUNCTION_NAME()
  {
    setName("MY_FUNCTION_NAME");
    setDescription("This is what my function does...");
  }
  public Object execute() throws Exception
  {
    // perform function's execution here
    // and return desired output value
  }
  public Class getReturnType()
  {
    return MY_FUNCTION'S_RETURN_TYPE;
  }
}
where:
- MY_FUNCTION_NAME
-
Is the name of your custom function.
- MY_FUNCTION'S_RETURN_TYPE
-
Is the data type of your custom function's return value.
The following procedure describes how to migrate custom functions created for the early versions of Transformer, for example, 5.2.104, to be called by your modified .xch file.
Note: Before you compile the migrated custom functions, verify that the iwtranse.jar file is in your classpath.
Procedure: How to How to Migrate Custom Functions
To migrate custom functions, modify your import statements as follows:
- Comment out xmlglobal package(s), for example:
//import com.xmlglobal.goxmltransform.engine.functions.*;
- Add the iwaysoftware package, which must be imported, for example:
import com.iwaysoftware.transform.common.function.AbstractFunction;
Using Custom Functions at Run Time
In iIT Transformer, the functionality of custom functions for run time purposes is the same as the design time functionality. For more information on configuring custom functions, see Custom Functions.