Creating an XML Schema for a Siebel Integration Object
|
Topics: |
The iWay Application Adapter for Siebel supports access to Siebel Integration Objects by using Siebel XML. Using Siebel Integration Objects through supported transports requires Siebel workflows. For more information, see Siebel Workflows.
Creating a Siebel XDR or XSD Schema
|
How to: |
Starting with version 7.5, you can generate XSD schemas using Siebel Tools. You can use these XSD files in iWay Explorer.
Note: As a best practice, it is recommended to use XSD schemas instead of XDR schemas when possible.
Procedure: How to Create a Siebel XDR or XSD Schema for a Siebel Integration Object
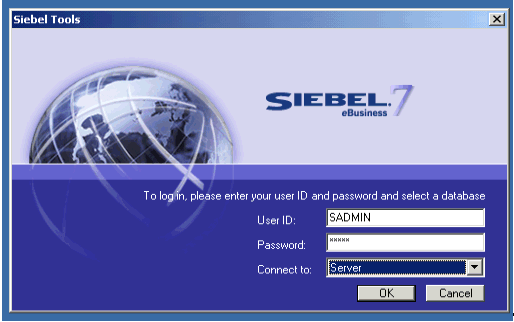
The following image shows the Siebel Tools screen where you log on.
To generate a Siebel XDR or XSD schema:
- Log on
to Siebel Tools.
- Type a user ID and password.
- From the Connect to: drop-down list, select a database.
- Click OK.
The following image shows the Siebel Tools window that opens. In the upper left is the Project drop-down list. In the lower left is the Object Explorer navigation pane with three tabs: Types, Detail, and Flat, with the Types tab selected to show a list of Siebel objects. The right pane has three buttons: Synchronize, Generate Schema, and Generate Code, followed by a table of Integration objects with their associated project and base object type. You can navigate by selecting a specific letter of the alphabet from a button beneath the table.
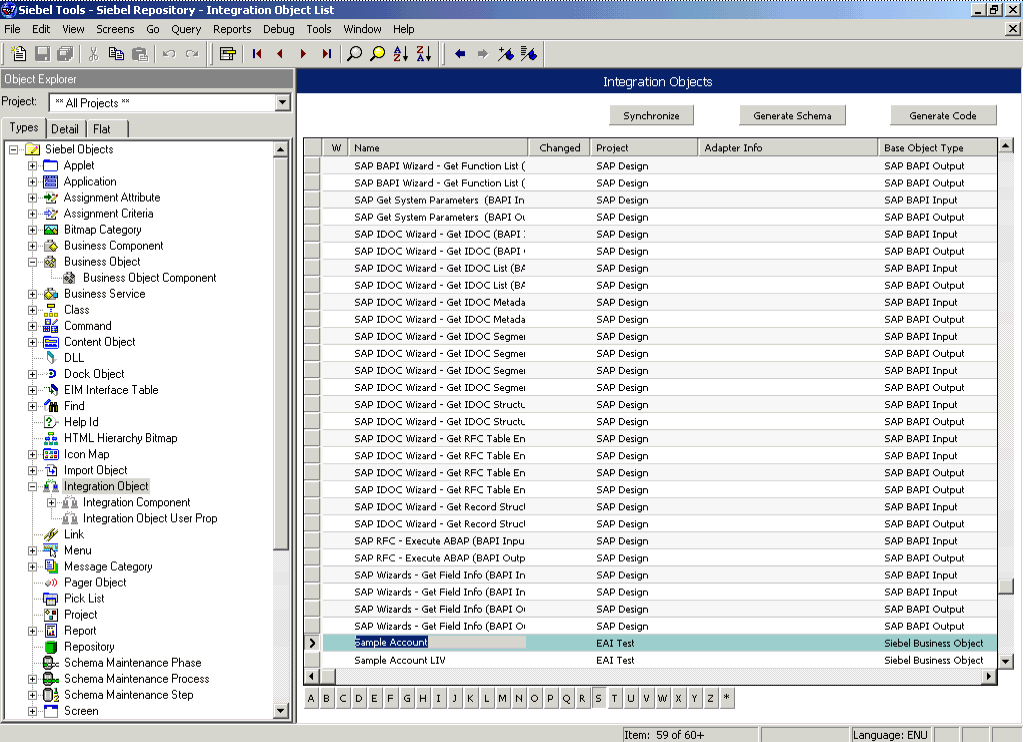
- To create an XML schema, select an integration object, for example, Sample Account.
- Click
the Generate Schema button.
The following image shows the Generate XML Schema wizard window that opens where you select a Business Service to generate a schema.
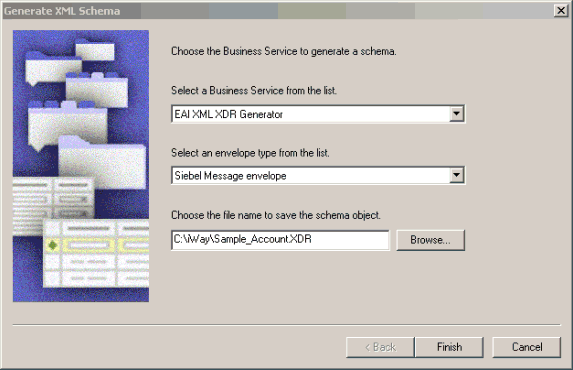
- From the Business Service drop-down list, select EAI XML XDR Generator or EAI XML XSD Generator.
- From the envelope type drop-down list, select Siebel Message envelope.
- In the third field, click Browse or
type to specify a file name for the XDR or XSD schema and a directory
where it can be accessed by iWay Explorer, for example, C:\iWay\Sample_Account.XDR.
Note: The XDR or XSD file must be on the same computer as iWay Explorer or be available through a mapped connection to another drive or machine.
- Click Finish.
Now you can use iWay Explorer to generate XML schemas for the Siebel Integration Object.
For more information, see How to Create a Schema For a Siebel Integration Object.
Creating a Schema for a Siebel Integration Object Using iWay Explorer
|
How to: |
iWay Explorer can generate schemas for Integration Objects from Siebel XDR files or it can use Siebel-generated XSD files. In Siebel versions 7.5 and higher, you can create XSD schemas for Integration Objects using Siebel Tools.
If you created an XDR file using the Siebel Tools Schema Wizard, after you create the Siebel XDR schema for a selected Siebel Integration Object, you can create an XML schema using iWay Explorer.
You must supply iWay Explorer with the location of the previously created Siebel XDR schema for the particular integration object selected.
Note: The XDR or XSD file must be on the same computer as iWay Explorer or be available through a mapped connection to another drive or machine.
Procedure: How to Create a Schema For a Siebel Integration Object
To create an XML schema from a Siebel XDR schema:
- In iWay
Explorer, expand the Integration Objects node
to browse the Integration Objects in the Siebel system.
The following image shows the Integration Object nodes in the left navigation pane and a table of property details for a selected node in the right pane. Each row of the table lists a property of the object and its value.
- Scroll
down and select an integration object, for example, Sample Account.
You can also use the Search feature to find a particular Integration Object. For more information, see How to Search for a Specific Siebel Object.
- To generate
a schema, move the pointer over Operations and
choose Add IO Node.
The following image shows the Add IO Node pane that appears on the right.
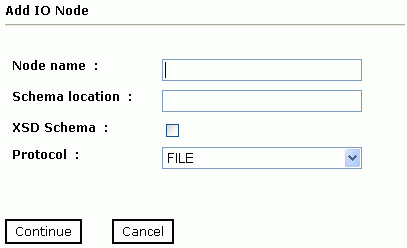
- In the Node name field, type a name for the node to create under Sample Account.
- In the Schema location field, type the location of the XDR
or XML schema that was created by Siebel Tools. Include the name
of the file in the location, for example:
C:\siebelrepo\SAMPLE_ACCOUNT.XDR
Note: For Siebel versions 7.5 and higher, you can generate XSD schemas using Siebel Tools.
- Select the XSD Schema check box only if
you are uploading the XSD schema.
iWay Explorer uses XDR schemas as input to generate XSD schemas.
- From the drop-down list, choose a protocol used by the Siebel workflow for the Integration Object.
- Click Continue.
For FILE, provide the location used by the Siebel workflow.
For HTTP, iWay Explorer builds the URL that is the key to activating the SWE. The protocol definition has multiple sections:
http://my_web_server/eai_enu/start.swe
  ?SWEExtSource=<SourceName>&SWEExtCmd=<Execute>
  &UserName=<UserName>&Password=<Password>
The following table lists and defines the parameters you supply for HTTP.
Parameter
Definition
SWE URL
Base SWE URL. For example
http://web_server/eai_enu/start.swe
where:
- web_server
-
Is the name of the web server hosting Siebel SWE.
SWE External Source
Section within the eai.cfg file to execute, which is the [HTTP Services] section.
SWE External Command
Use Execute.
User Name
User ID logon to execute.
Password
Logon password to execute.
The following table lists and defines the parameters you supply for MQSeries.
Parameter
Definition
Queue Manager Name
Name of the queue manager to which the server must connect.
MQ server host for MQClient operation
Host on which the MQ Server resides (MQ Client only).
MQ server port for MQClient operation
The number to connect to an MQ Server queue manager (MQ client only).
MQ server channel for MQClient operation
Case-sensitive name of the channel that connects with the remote MQ Server queue manager (MQ client only). The default channel name for MQSeries is
SYSTEM.DEF.SVRCONN
Document type XML
Keep the default selection.
respqueue
Name of the queue where messages are placed.
- Select
the node just created and then select Generate Schema from
the Operations menu in the right pane.
The following image shows the Schemas table that appears on the right and has three columns labeled Part, Root Tag, and Schema. The Schema column provides the locations of the schemas. There are four rows: Request, Response, Event, and EventReply.
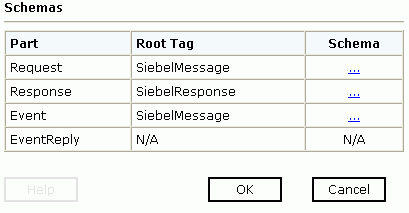
- To view
the XML for a schema, click the ellipsis (...)
in the event row.
The following image shows the XML schema that appears in the right pane.
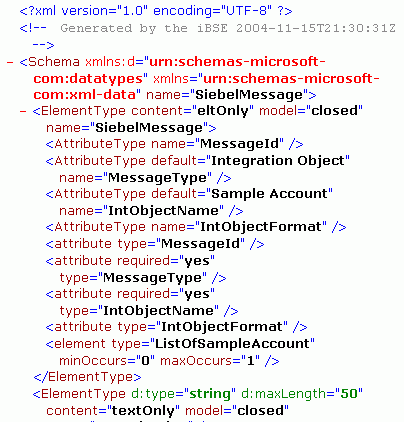
- Click
the browser Back button to return to the Schemas
table.
A directory structure is created to store the schemas. For more information on where the schemas are stored, see Locating Schemas.
You are now ready to configure ports and channels or create iWay Business Services for the Siebel Integration Object node you just created.
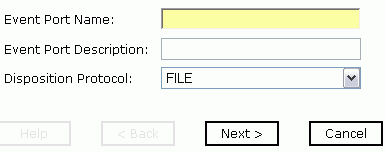
- To create
an event port, click the IO node name you just created and select Create
iWay Event Port from the Operations menu in the right
pane.
The following image shows the Create Event Port pane that opens on the right. This pane includes two fields you complete to define the port: Event Port Name and Event Port Disposition. It includes the Disposition Protocol drop-down list from which you select the protocol type, a Help button, and three action buttons.
For more information on creating event ports, see Listening for Siebel Events.