Application Link Enabling Configuration for the Event Adapter
|
Topics: |
The SAP ERP event adapter receives IDocs (Intermediate Documents) from SAP ERP.
Document Processing
The iWay Application Adapter for SAP ERP accepts IDocs in either SAP ERP standard format or XML format. If you are using flat IDocs, no encoding is required and the EDI_DC40 control header must be the first entry in the IDoc.
Collected Inbound Configuration
|
How to: |
When sending collected IDocs to SAP ERP, if the DOCNUM field does not have a unique document number for each IDoc, the system creates an IDoc for each header record in the collected IDoc file. The system also duplicates the data for each IDoc.
You must ensure that the DOCNUM field is included in the EDI_DC40 structure and that each IDoc has a unique sequence number within the collected IDoc file.
To configure an SAP ERP system to send IDocs to the SAP ERP event adapter, you use the ALE (Application Link Enabling) configuration to:
- Register your program ID in SAP GUI. For more information, see Registering Your Program ID in SAPGUI.
- Define a
port.
A port identifies where to send messages. The port can be used only if an RFC destination was previously created.
For more information on creating an RFC destination, see Overview. For more information on defining a port, see How to Define a Port.
- Create a
logical system.
One type of partner is a logical system. A logical system manages one or more RFC destinations. For more information, see How to Create a Logical System.
- Create a
partner profile.
A partner profile is a definition of parameters for the electronic interchange of data with a trading partner using the IDoc interface. To communicate with a partner using the IDoc interface, you must create a partner profile. For more information, see How to Create a Partner Profile.
- Create a
distribution model for the partner and message type.
You create a distribution model for the partner and message type you designated. For more information, see How to Create a Distribution Model for the Partner and Message Type.
- Test the SAP ERP event adapter. For more information, see Testing the SAP ALE Configuration.
Procedure: How to Define a Port
To define a port:
- In the ALE configuration, choose Tools, Business Communications,
IDocs Basis, IDoc, and then Port Definition or
execute the WE21 transaction.
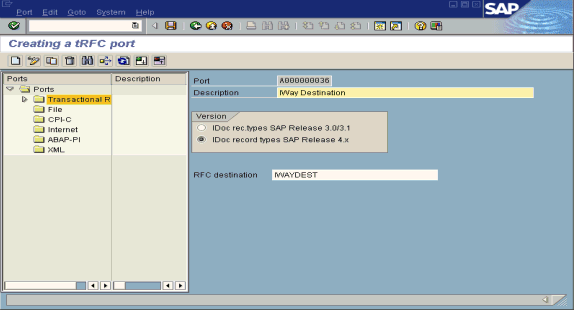
The Creating a tRFC port window opens as shown in the following image. On the left, the window is divided into a Ports pane and a Description pane. A pane for displaying information about the port is on the right.
- In the left pane under Ports, select Transactional RFC and click Create.
- Select Generate port name.
The system generates the port name.
- In the right pane, select the IDoc version you want to send through this port.
- Click the destination you created, for example, IWAYDEST.
- Save the session, making note of the system-generated RFC port.
Procedure: How to Create a Logical System
To create a logical system called IWAYLOG:
- In the ALE Configuration, enter the area menu selection SALE transaction.
- Select SAP Reference IMG.
- Expand the following nodes: Basis Components, Application Link Enabling (ALE), Sending and Receiving Systems, Logical Systems, and Define Logical System.
- Click the green check mark beside Define Logical System.
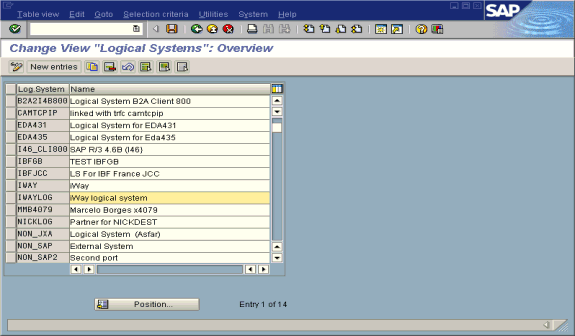
The Change View "Logical Systems": Overview window opens and displays a list of logical systems and their names, as shown in the following image.
- Click New entries.
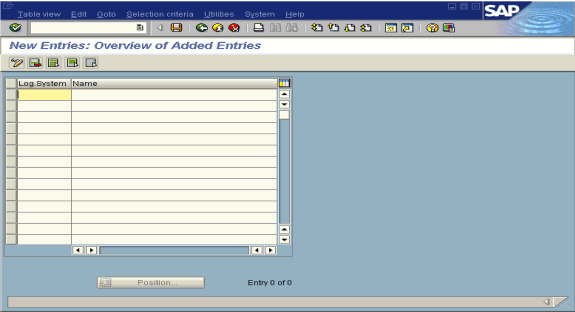
The New Entries: Overview of Added Entries window opens, as shown in the following image, with columns labeled Log.System and Name for adding new log systems.
- Type an entry for Log System, for example, IWAYLOG.
- In the Name column, type a name (description) for the partner profile.
- Save the session.
Procedure: How to Create a Partner Profile
To create a partner profile:
- In the SAP ERP Workbench, choose Tools, Business
Communication, IDoc Basis, IDoc, and then Partner profile or
execute the WE20 transaction.
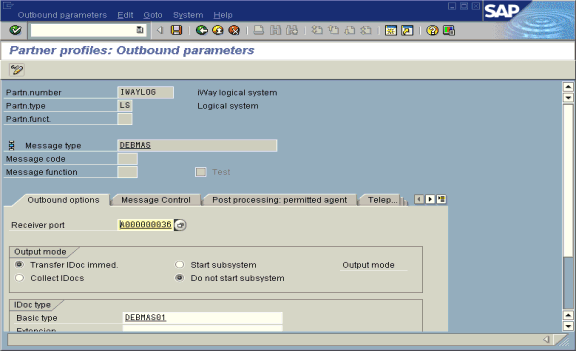
The Partner profiles: Outbound parameters window opens and displays fields for specifying details for the partner profile, as shown in the following image.
- Select Partner type LS (Logical system).
- Press F5 (Create).
- For Type, enter USER.
- For Agent, enter the current user ID, or you may select another agent type.
- Under the outbound parameter table control, select Create outbound
parameter.
Partn.type is LS.
Message type is DEBMAS (the IDoc document type).
- Leave Partn.funct blank.
- Click the Outbound options tab.
- Depending on your performance requirements, click Transfer IDoc Immed or Collect IDocs.
- For the IDoc, type a message type, for example, DEBMAS.
- Type a receiver port, for example, A000000036.
- Save the session and exit.
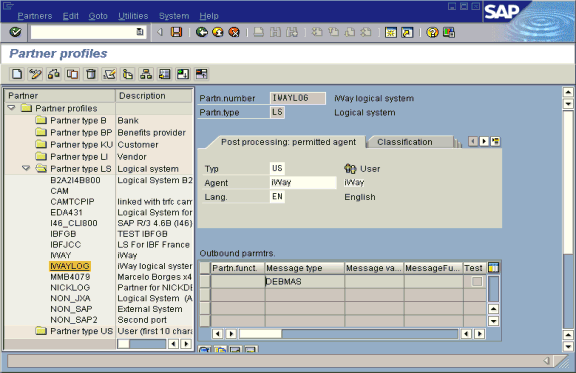
The Partner profiles summary window opens and displays information for the logical system that you created, as shown in the following image. In the left pane are partners and descriptions. The right pane displays information depending on which tab is active.
Procedure: How to Create a Distribution Model for the Partner and Message Type
To create a distribution model called IWAYMOD:
- In the SAP ERP Workbench, choose Tools, AcceleratedSAP,
Customizing, and then Project Management or
execute the BD64 transaction.
The Display Distribution Model window opens.
- Select Create model view. (If required, switch processing mode to edit within Distribution Model/Switch Processing Mode.)
- Type a short text string and a technical name for your new model view.
- Click the Save button.
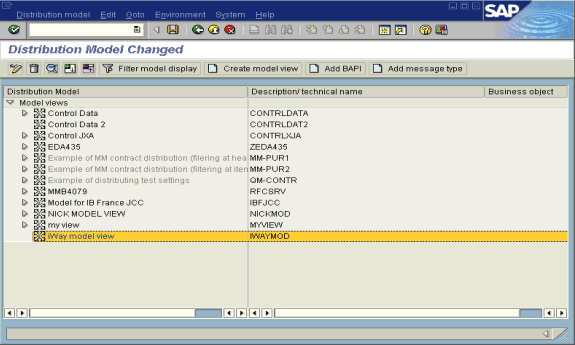
The Distribution Model Changed window opens with a tree structure of the distribution model in the left pane and the descriptions or technical names in the right pane, as shown in the following image.
- In the Distribution Model tree, select a new model view.
- At the right, in the button bar, select Add message type.
The Add Message Type pane opens and displays the name of the model view. It includes fields for specifying the sender and receiver of the message, as well as the message type, as shown in the following image.
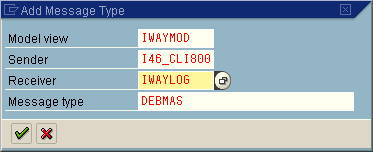
- In the Sender field, provide the sender that points to the
SAP ERP system that sends the IDoc, for example, I46_CLI800.
In this case, the sender is an SAP ERP 4.6B system.
- In the Receiver field, provide the logical system, for example, IWAYLOG.
- In the Message type field, provide the type of IDoc, for example, DEBMAS.
- In the Sender field, provide the sender that points to the
SAP ERP system that sends the IDoc, for example, I46_CLI800.
- Click the check mark icon.
- Click the Save button.
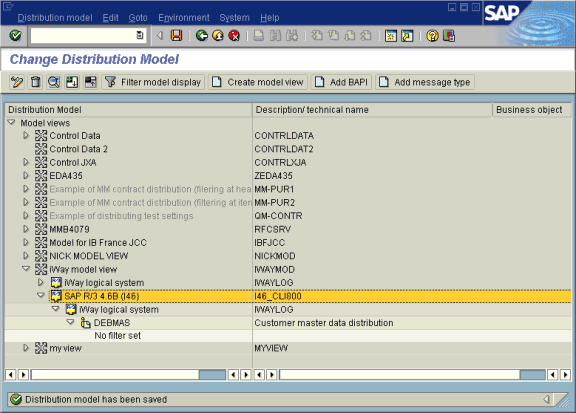
The Change Distribution Model window opens and displays the new model view to use to send message type, DEBMAS, from the I46_CLI800 SAP ERP system to the IWAYLOG logical system, as shown in the following image.
You are now ready to test the connection to the logical system.