Connecting to Oracle E-Business Suite
|
Topics: |
To browse and work with Oracle E-Business Suite metadata, you must create a target for Oracle E-Business Suite. This target serves as your connection point. You must establish a connection to Oracle every time you start iWay Explorer or after you disconnect from the system.
Creating a New Target
|
How to: |
A target serves as the connection point to your Enterprise Information System (EIS) and is automatically saved after you create it. To connect to Oracle E-Business Suite for the first time, you must create a new target. Before a target is created in iWay Explorer, you must define a Data Provider using the iWay Service Manager Administration Console.
Procedure: How to Define a Data Provider Using the iWay Service Manager Administration Console
To define a Data Provider using the iWay Service Manager Administration Console:
- Ensure iWay Service Manager (iSM) is started.
- Log on to the iWay Service Manager Administration Console.
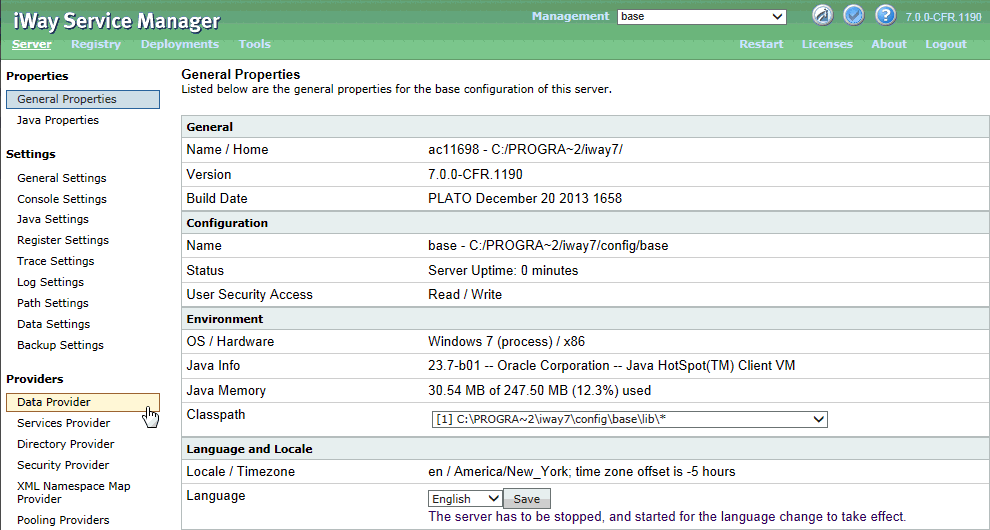
- Click Data Provider under the
Providers section in the left pane, as shown in the following image.
The Data Provider pane opens, as shown in the following image.
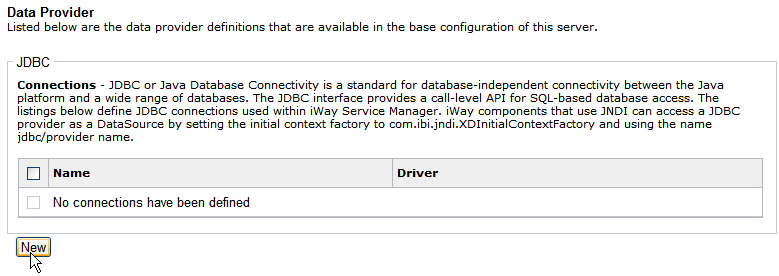
- Click New In the JDBC section.
The Data Provider - JDBC pane opens, as shown in the following image.
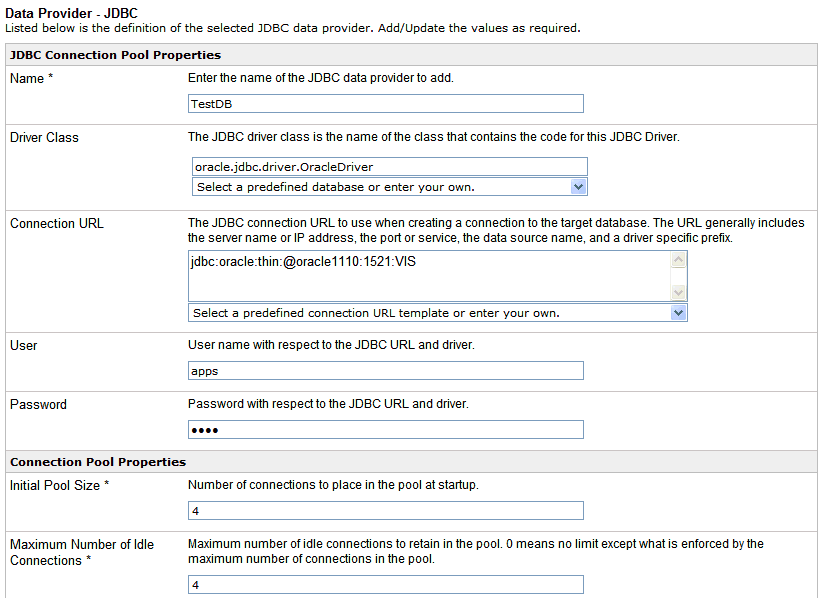
The following table lists and describes the parameters in the Data Provider - JDBC pane that must be configured for the data provider that you are defining.
Parameter
Description
JDBC Connection Pool Properties
Name *
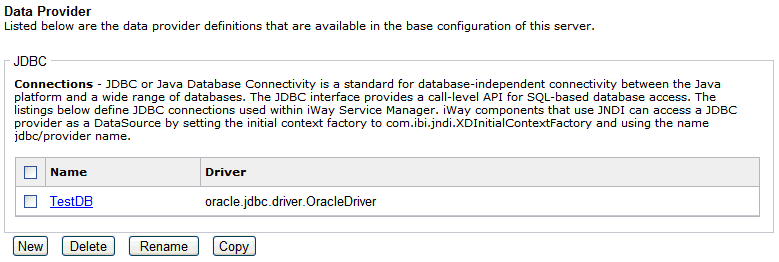
Enter the name of the JDBC data provider to add (for example, TestDB).
Driver Class
The JDBC driver class is the name of the class that contains the code for this JDBC Driver. Select the following predefined driver class from the drop-down list:
Oracle Thin - {oracle.jdbc.driver.OracleDriver}The required .jar files for the JDBC driver must be installed and registered in the iSM classpath. You can use the Path Settings option on the console to add Java classes and libraries.
Connection URL
The JDBC connection URL to use when creating a connection to the target database. The URL generally includes the server name or IP address, the port or service, the data source name, and a driver specific prefix. Select the following predefined driver class from the drop-down list:
Oracle Thin - jdbc:oracle:thin:@[HOST][:PORT]:[SID]
The following is a sample value for the URL:
jdbc:oracle:thin:@oracle1110:1521:VIS
For more information, see the JDBC documentation for the specific data source.
User
User name with respect to the JDBC URL and driver. SREG names can also be used.
Password
Password with respect to the JDBC URL and driver. SREG names can also be used.
Connection Pool Properties
Initial Pool Size *
Number of connections to place in the pool at startup.
Maximum Number of Idle Connections *
Maximum number of idle connections to retain in the pool. A value of 0 means no limit except what is enforced by the maximum number of connections in the pool.
Maximum Number of Connections *
Maximum number of connections in the pool. A value of 0 means no limit.
Login Timeout
Time in seconds to wait for a pooled connection before throwing an exception. A value of 0 means no limit.
Behavior When Exhausted
What to do when the pool reaches the maximum number of connections. Block means wait for a connection to become available for the period defined by the login timeout parameter. Fail means throw an exception immediately.
Validation SQL
SQL statement that can be executed to validate the health of a pooled connection. The statement should return a result set of at least one row.
Validate on Borrow
If set to true, the validation SQL statement will be executed on a pooled connection before returning the connection to the caller.
Validate on Return
If set to true, the validation SQL statement will be executed on a pooled connection before replacing the connection in the pool.
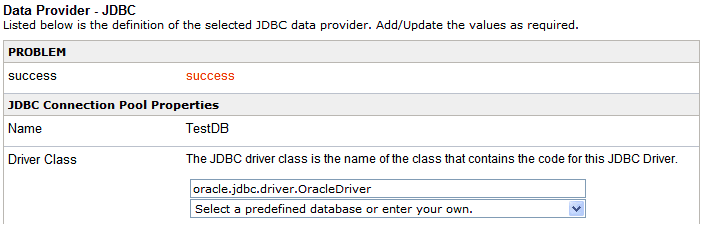
- Click Test when you have entered
all of the required parameters for your data provider.
A success message is displayed at the top of the pane if the data provider has been configured correctly, as shown in the following image.
If a connection cannot be made, an error message displays describing the problem. Typically, the driver has not been installed or the classpath has not been set.
- Click Add.
You are returned to the Data Provider pane, where the new JDBC data provider you defined (for example, TestDB) is added to the list of available providers, as shown in the following image.
You can now define a data source target for the adapter using iWay Explorer.
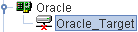
Procedure: How to Create a New Target Using iWay Explorer
To create a new target using iWay Explorer:
- In the
left pane, expand the iWay Adapters node
and select the Oracle node.
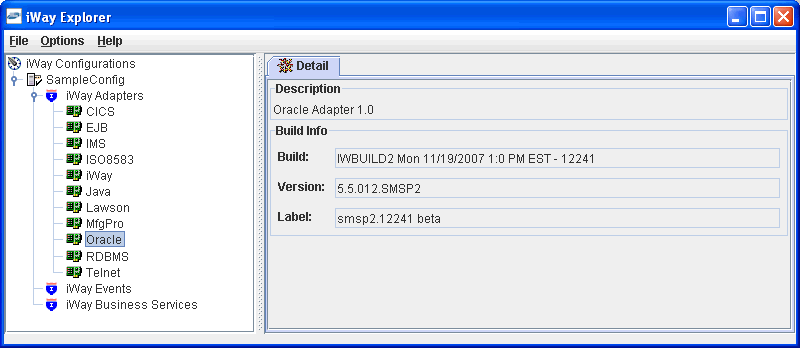
The following image shows the list of supported adapters in the left pane and information about the selected adapter on the right.
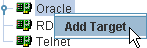
- Right-click
the Oracle adapter node and select Add Target, as shown in the following
image.
The Add Target dialog box opens, as shown in the following image. This dialog box provides fields to define the new target.
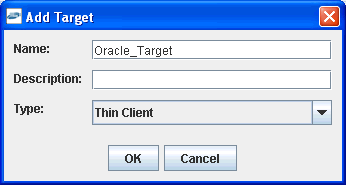
- In the Name field, type a descriptive name for the target, for example, Oracle_Target.
- In the Description field, type a brief description of the connection (optional).
- From the Type drop-down list, select Thin Client (default).
- Click OK.The Thin Client dialog box opens.
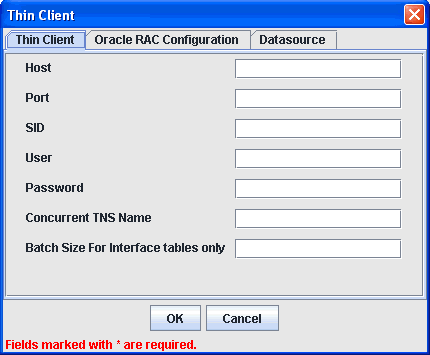
Note: The connection parameters are consistent with those found in your Oracle E-Business Suite system. For more information on parameter values that are specific to your Oracle E-Business Suite configuration, consult your Oracle E-Business Suite system administrator.
The following table lists and describes the connection parameters for a Thin Client target.
Parameter
Description
Thin Client Tab
Host
Name of the server on which the Oracle E-Business Suite database instance resides.
Port
Port number on which the database is listening.
SID
Unique name of the database service, chosen by the database administrator or the person who installed Oracle E-Business Suite.
User
Oracle database user ID to access the Oracle database underlying the Oracle E-Business Suite system. The user ID must have database access to the interface tables being accessed.
Password
Password associated with the specified user ID.
Concurrent TNS Name
Logical name of the Oracle E-Business Suite database instance. (Can be obtained from the database administrator.)
The TNS name that is found in the tnsnames.ora file that contains an entry for that database and that resides on the Oracle E-Business Suite database server. This is not the TNS name that is registered on the server on which the iWay Application Adapter for Oracle E-Business Suite is running (unless the adapter and the Oracle database reside on the same server).
If a TNS name does not exist, you must create it. For more information about creating a TNS name, see your Oracle administrator.
Batch Size For Interface tables Only
The number of request document records that the adapter buffers before inserting them into an Oracle E-Business Suite interface table. When the adapter reaches the end of the request document, it inserts any remaining buffered records.
The adapter tracks this batch limit separately for each interface table, not aggregately for all interface tables. For example, if you set the batch size property to 25, and the adapter accumulates 18 input records for the GL_INTERFACE table and 25 for the BUDGET_INTERFACE table, the adapter continues to hold records for GL_INTERFACE but inserts the records for BUDGET_INTERFACE.
The batch size property enables you to optimize I/O: inserting too few records at a time increases I/O overhead, and inserting too many at a time ties up database resources.
Note: The Batch size parameter is only supported for integration with Oracle E-Business Suite interface tables.
Oracle RAC Configuration Tab
Enables you to configure Oracle Real Application Clusters (RAC), which provides clustering and higher availability for an Oracle RDBMS.
Connection Cache Name
The connection name you want to use for the Oracle RAC configuration. You can use any name.
TCP Timeout
The number of milliseconds before the connection times out.
Connection Descriptor of LDAP URL
The connection description URL, which is found in the tnsnames.ora file of the Oracle RAC configuration.
Oracle Name Server (ONS)
The node setting for each Oracle system in the cluster, which includes host and port number.
For example:
nodes=orac1:6200,orac2:6200
where:
- orac1 and orac2
-
Are the host names.
Datasource Tab
Initial Context
Specify the following JNDI context that is provided by the JNDI service provider.
com.ibi.jndi.XDInitialContextFactory
URL
For a JDBC connection, the JDBC driver-specific URL used to connect to the Oracle database. Specify this value using the following format
jdbc/DataProviderName
where:
- DataProviderName
-
Is the JDBC data provider you defined using the iWay Service Manager Administration Console.
For example:
jdbc/TestDB
JNDI Name
JNDI name of a queue to which events are emitted. Specify this value using the following format
jdbc/DataProviderName
where:
- DataProviderName
-
Is the JDBC data provider you defined using the iWay Service Manager Administration Console.
For example:
jdbc/TestDB
- Enter values for the connection parameters according to your target type.
- Click OK.
The new target, for example, Oracle_Target, appears in the left pane beneath the Oracle node, as shown in the following image.
You can now connect to the Oracle application target you defined.
Connecting to a Target
|
How to: |
You must use a defined target to connect to an instance of Oracle E-Business Suite.
Procedure: How to Connect to a Target
To connect to an existing target:
- In the left pane, expand the Oracle node and select the target you defined, for example, Oracle_Target.
- In the right pane, enter the password for Oracle E-Business Suite.
- Right-click
the target.
The following image shows the options (Connect, Edit, and Delete) that are available in the left pane when you right-click the Oracle_Target node.
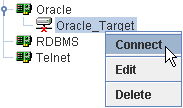
- Select Connect.
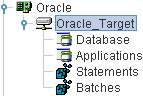
In the left pane, the Oracle_Target node changes to reflect that a connection was made.
- Expand
the target node to reveal the business objects for the Oracle E-Business
Suite.
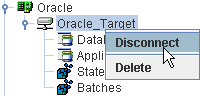
The following image shows the Oracle_Target node expanded to reveal the Database, Applications, Statements, and Batches nodes.
Modifying, Closing, or Removing a Target
|
How to: |
After you create a target for an EIS using iWay Explorer, you can edit the information that you provided when you created the target. For instructions on editing a target, see How to Edit a Target.
Although you can maintain multiple open connections to different application systems, it is recommended that you close connections when they are not in use. For instructions on closing a connection, see How to Disconnect From a Target.
Disconnecting from a target closes the connection, but the target node remains. For instructions on deleting a target, see How to Delete a Target.
Procedure: How to Edit a Target
To edit a target:
- In the
left pane, right-click the target, for example, Oracle_Target.
The following image shows the options (Connect, Edit, and Delete) that are available in the left pane when you right-click the Oracle_Target node.
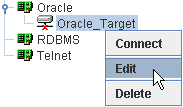
- Select Edit.
The Thin Client dialog box opens, as shown in the following image. There are three tabs: Thin Client, Oracle RAC Configuration, and Datasource. In this example, the Thin Client tab is selected and its associated fields are displayed. Use this dialog box to update the connection information to Oracle and the application server you are using.
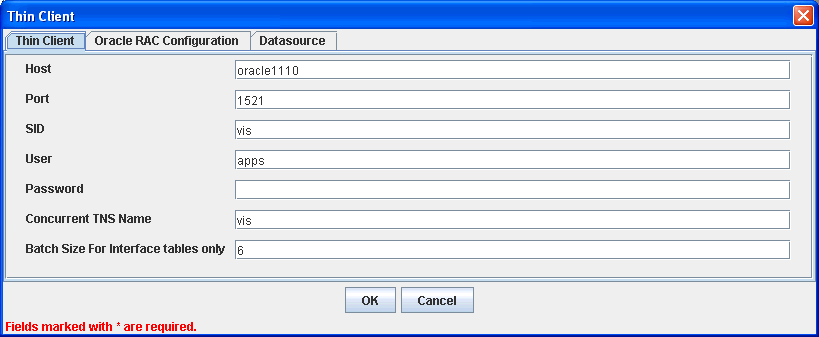
- Modify the connection information and click OK.
Procedure: How to Disconnect From a Target
To disconnect from a target:
- In the
left pane, right-click the target to which you are connected, for
example, Oracle_Target.
The following image shows the Disconnect option that is available in the left pane when you right-click the Oracle_Target node.
- Select Disconnect.
The Oracle_Target node changes to reflect that the connection was terminated.
Procedure: How to Delete a Target
To delete a target:
- In the
left pane, right-click the target, for example, Oracle_Target.
The following image shows the options (Connect, Edit, and Delete) that are available in the left pane when you right-click the Oracle_Target node.
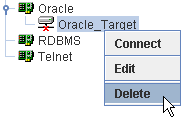
- Select Delete.
The Oracle_Target node is removed from the left pane.