Installing and Configuring the WSO2 Identity Server
|
How to: |
This section describes how to install and configure the WSO2 Identity Server.
Procedure: How to Install a New WSO2 Identity Server
A preconfigured, pre-upgraded version 4.6 of the WSO2 Identity Server (WSO2 IS) is supplied in the OPMC delivery archive. This upgraded version contains patches to allow proper LDAP authentication, and uppercase/lowercase user name submission.
- Use WinZip to extract the c:\opmc_2.5.x\wso2.zip
file into the root directory on the selected root drive.
The following root directory is created:
drive:\wso2_is
- Open a command line window, and enter the following command:
cd \wso2_is\bin
- Type wso2isServer and press Enter.
The server will come up while logging progress on this WSO2 Identity Server console. When completed, you should see the following message:
xacml policy schema loaded successfully
- You should stop this WSO2 Identity Server running in the command window using CTRL+C.
Procedure: How to Build and Install a WSO2 Keystore and a Java Security Certificate
Creating the certificate involves three steps:
- Creating a new Certificate for WSO2 Identity Server (WSO2 IS).
- Validating the new Certificate.
- Configuring the RemediationService Client Machine.
Step 1: Creating a New Certificate for WSO2 IS
The first procedure is to create a new certificate for the WSO2 IS with the opmc_hostname in it (not necessarily the same as the wso2_hostname). Perform the following steps:
- In the following directory,
rename the wso2carbon.jks file to wso2carbon.original-jks:
drive:\wso2_is\repository\resources\security
If the new keystore build fails, then you can always return to the original version.
- Open a command prompt window (or unix shell).
- Type the following command:
cd \wso2_is\repository\resources\security
- Run the keytool command, which may be on your PATH. This
command is normally in the Java/jdk/bin folder.
Only if the Java/jdk/bin folder is not in your path, then type:
path=%java_home%\bin;%path%
- Enter the following command in the command prompt window:
keytool -genkey -keyalg RSA -alias wso2carbon -keystore wso2carbon.jks -storepass wso2carbon -validity 720 -keysize 2048
You will now be prompted for several pieces of information that you need to provide:
What is your first and last name?
  [Unknown]: Your server name, e.g. myhost.abc.co
What is the name of your organizational unit?
  [Unknown]:  MHS
What is the name of your organization? [Unknown]: MHSWhat is the name of your City or Locality? [Unknown]: Kansas CityWhat is the name of your State or Province? [Unknown]: New YorkWhat is the two-letter country code for this unit? [Unknown]: USIs CN=myhost.abc.com, OU=MHS, O=MHS, L=Kansas City, ST=New York, C=US correct? [no]: yesThe first and last name prompt is where you type the host name of the server where WSO2 IS is running (so, do not always use the above values). All of the other parameters can have any values that you prefer.
- When you confirm the settings by answering yes to the
last question, you will be prompted for the key password:
Enter key password for <wso2carbon>
(RETURN if same as keystore password): wso2carbonRe-enter new password: wso2carbon
Enter the values shown in bold. These values will not echo back to the screen.
- You now have a new file called wso2carbon.jks.
- From the same command prompt, export your public certificate
from the keystore and import it into the trust store. Type:
keytool -export -alias wso2carbon -keystore wso2carbon.jks -storepass wso2carbon -file wso2carbon.pem
Then type:
keytool -import -alias wso2carbon -file wso2carbon.pem -keystore client-truststore.jks -storepass wso2carbon
- (Optional) In case you receive an error that a certificate with
such an alias name already exists, just delete it from the keystore
by typing the following command:
keytool -delete -noprompt -alias wso2carbon -keystore client-truststore.jks -storepass wso2carbon
Note: The name of the keystore and storepass could vary.
Import the Certificate Into the Host of the Apache Tomcat JVM
- In the command prompt change directory to the keystore folder
of the JDK:
…\Java\jdk1.7.0_45\jre\lib\security
- Import the public key generated above (wso2carbon.pem) in step
5, to the JDK keystore (cacerts):
- Copy the generated file (wso2carbon.pem) from the \wso2_is\repository\resources\security folder to the current folder …\Java\jdk1.7.0_45\jre\lib\security
- From the same command prompt, type:
keytool -import -alias wso2carbon -file wso2carbon.pem -keystore cacerts -storepass changeit
- Restart WSO2 IS.
In the command prompt window, type:
Cd \wso2_is\bin
Then type:
wso2server
Step 2: Validating the New Certificate
Perform the following steps when the WSO2 IS has started:
- Open a browser and start the WSO2 Admin Console.
Use the full server name (not localhost), and log on. For example:
https://myserver.abc.com:9443/carbon
- Go to Configure and select KeyStores,
as shown in the following image.
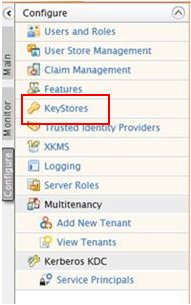
Only one keystore should be listed (wso2carbon.jks), as shown in the following image.

- Click on the View action. If you performed
all of the steps correctly, then you should see the certificate
you just created, as shown in the following image.

If this information appears correct, then you have finished configuring the WSO2 Identity Server (WSO2 IS).
Step 3: Configuring the RemediationService Client Machine
The server running the RemediationService must have the client certificate for accessing the WSO2 Identity Server (WSO2 IS) over the SSL protocol. Java handles the connection but, by default, assumes it already has the client certificate. If it does not, then it will fail to connect.
- Attached in the release distribution .zip is a .zip file containing two Java classes. Unzip this .zip file into c:\installCerts on the machine that must connect to WSO2 IS.
- Open a command prompt and navigate to this folder (c:\installCerts).
- Enter the following command:
Java InstallCert <hostname>:<port>
where:
- <hostname>:<port>
-
Correspond to the WSO2 IS.
In our example above, this would be as follows:
java InstallCert rhwapp371a:9443
The certificate is retrieved and you are asked if you want to add it.
- Press Enter (and ignore the Java exception, which is normal).
The utility has created a file called jssecacerts for you, which now contains the certificate.
- Copy this file to the security folder in your Java runtime (usually java/jre/lib/security).
- Restart iSM (or Apache Tomcat).
Procedure: How to Configure Apache Tomcat/OPMC to Access the WSO2 Identity Server
To enable OPMC web applications that are deployed to Apache Tomcat to connect to the WSO2 Identity Server, you must update the JNDI properties in the <Tomcat_Home>\conf\context.xml file.
- Use a text editor to modify the <Tomcat_Home>\conf\context.xml file to point to the new WSO2 Identity Server.
- Copy and paste the following XML fragment inside the
<Context> element:
<Environment override="true" type="java.lang.String" value="https://195.160.232.136" name="is.wso2.url"/>
<Environment override="true" type="java.lang.String" value="admin" name="is.wso2.username"/>
<Environment override="true" type="java.lang.String" value="admin" name="is.wso2.password"/>
In this example, you must substitute the host name or IP address of your WSO2 server for 195.160.232.136. During initial setup, it is recommended to leave the password set to admin.
- Save your changes to the <Tomcat_Home>\conf\context.xml file.