Infrastructure Requirements for the Installation Environment
|
How to: |
Before installing Omni-Patient Management Central (OPMC), you must verify that Apache Tomcat Version 7.xx is available on the system where OPMC will be installed.
Use one of the following options to verify the availability of Apache Tomcat Version 7.xx on your system:
- Right-click Command Prompt and select Run
as Administrator.
When the Command Prompt opens, enter the following command:
netstat -a -b
- Open the Windows Control Panel and select Programs and Features. Browse through the list of installed programs to determine if Apache Tomcat is installed.
- Perform a general search across your file system(s) for Apache Tomcat.
If not, then install Apache Tomcat Version 7.0 as a service on the OPMC host system.
Procedure: How to Download Apache Tomcat
- Enter the following URL in your web
browser (Microsoft Internet Explorer):
http://tomcat.apache.org/download-70.cgi
The Apache Tomcat 7 Downloads page opens, as shown in the following image.

- Download the 32-bit/64-bit Windows Service Installer
distribution.
Note: The recommended download is the 32-bit/64-bit Windows Service Installer distribution because the additional setup and configuration tasks are automatically performed during the installation of Apache Tomcat. The Apache Tomcat Host Manager and Web Application Manager are also included with the installation.
Procedure: How to Install the Windows Service Distribution of Apache Tomcat
The following procedure can be used for the Windows service installation distribution of Apache Tomcat.
- Install Apache Tomcat Version 7.xx on the appropriate server.
By default, the Apache Tomcat installation installs the following Apache Tomcat home directory:
C:\Program Files\Apache Software Foundation\Tomcat 7.0
This location is defined as, and referred to as <CATALINA_HOME>, and also in this documentation, as [Tomcat_Home].
- During the Apache Tomcat installation, choose the components to install.
- Specify the site-specific properties in the Configuration
pane, as shown in the following image.

- Click Next.
- Specify the path to Java Version 1.7 on your system in
the Java Virtual Machine pane, as shown in the following image.
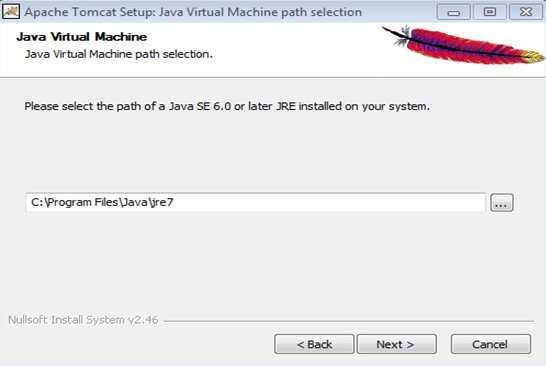
- Click Next and complete the remaining steps in the Apache Tomcat installation.
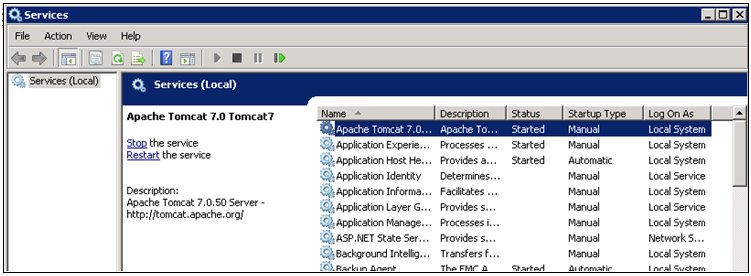
- Open the Services utility on Windows through the Control
Panel and start the Windows service for Apache Tomcat, as shown
in the following image.
- Perform the following steps to verify that Apache Tomcat
was installed correctly and starts successfully.
- Enter the following URL in your web browser (Microsoft
Internet Explorer):
http://localhost:8080
- On the Apache Tomcat startup page, confirm that the
following message is displayed:
If you're seeing this, you've successfully installed Tomcat. Congratulations!
For example:

- Enter the following URL in your web browser (Microsoft
Internet Explorer):
- Return to the Services utility on Windows through the Control Panel and stop the Windows service for Apache Tomcat.
- Navigate to the [tomcat_home]\bin directory and
run the Tomcat7w application to update Apache Tomcat properties.
The Apache Tomcat 7.0 Tomcat 7 Properties dialog box opens, as shown in the following image.

- Click the Java tab to update the Java settings used by
Apache Tomcat.

- Add the following Java settings in the Java Options area:
-Dcatalina.home=C:\Tomcat 7.0
-Dcatalina.base=C:\Tomcat 7.0
-Djava.endorsed.dirs=C:\Tomcat 7.0\endorsed
-Dcom.microsoft.tfs.jni.native.base-directory=C:\OPMC_Home\tfs\native
-Djava.io.tmpdir=C:\Tomcat 7.0\temp
-Djava.util.logging.manager=org.apache.juli.ClassLoaderLogManager
-Djava.util.logging.config.file=C:\Tomcat 7.0\conf\logging.properties
-XX:PermSize=1024m
-XX:MaxPermSize=2048m
For example:
- Click OK.
- Return to the Services utility on Windows through the Control Panel and restart the Windows service for Apache Tomcat.
- Verify that Apache Tomcat starts successfully by entering
the following URL in your web browser (Microsoft Internet Explorer):
http://localhost:8080
- Stop the Windows service for Apache Tomcat.
Procedure: How to Install Apache Tomcat on a Different Port
If you need to run the Omni-Patient Management Central (OPMC) application in Apache Tomcat on a port other than 8080 (for example, to avoid conflicts with another HTTP listener, application, or server), perform the following steps:
- Ensure that the new port number you want to specify
for the HTTP listener used by Apache Tomcat is not currently in
use.
You can enter the following command to check for ports that are currently in use:
netstat -a
- Stop Apache Tomcat.
- Edit the server.xml file, which is located in the following directory:
<Catalina_Home>\conf
- Change the value of xx to the desired port number (for example, 8082).
- Using WinZip, open the OmniDomain.war file.
- Go to WEB-INF \classes, edit the domains.xml file, and look for the section that begins with <Connector name=””>.
- Edit the two URLs, as shown in the following sample:
<connector name="OmniService">
 <type>ODATA</type>
 <odata_url>http://localhost:8082/OmniService/OmniPatient/</odata_url>
 <about_url>http://localhost:8082/OmniService/about.jsp</about_url>
 <queryString>$format=xml</queryString>
</connector>
- Ensure the port number you choose is not currently in use.
Procedure: How to Install the Non-Windows Service Distribution of Apache Tomcat
The following procedure can be used for the non-Windows service installation distribution of Apache Tomcat.
- Unzip the Apache Tomcat distribution to an appropriate
drive on your file system (for example, C:\).
Apache Tomcat will be installed into the following directory:
C:\apache-tomcat-7.0.xx
The Apache Tomcat home directory, also referred to as [CATALINA_HOME], will point to this directory.
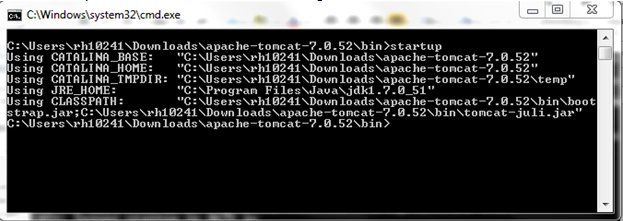
- Navigate to [CATALINA_HOME]\bin and open a Command Prompt window.
- Enter startup in the first line to start Apache
Tomcat, as shown in the following image.
- Perform the following steps to verify that Apache Tomcat
was installed correctly and starts successfully.
- Enter the following URL in your web browser (Microsoft
Internet Explorer):
http://localhost:8080
- On the Apache Tomcat startup page, confirm that the
following message is displayed:
If you're seeing this, you've successfully installed Tomcat. Congratulations!
For example:
- Enter the following URL in your web browser (Microsoft
Internet Explorer):
- Return to the Command Prompt window that was used to start Apache Tomcat (step 3) and enter shutdown.
- Navigate to [CATALINA_HOME]\bin and edit the catalina.bat file using a text editor.
- Add the following line, which allocates additional JVM
memory:
set CATALINA_OPTS=-XX:MaxPermSize=256M
- Save the catalina.bat file.