Completing Post-Upgrade Tasks
|
Topics: |
|
How to: |
This section describes how to complete post-upgrade tasks, such as deploying the new bundle for Omni-HealthData™ version 3.11.
Procedure: How to Deploy Your Bundle
- Enter the following URL in your browser to access the Omni Console:
https://yourhost.yourdomain.com:9500
For example:
https://omnihealthdata.ibi.com:9500
Note: You cannot use localhost in the URL.
- Log on using the following credentials:
- Username: ibi
- Password: ibi
- Navigate to the Configuration section of the Omni Console.
- Ensure that the local Configuration parameters you noted in Completing Upgrade Prerequisites are set with the appropriate values from your prior implementation.
- Deploy the new Data Model that is included with Omni-HealthData™ version 3.11 by selecting Update Bundle from the Deploy Bundle drop-down list, as shown in the following image.
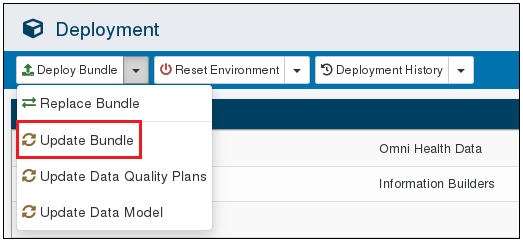
- Browse to the location of the updated deployment bundle file (omni-healthdata-bundle-3.11.*.zip), which is located in the following directory on Windows platforms:
C:\data\omni\product\omnihealthdata\omnigen\OmniGenData\OmniHealthData\omni-healthdata-bundle-3.11.*.zip - Deploy your current (Omni-HealthData™ version 3.1.5) bundle into the updated (version 3.11) Omni Console, by selecting Update Data Quality Plans from the Deploy Bundle drop-down list, as shown in the following image.
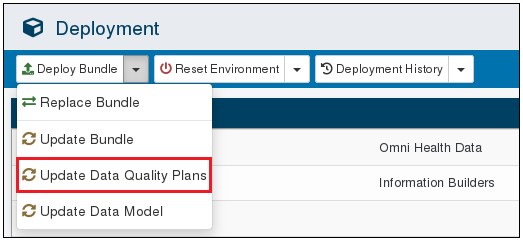
- Browse to the location of your current (Omni-HealthData™ version 3.1.5) bundle, and select it for upload.
This will deploy your existing Data Model and Data Quality (DQ) plans to your Omni-HealthData™ version 3.11 implementation.
- Download and save the new deployment bundle by selecting the Current Deployment hyperlink for the latest Deployment listed in the Deployment History drop-down list.
Procedure: How to Start Omni Services
See the How to Start Omni Services procedure in Chapter 2, Installing Omni-HealthData™ Version 3.11 on Windows, in the Omni-HealthData™ Installer User's Guide.
Procedure: How to Upload Your Metadata in Omni-HealthData Governance Console
See the How to Upload Your Metadata in Omni-HealthData Governance Console procedure in Chapter 2, Installing Omni-HealthData™ Version 3.11 on Windows, in the Omni-HealthData™ Installer User's Guide.
Congratulations, you have successfully upgraded your Omni-HealthData™ implementation to version 3.11.
Upgrade Consideration for Existing Matching Repositories on Microsoft SQL Server
Omni-HealthData™ version 3.11 is packaged with iWay Data Quality Server (DQS) version 12. Earlier versions of Omni-HealthData (for example, version 3.1.5) included DQS version 10. In the underlying DQ database, the creation of tables differs between DQS version 10 and version 12 as follows:
- In DQS version 10, the data2 column on the repos_subject_data table is of type text.
- In DQS version 12, the data2 column on the repos_subject_data table is of type varchar(max).
As per current Microsoft SQL Server (MS SQL) specifications, the text type is obsolete and the varchar(max) type should be used instead.
If you are upgrading from an earlier version of Omni-HealthData (for example, version 3.1 or 3.1.5) and you are migrating an existing Matching repository that resides on MS SQL, you must execute the following SQL commands to modify the data2 columns on the repos_subject_data tables to use the varchar(max) type:
ALTER TABLE repos_facility_data ALTER COLUMN data2 varchar(max);
ALTER TABLE repos_facilitylocation_data ALTER COLUMN data2 varchar(max);
ALTER TABLE repos_member_data ALTER COLUMN data2 varchar(max);
ALTER TABLE repos_organization_data ALTER COLUMN data2 varchar(max);
ALTER TABLE repos_organizationalunit_data ALTER COLUMN data2 varchar(max);
ALTER TABLE repos_patient_data ALTER COLUMN data2 varchar(max);
ALTER TABLE repos_payer_data ALTER COLUMN data2 varchar(max);
ALTER TABLE repos_practicefacility_data ALTER COLUMN data2 varchar(max);
ALTER TABLE repos_provider_data ALTER COLUMN data2 varchar(max);
ALTER TABLE repos_providerpractice_data ALTER COLUMN data2 varchar(max);
ALTER TABLE repos_worker_data ALTER COLUMN data2 varchar(max);
If the data2 columns are not modified to use the varchar(max) type, then the following error is generated during the Match steps when processing data:
ERROR com.ibi.omni.managedservices.ManagedJavaService$IOThreadHandler:656 [FATAL]

[OnlineServicesComponent][01_match_patient.online][match_patient][match_patient_write.comp] [80] Internal error occurred during run of the plan:

java.sql.BatchUpdateException: Operand type clash: varbinary is incompatible with text[STEP Match patient/Match patient[Extended Unify]]