Key Features and Considerations
|
Topics: |
This section describes the key features and considerations in all editions of Omni-Gen version 3.15.
WSO2 Identity Server
Omni-Gen makes use of WSO2, a third-party tool, for authentication and authorization to control access to the Omni-Gen Console and the Omni-Gen Server and API. It uses the WSO2 Identity Server (https://wso2.com/identity-and-access-management/), an open-source solution for Identity and Access Management.
As part of the Omni installation for Version 3.15, you may choose to have a new WSO2 installed alongside of Omni, or you may configure Omni to use a pre-existing WSO2 solution. Options for specifying this are in the Omni installer.
The default Omni-Gen installation creates two default user IDs in WSO2, primary/ibi for the Omni-Gen Console, and primary/omniapi for the Server and its API. The password for both of the default user IDs is ibi00 (two zeroes). The installation also creates eight roles in WSO2, four of which are assigned to these default user IDs. These eight roles can be assigned to any newly created IDs to control access to the Omni-Gen Server and Console.
The following three roles are available for the Console:
- Application/ROLE_OMNI_CONTROLLER_ADMIN
- Application/ROLE_OMNI_CONTROLLER_OPERATOR
- Application/ROLE_OMNI_CONTROLLER_READONLY
The following three roles are available for the Server:
- Application/ROLE_OMNI_SERVER_ADMIN
- Application/ROLE_OMNI_SERVER_OPERATOR
- Application/ROLE_OMNI_SERVER_READONLY
Note: The ROLE_OMNI_SERVER_OPERATOR and ROLE_OMNI_SERVER_READONLY roles are reserved for future use. The ROLE_OMNI_SERVER_ADMIN role, along with the ROLE_OMNI_CONTROLLER_ADMIN role, should be given to those who administer Omni-Gen.
The following two roles provide access to REST services used to call Omni services directly:
- Application/ROLE_OMNI_SERVER_API
Provides access to the Omni-Gen Server REST services. For more information, see Chapters 1 - 4 in the Omni-Gen API Services Reference Guide.
- Application/ROLE_OMNI_CONTROLLER_API
Provides access to the Omni-Gen Controller REST services. For more information, see Chapters 5 - 7 in the Omni-Gen API Services Reference Guide.
Note:
- Each of the roles has privileges assigned to them, by default. These privileges cannot be changed.
- The default user IDs are assigned the following roles:
- The primary/ibi user ID is assigned the roles of Application/ROLE_OMNI_CONTROLLER_ADMIN and Application/ROLE_OMNI_SERVER_ADMIN.
- The primary/omniapi user ID is assigned the roles of Application/ROLE_OMNI_SERVER_API and Application/ROLE_OMNI_CONTROLLER_API
- You can use WSO2 to create additional users and assign them non-admin roles, such as ReadOnly or Operator.
Omni Server Console Authorization
An Administrator can provide authorization to provide limited access to the Omni Server Console to protect it from unauthorized users.
The following table outlines the privileges that are assigned to each role used by the Omni Server Console.
|
Role |
Admin |
Operator |
ReadOnly |
|---|---|---|---|
|
ROLE_OMNI_CAN_DEPLOY |
X |
||
|
ROLE_OMNI_DEPLOYMENT_CHANGE_WORKFLOW |
X |
||
|
ROLE_OMNI_DEPLOYMENT_RESET_SUBJECT |
X |
||
|
ROLE_OMNI_DEPLOYMENT_REPROCESS_SUBJECT |
X |
||
|
ROLE_OMNI_DEPLOYMENT_RUN_TESTS |
X |
||
|
ROLE_OMNI_SERVICES_WRITE |
X |
X |
|
|
ROLE_OMNI_CONFIGURATION_WRITE |
X |
||
|
ROLE_OMNI_WORKORDER_WRITE |
X |
X |
|
|
ROLE_OMNI_WORKORDER_DEBUG |
X |
||
|
ROLE_OMNI_WORKORDER_DISPATCHER |
X |
X |
|
|
ROLE_OMNI_OPERATIONS_DOWNLOAD_DIAGNOSTICS |
X |
X |
|
|
ROLE_OMNI_ALLOW_TESTING |
X |
||
|
ROLE_OMNI_CONFIG_DB_CONFIG_READ |
X |
||
|
ROLE_OMNI_SERVICES_READ * Reserved for future use. |
X |
X |
X |
|
ROLE_OMNI_DEPLOYMENT_READ * Reserved for future use. |
X |
X |
X |
|
ROLE_OMNI_PROCESSING_READ * Reserved for future use. |
X |
X |
X |
|
ROLE_OMNI_CONFIGURATION_READ * Reserved for future use. |
X |
X |
X |
|
ROLE_OMNI_LOGS_AND_MESSAGES_READ * Reserved for future use. |
X |
X |
X |
|
ROLE_OMNI_SYSTEM_CODES_READ * Reserved for future use. |
X |
X |
X |
|
ROLE_OMNI_CONSOLES_READ * Reserved for future use. |
X |
X |
X |
|
ROLE_OMNI_OPERATIONS_READ * Reserved for future use. |
X |
X |
X |
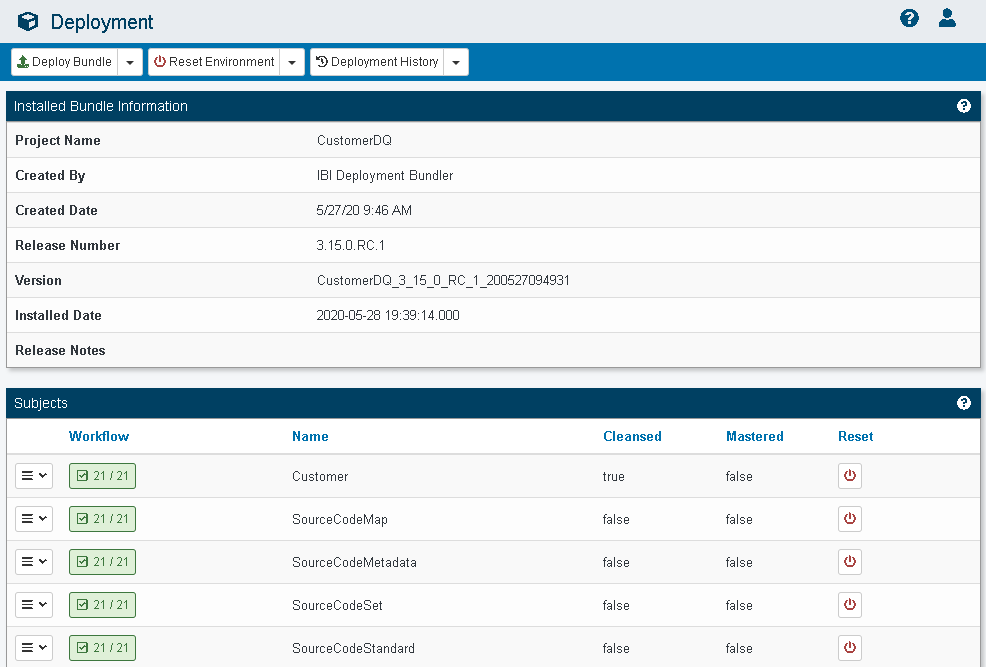
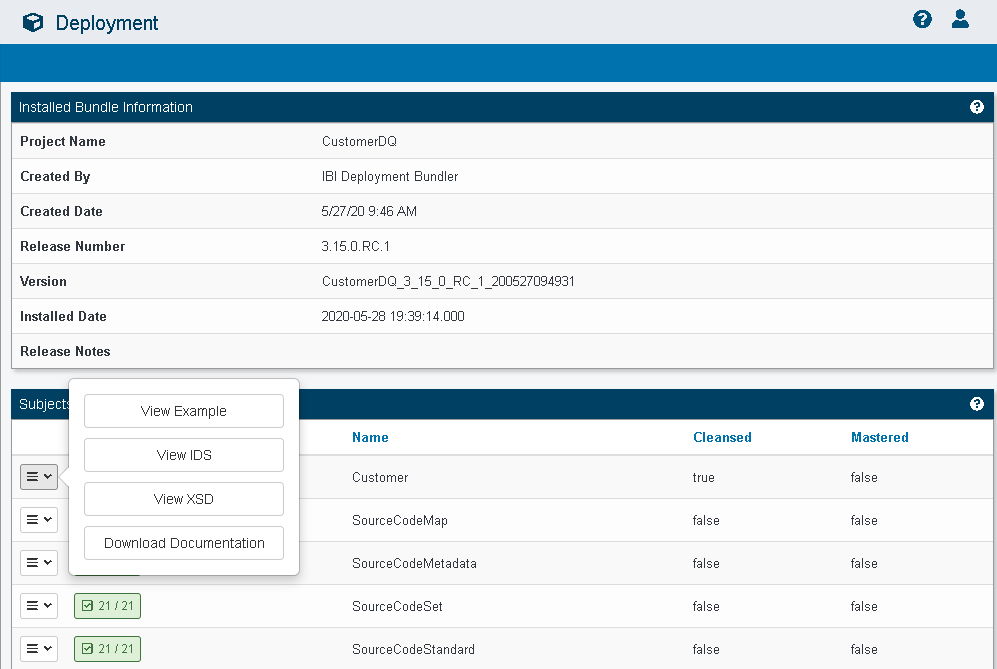
ROLE_OMNI_CAN_DEPLOY
The following image shows the Console when the ROLE_OMNI_CAN_DEPLOY privilege is assigned.
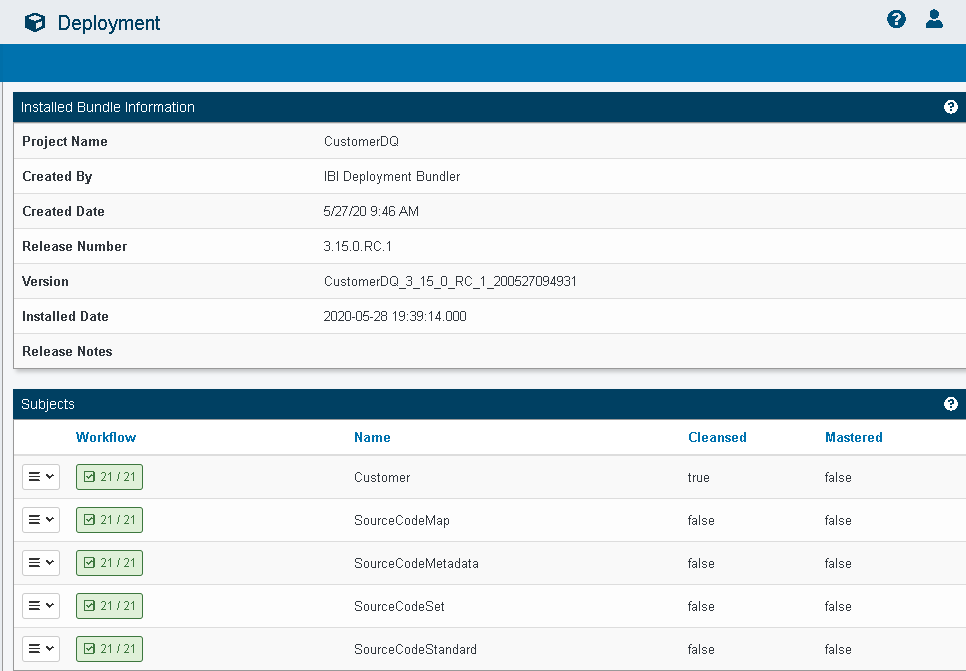
When the ROLE_OMNI_CAN_DEPLOY privilege is not assigned, the three global deploy buttons are removed, as shown in the following image.
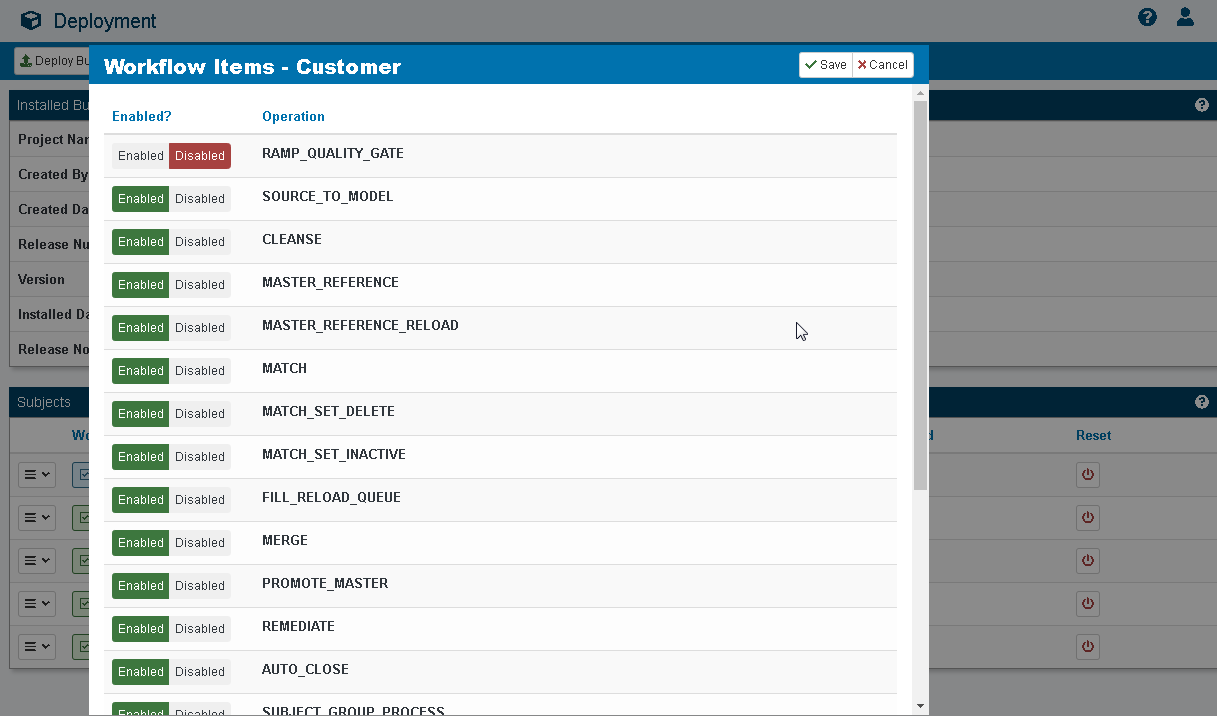
ROLE_OMNI_DEPLOYMENT_CHANGE_WORKFLOW
The following image shows the Console when the ROLE_OMNI_DEPLOYMENT_CHANGE_WORKFLOW privilege is assigned.
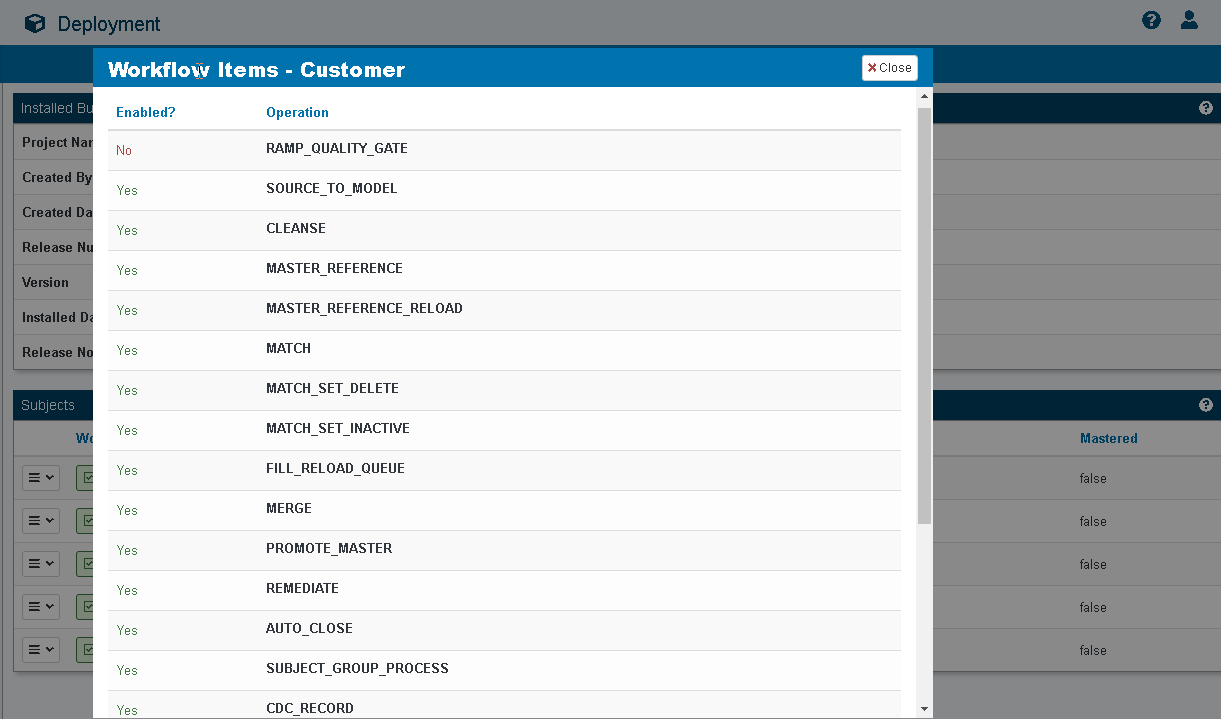
When the ROLE_OMNI_DEPLOYMENT_CHANGE_WORKFLOW privilege is not assigned, the Workflow Items show a read-only value for the Enabled? column in place of the Enabled and Disabled buttons, as shown in the following image.
ROLE_OMNI_DEPLOYMENT_RESET_SUBJECT
The following image shows the Console when the ROLE_OMNI_DEPLOYMENT_RESET_SUBJECT privilege is assigned.
When the ROLE_OMNI_DEPLOYMENT_RESET_SUBJECT privilege is not assigned, the Subjects grid does not show the last column containing the Reset Subjects buttons, as shown in the following image.

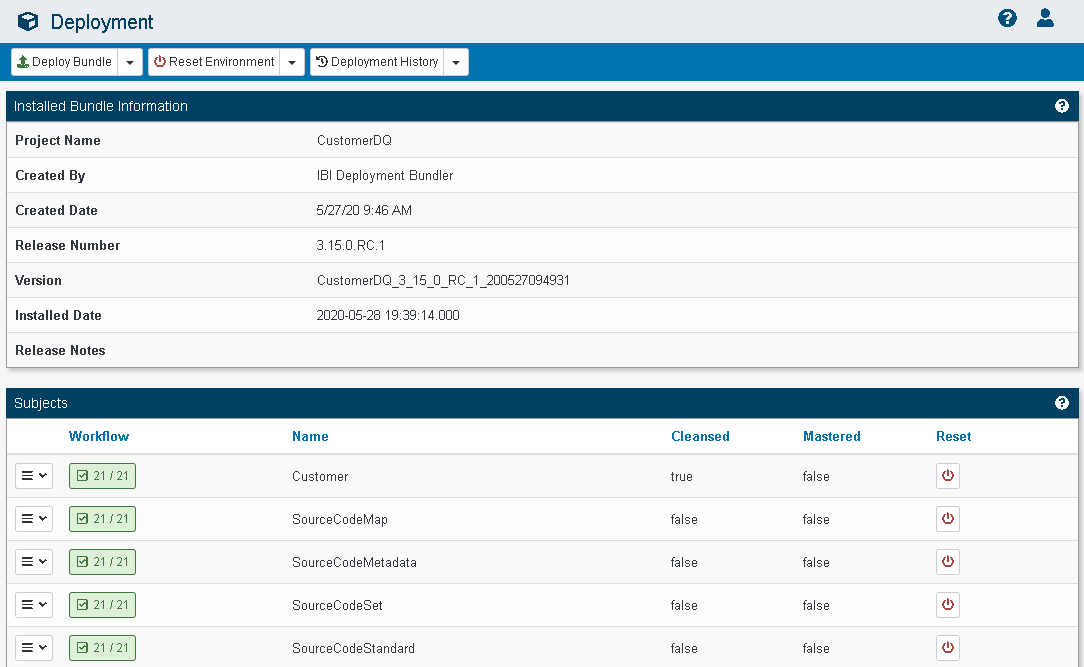
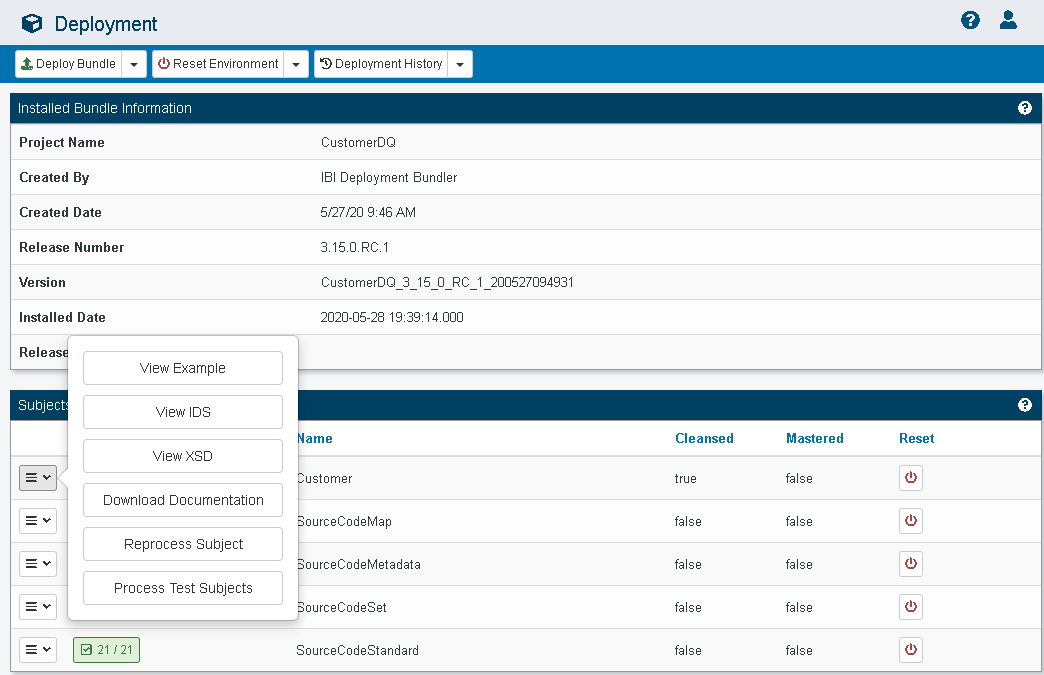
ROLE_OMNI_DEPLOYMENT_REPROCESS_SUBJECT
The following image shows the Console when the ROLE_OMNI_DEPLOYMENT_REPROCESS_SUBJECT privilege is assigned.
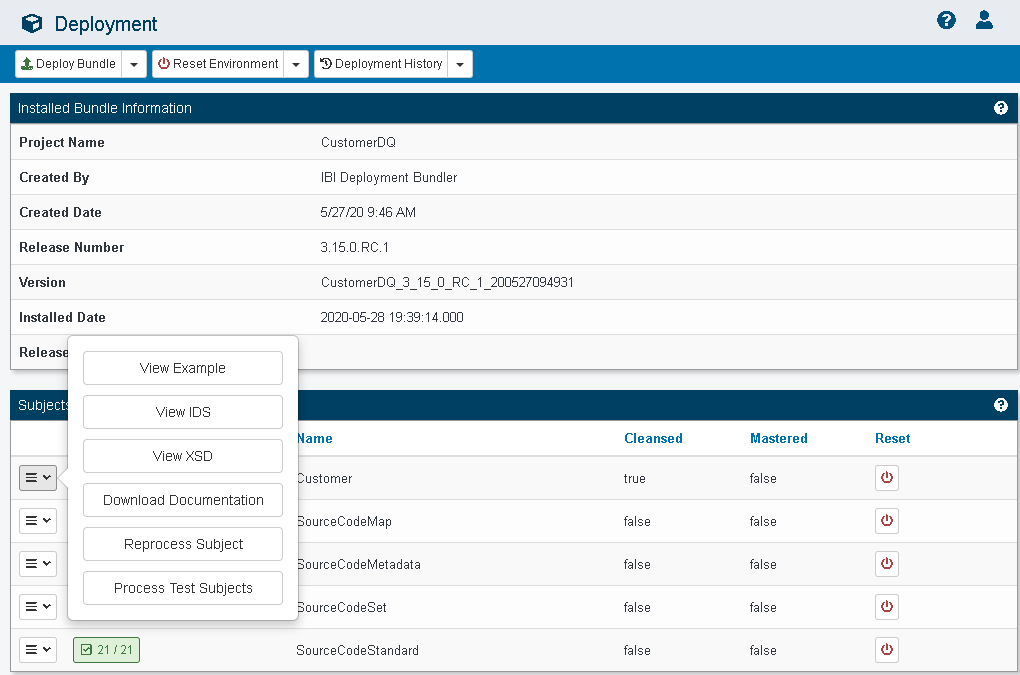
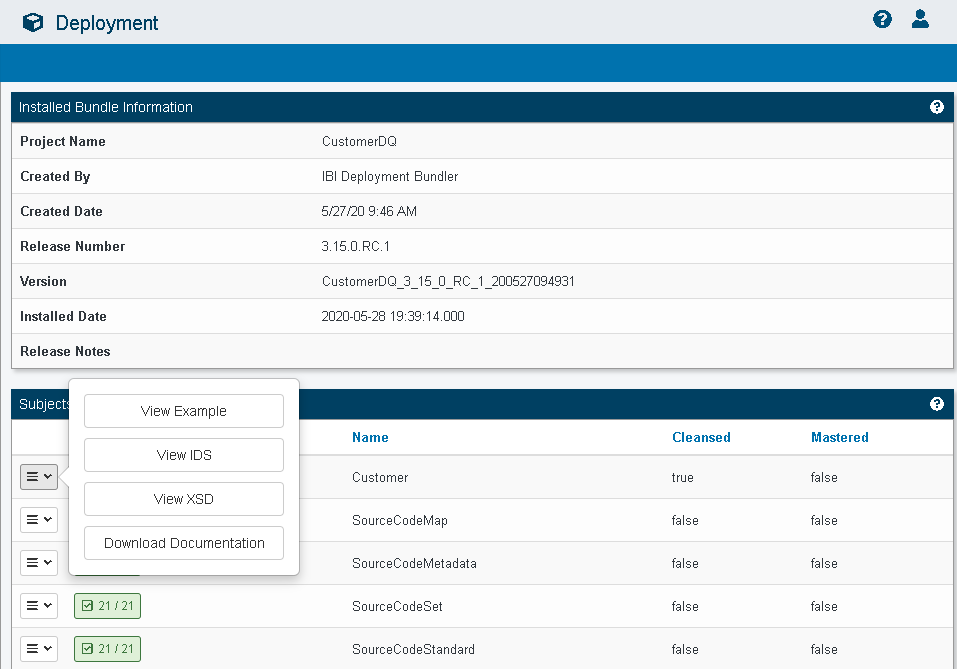
When the ROLE_OMNI_DEPLOYMENT_REPROCESS_SUBJECT privilege is not assigned, the Subject menu popup does not show the Reprocess Subject or Process Test Subjects buttons, as shown in the following image.
ROLE_OMNI_DEPLOYMENT_RUN_TESTS
The following image shows the Console when the ROLE_OMNI_DEPLOYMENT_RUN_TESTS privilege is assigned.
When the ROLE_OMNI_DEPLOYMENT_RUN_TESTS privilege is not assigned, the Subject menu popup does not show the Process Test Subjects and Reprocess Subject buttons, as shown in the following image.
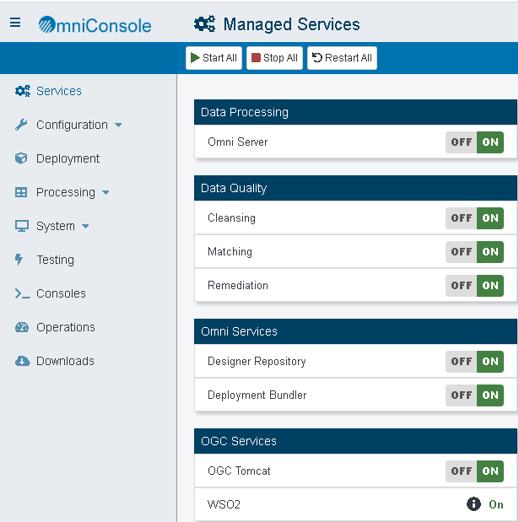
ROLE_OMNI_SERVICES_WRITE
The following image shows the Console when the ROLE_OMNI_SERVICES_WRITE privilege is assigned.
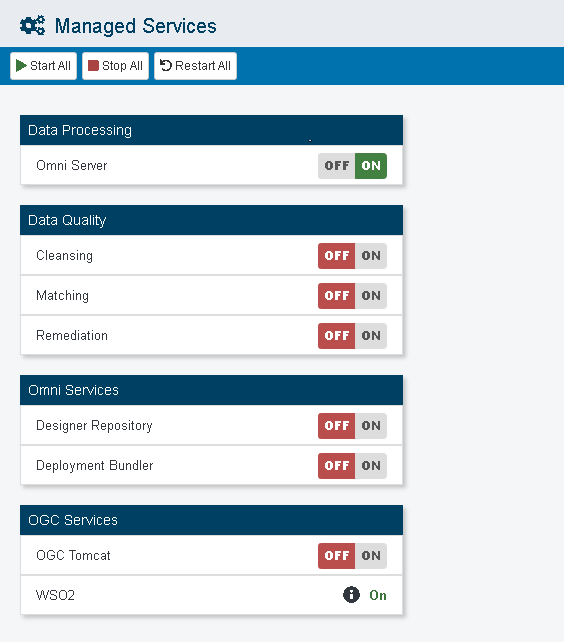
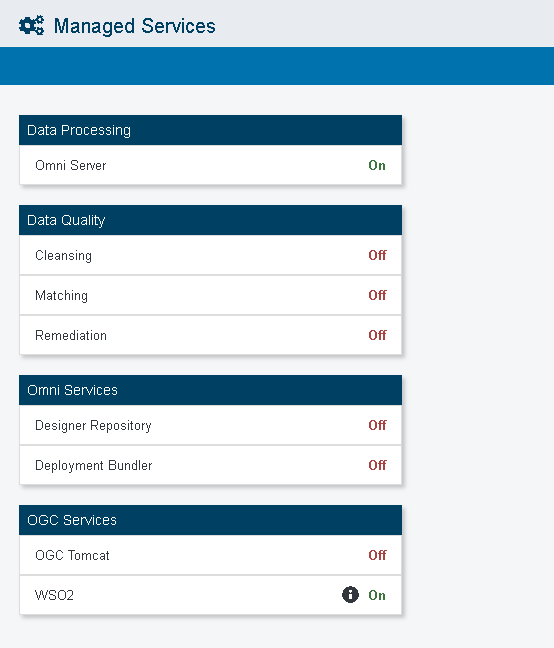
When the ROLE_OMNI_SERVICES_WRITE privilege is not assigned, the Start All and Restart All buttons are removed, as shown in the following image.
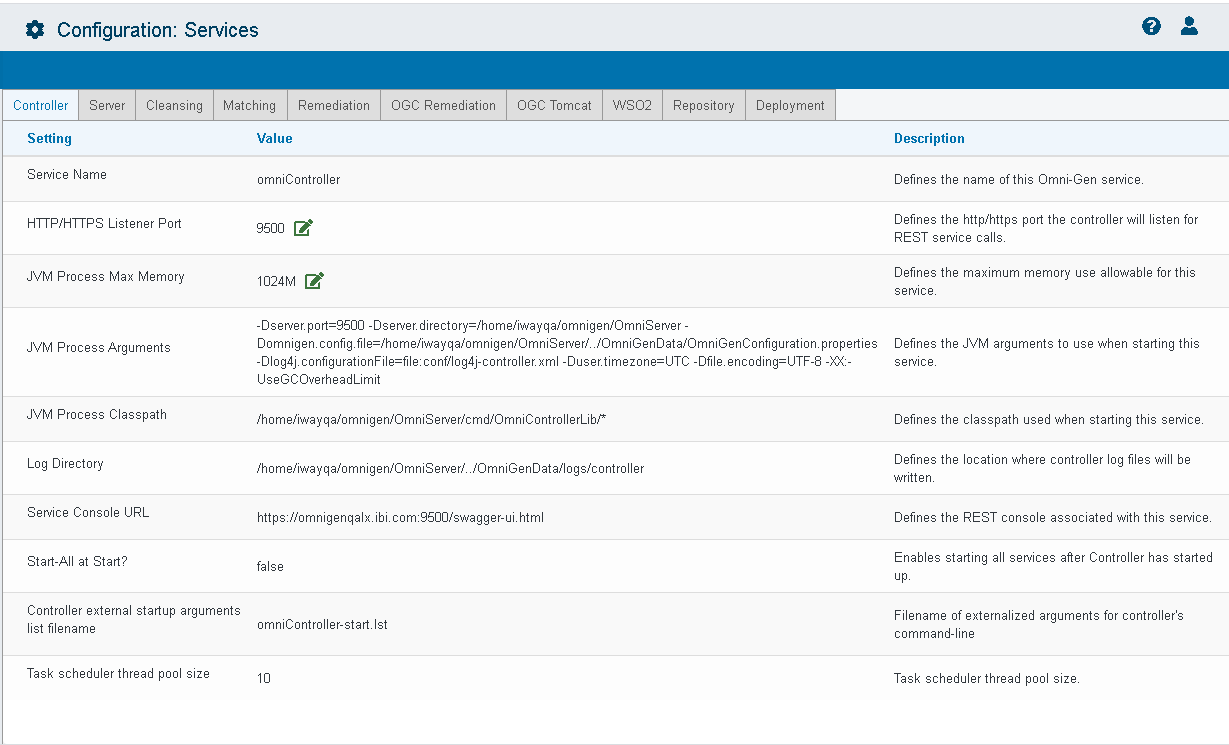
ROLE_OMNI_CONFIGURATION_WRITE
The following image shows the Console when the ROLE_OMNI_CONFIGURATION_WRITE privilege is assigned.
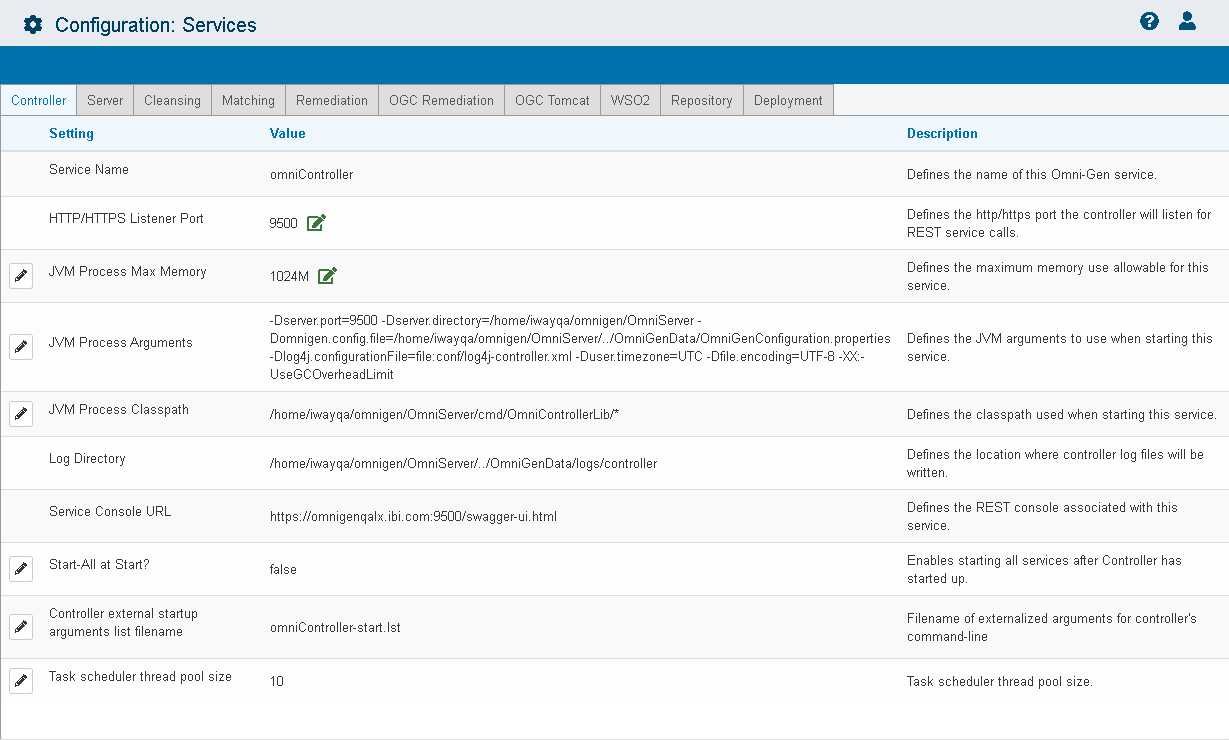
When the ROLE_OMNI_CONFIGURATION_WRITE privilege is not assigned, the configuration information will be read only. The Edit icon is removed for all properties, as shown in the following image.
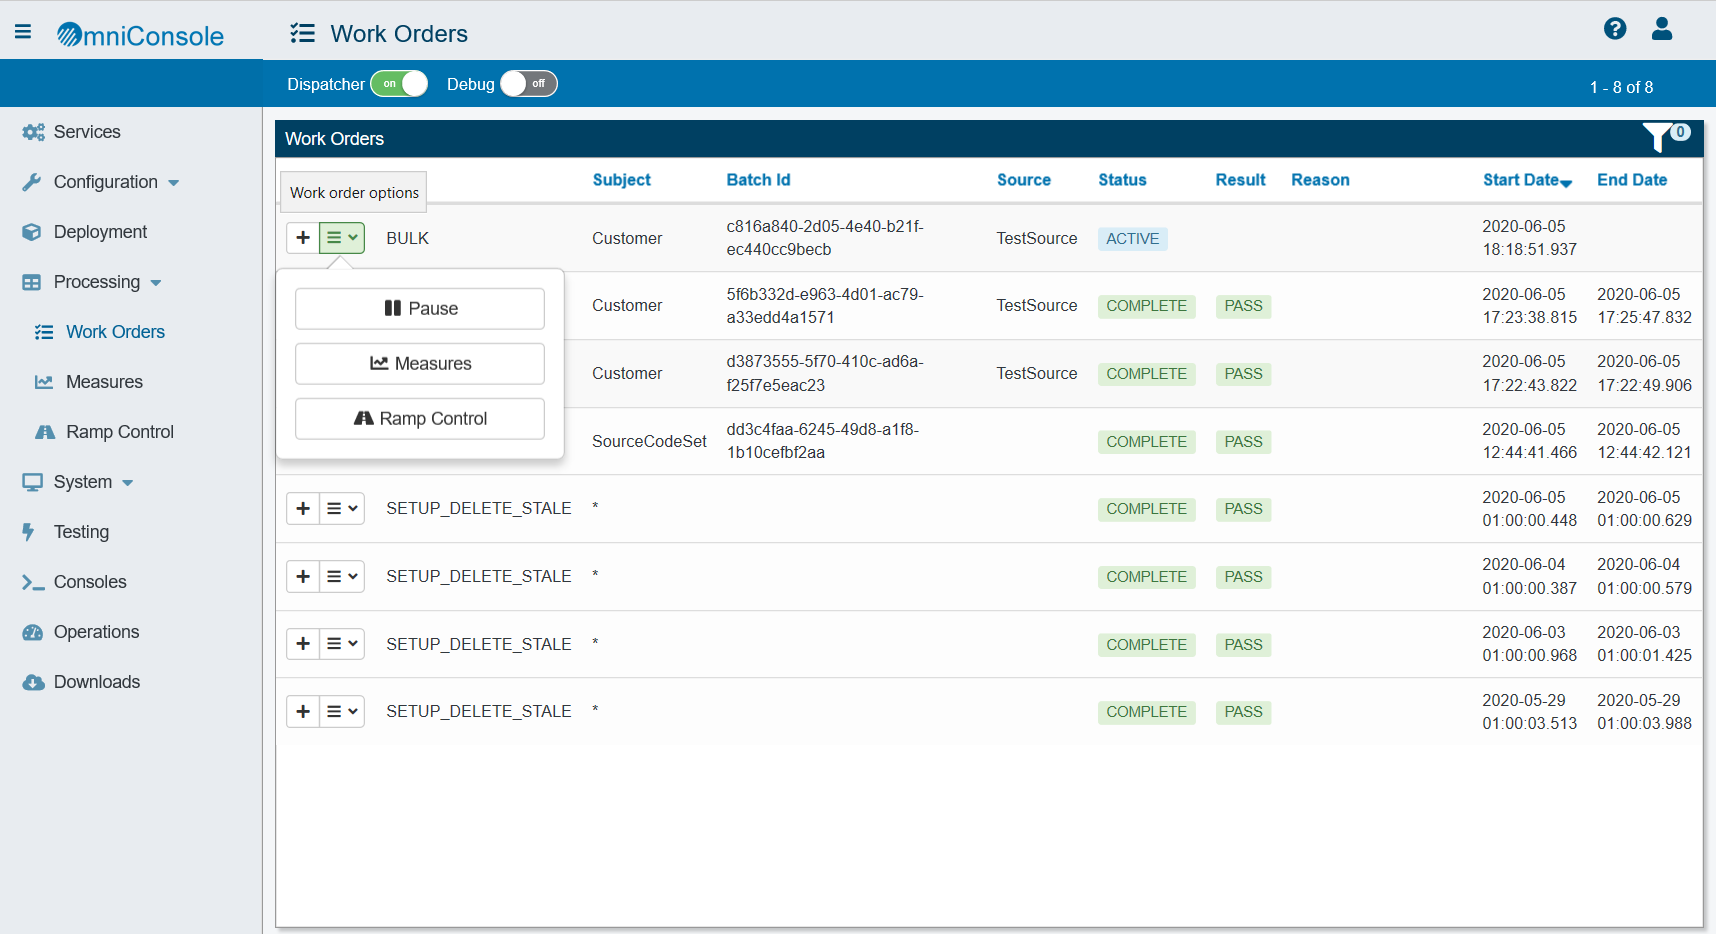
ROLE_OMNI_WORKORDER_WRITE
Using the ROLE_OMNI_WORKORDER_WRITE privilege, you can pause or resume something that has been paused. The following image shows the Console, with the Pause button, when the ROLE_OMNI_WORKORDER_WRITE privilege is assigned.
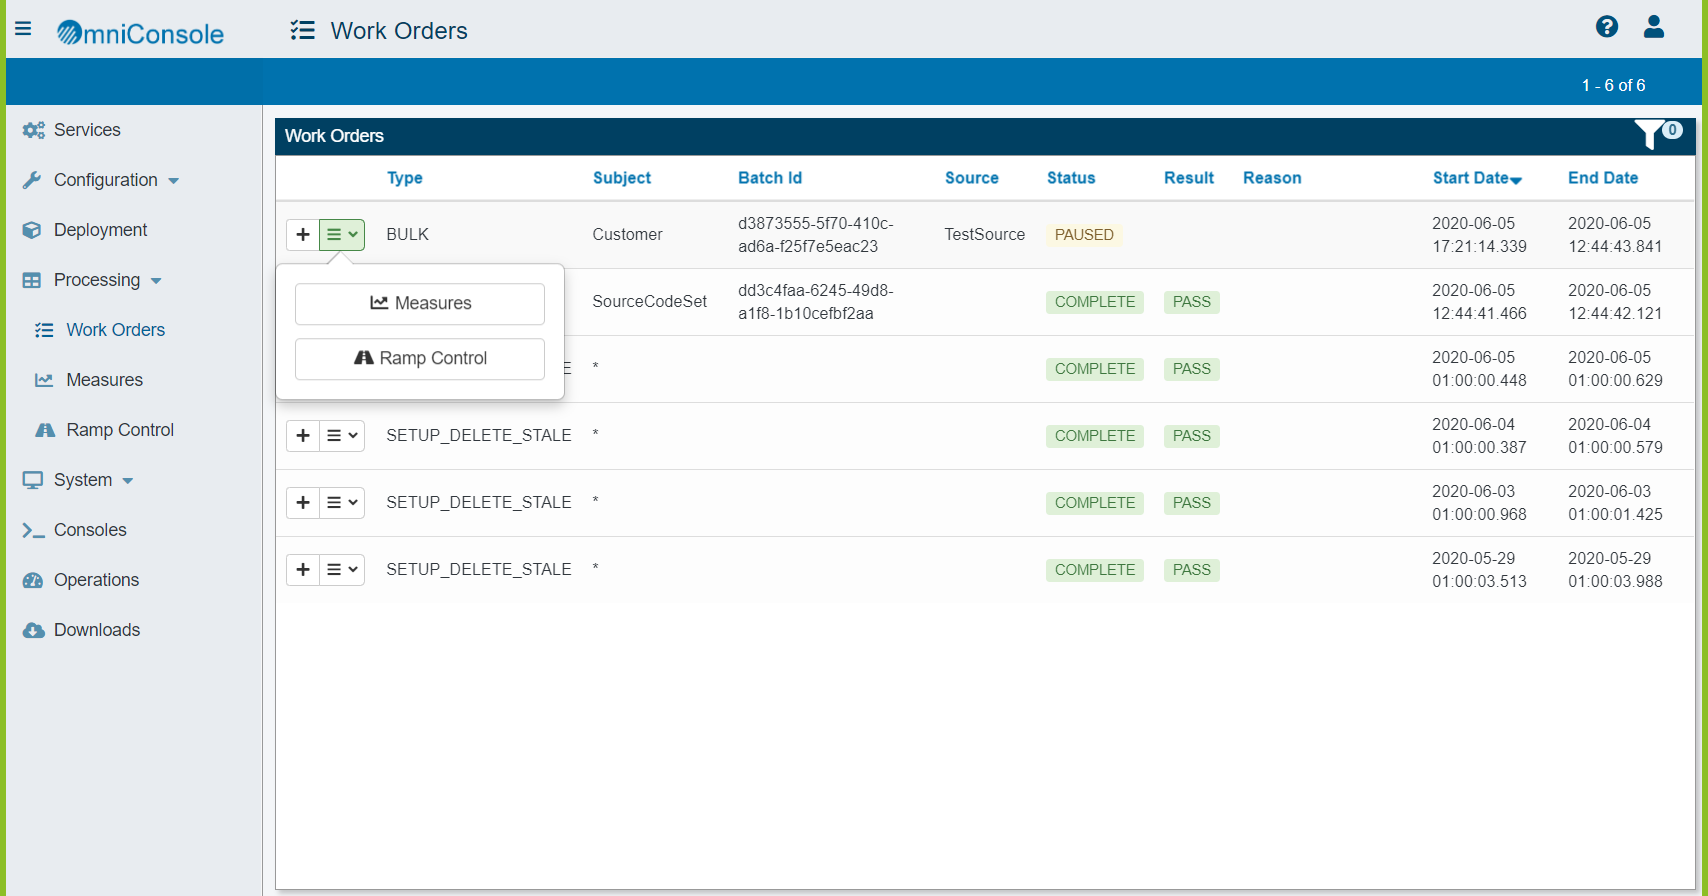
When the ROLE_OMNI_WORKORDER_WRITE privilege is not assigned:
- If the Work Order status is Active, the Pause button is not available.
- If the Work Order status is Paused, the Resume and Ignore buttons are not available.
- If the Work Order status is Failed, the Restart and Ignore buttons are not available.
The following image shows an example of the Console, when the ROLE_OMNI_WORKORDER_WRITE privilege is not assigned.
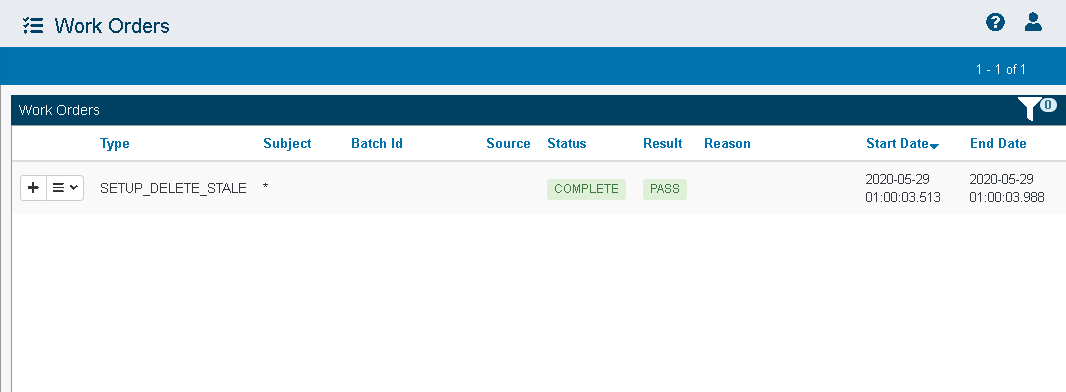
ROLE_OMNI_WORKORDER_DEBUG
The following image shows the Console when the ROLE_OMNI_WORKORDER_DEBUG privilege is assigned.
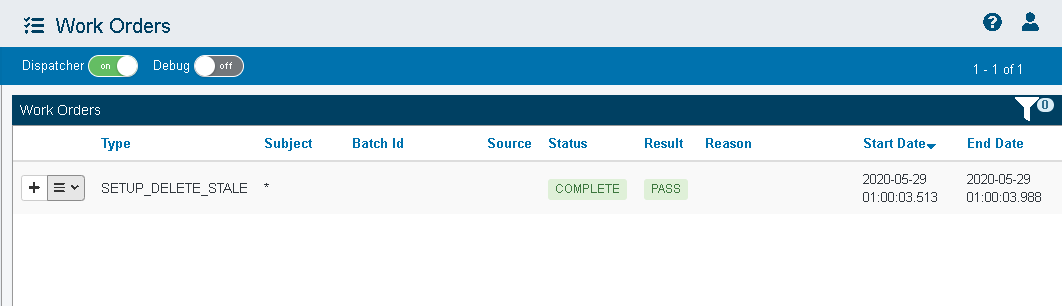
When the ROLE_OMNI_WORKORDER_DEBUG privilege is not assigned, the Debug toggle button is removed from the Work Orders screen, as shown in the following image.

ROLE_OMNI_WORKORDER_DISPATCHER
The following image shows the Console when the ROLE_OMNI_WORKORDER_DISPATCHER privilege is assigned.
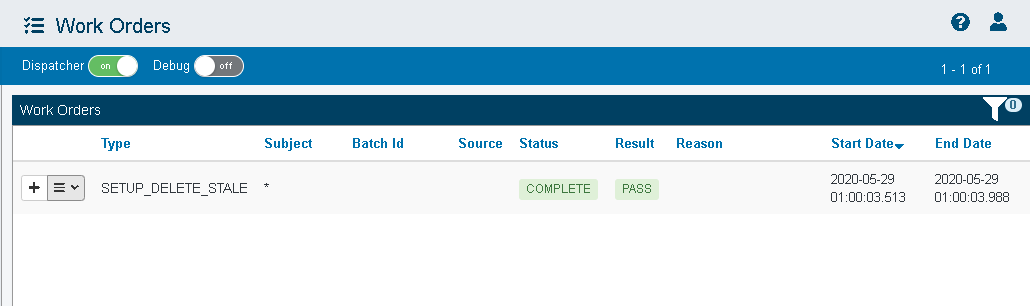
When the ROLE_OMNI_WORKORDER_DISPATCHER privilege is not assigned, the Dispatcher toggle button is removed from the Work Orders screen, as shown in the following image.
ROLE_OMNI_OPERATIONS_DOWNLOAD_DIAGNOSTICS
The following image shows the Console when the ROLE_OMNI_OPERATIONS_DOWNLOAD_DIAGNOSTICS privilege is assigned.
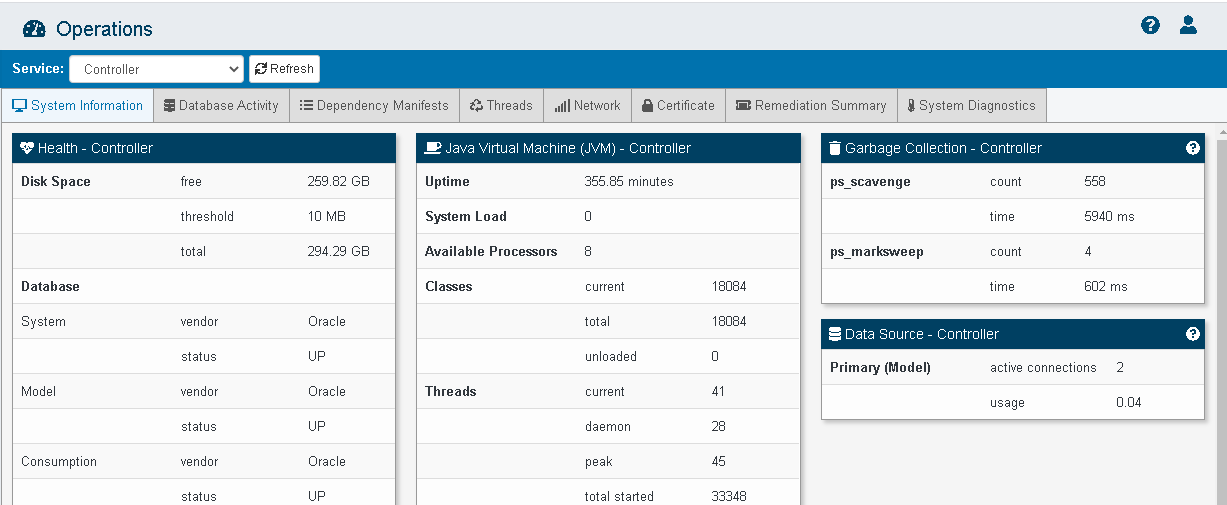
When the ROLE_OMNI_OPERATIONS_DOWNLOAD_DIAGNOSTICS privilege is not assigned, the Download Diagnostics tab is removed from the Operations page, as shown in the following image.

ROLE_OMNI_ALLOW_TESTING
The following image shows the Console when the ROLE_OMNI_ALLOW_TESTING privilege is assigned.
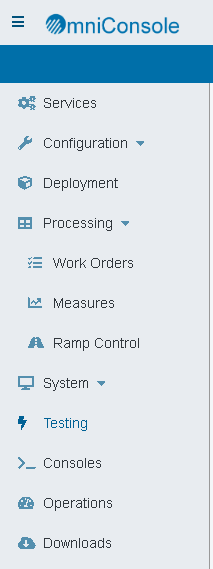
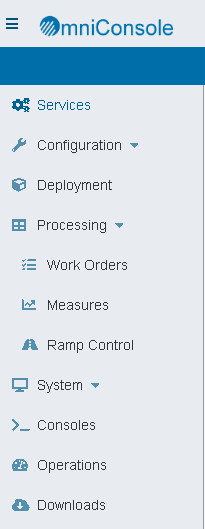
When the ROLE_OMNI_ALLOW_TESTING privilege is not assigned, the Testing link is removed from the left navigation menu, as shown in the following image.
ROLE_OMNI_CONFIG_DB_CONFIG_READ
The following image shows the Console when the ROLE_OMNI_CONFIG_DB_CONFIG_READ privilege is assigned.
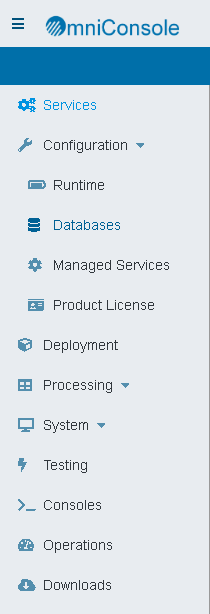
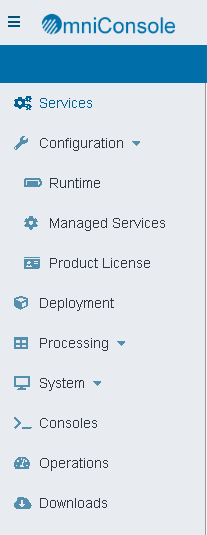
When the ROLE_OMNI_CONFIG_DB_CONFIG_READ privilege is not assigned, the Configuration Databases link is removed from the left navigation menu, as shown in the following image.
Using WSO2 to Create New User IDs
The following procedure describes how to use WSO2 to create new users and assign roles. You can create non-admin users, such as READONLY or OPERATOR, or additional users with administrative privileges.
Note: You must be a WSO2 admin to create the users and assign roles.
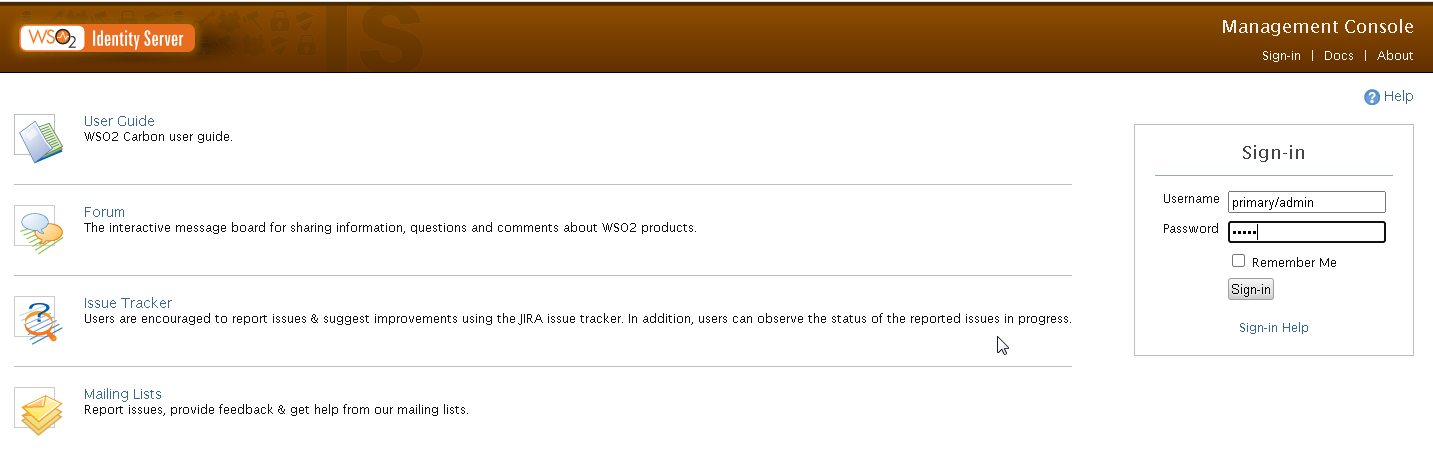
- Log in to the WSO2 Identity Server as an Administrator, as shown in the following image.
- Under Users and Roles, click Add, then click Add New User.
The Add New User pane opens, as shown in the following image.
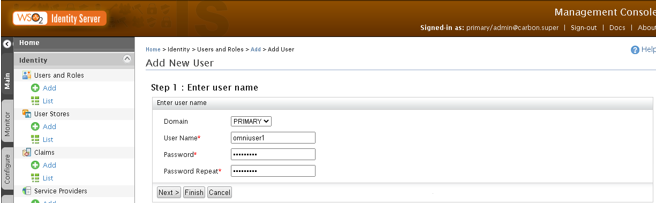
- Type the user name, password, password repeat, and then click next.
- In Step 2, select the Omni role or roles for the user, as shown in the following image.
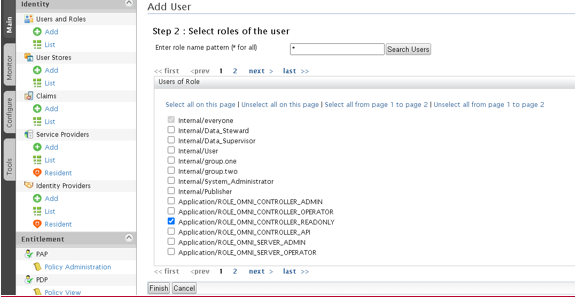
- Click Finish.
Note: If you log in to the Console with this newly created omniuser1 ID with the READONLY role, you will see the services displayed, but because it is a read-only user, you will not be allowed to change anything.
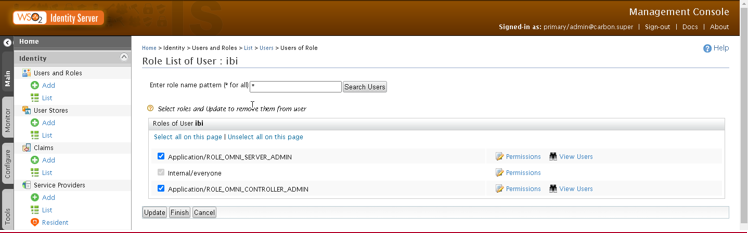
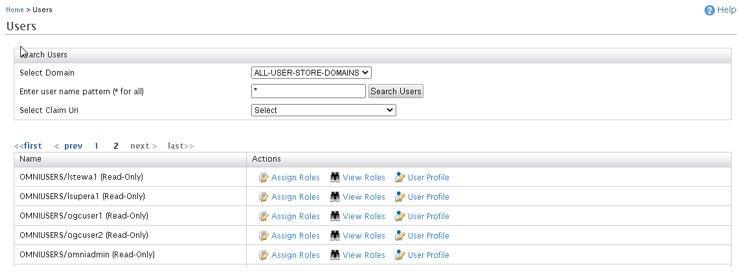
- To view the Users and their roles, under Users and Roles, click List, then Users, and then select View Roles.
The following image shows the roles assigned to the default user primary/ibi.
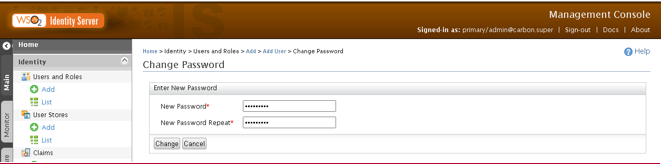
- To change the password for a user, under Users and Roles, click List and then select Change my Password. The Change Password pane is shown in the following image.
Authenticating Omni-Gen Console Users With Microsoft Active Directory/LDAP
|
Topics: |
As of Version 3.15, the Omni-Gen Console can use Active Directory/LDAP for authentication and authorization, by utilizing WSO2 user stores. The user store is created in WSO2 and configured with the user store manager class for LDAP.
The following topic details the procedure for configuring a WSO2 user store and configuring a WSO2-based LDAP connection allowing User ID authorizations to be obtained from Active Directory.
Note: You will need to consult with your Active Directory/LDAP administrator to obtain the information required to configure within WSO2.
In the WS02 System
-
Connect to the WSO2_IS System Administration Console, for example:
https://your-wso2hostname:port
-
Log in with the WSO2_IS administrator user name and password.
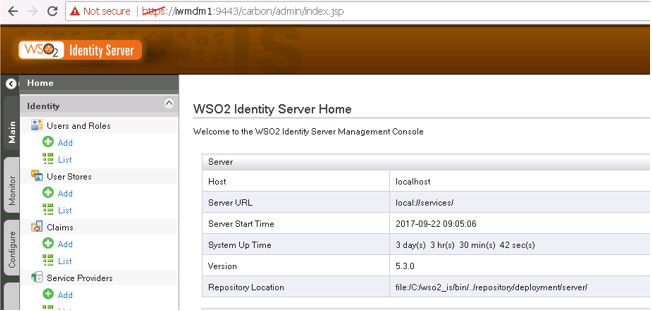
The WSO2 Identity Server Home page opens, as shown in the following image.
-
Select the Main tab on the left side of the Home page.
-
Select Identity, then select User Stores, and then select Add.
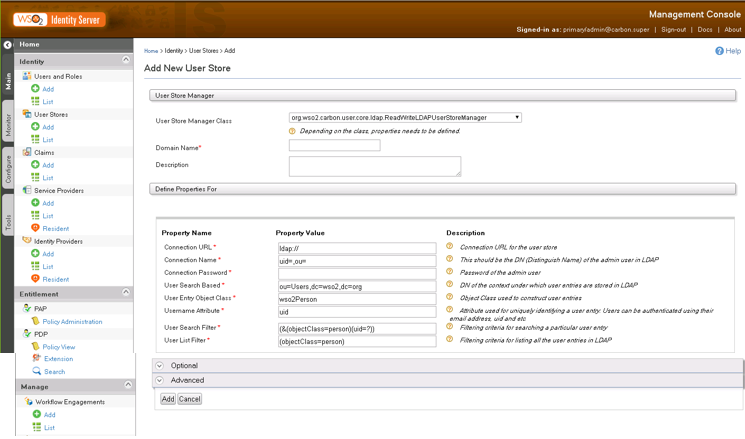
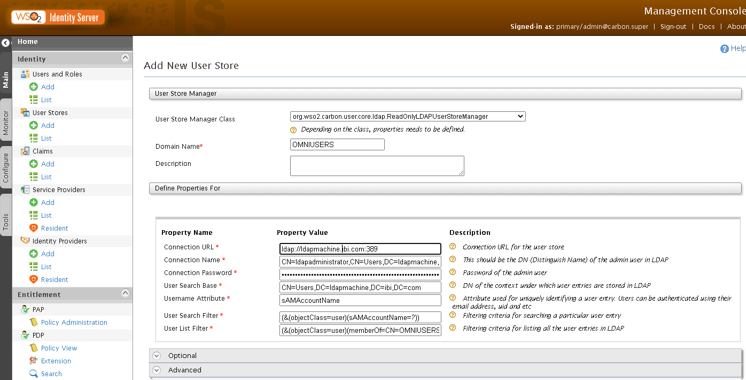
The Add New User Store pane opens, as shown in the following image.
-
Complete the Add New User Store pane by filling in the Property Value text boxes.
-
Change the User Store Manager Class drop-down to org.wso2.carbon.user.core.ldap.ReadOnlyLDAPUserStoreManager.
-
Type a Domain Name, for example, OMNIUSERS.
Note: This Domain Name will be used by all users logging in to the Omni-Gen Console. Users will connect as OMNIUSERS/_userid.
-
Type the appropriate information for your company’s Active Directory system.
Note: All parameters on this pane are required. When completed, your pane will look similar to the following image.
-
-
Expand the Optional section, as shown in the following image.

The following parameters must be entered:
Display name attribute

Read Groups

Group Search Base

Group Name attribute

Membership Attribute
member

Enable Escape Characters at User Login
Selected
-
Click Add.
-
Confirm the User Stores are being Updated.
In the Active Directory/LDAP System
|
Topics: |
Once the user store is created in WSO2, log in to Active Directory. In Active Directory, you need to create groups for the roles used by Omni-Gen and assign Active Directory users to the appropriate groups.
Note: You will need to consult with your Active Directory/LDAP administrator to obtain the information for this configuration.
Creating a User
-
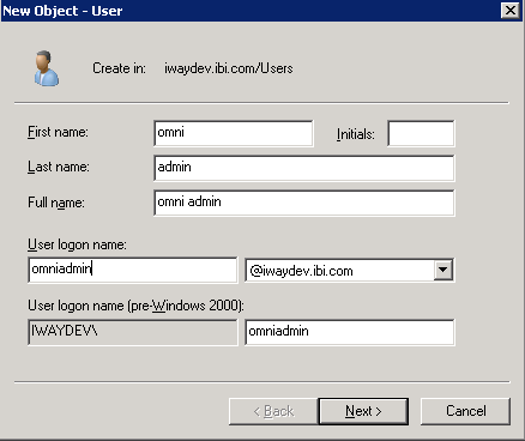
In Active Directory, on the Active Directory Users and Computers left pane, right-click Users, then select New, and then select Users.
The New Object - User dialog box opens.
-
Type the first name, last name, full name, and user logon name, as shown in the following image.
-
Click Next.
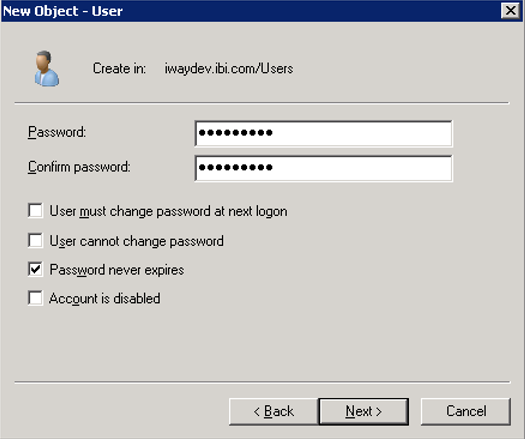
A second New Object - User dialog box opens, for you to set the password.
-
Type and confirm the password, as shown in the following image. Select or deselect User must change password at next logon and Password never expires, as is appropriate for your company.
-
Click Next.
-
Click Finish.
Creating a Group in Active Directory
A special group needs to be created for the Active Directory users to display in WSO2. Groups also need to be created for the Omni roles.
The following Group names should be created:
- OGCUSERS
- ROLE_OMNI_CONTROLLER_ADMIN
- ROLE_OMNI_CONTROLLER_READONLY
- ROLE_OMNI_SERVER_ADMIN
- ROLE_OMNI_SERVER_OPERATOR
- ROLE_OMNI_SERVER_READONLY
- ROLE_OMNI_SERVER_API
- ROLE_OMNI_CONTROLLER_API
-
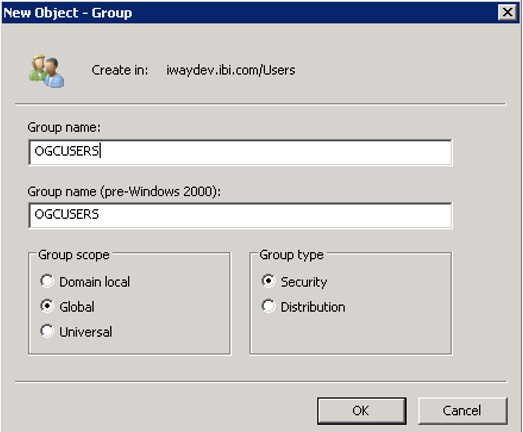
In Active Directory, on the Active Directory Users and Computers left pane, right-click Users, then select New, and then select Group.
The New Object - Group dialog box opens.
-
Type the group name, leave the Group scope option as Global, and leave the Group type option as Security, as shown in the following image.
-
Click OK.
-
Repeat the process to create groups for the Omni roles.
Once the groups are created, users must be assigned to the appropriate groups depending on the Omni-Gen privileges they require.
Note: All Omni-Gen users must be members of the OGCUSERS group and at least one other Omni group.
Adding a User to a Group
-
Right-click the group name, select Properties, and then select Members.
-
Click Add.
-
Type the first name or Login ID in the Enter the object names to select field box.
-
Click Check Names.
-
Click OK, then click Apply, and then click OK to exit the Group Properties dialog box.
Repeat this process to add members to all the newly created Omni groups.
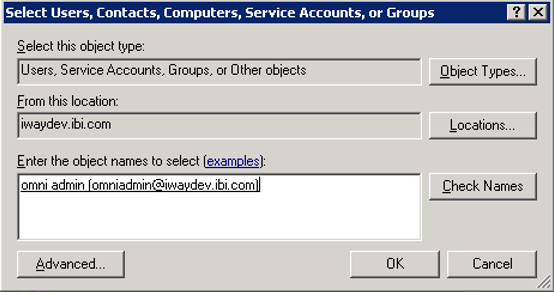
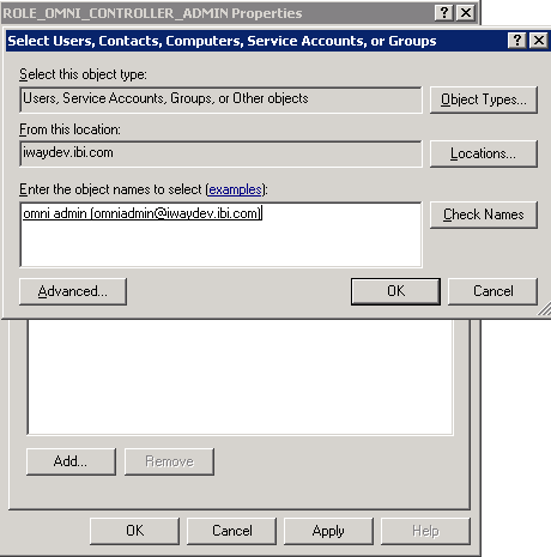
The following image shows that the omniadmin user is also added to the ROLE_OMNI_CONTROLLER_ADMIN group.
-
Return to WSO2 and you will see that the Active Directory user, omniadmin, appears in the list of users.
Testing the Login to the Omni-Gen Console
-
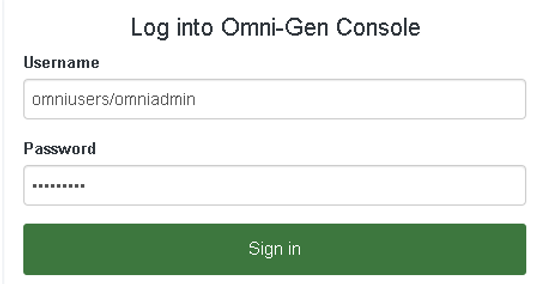
Verify that you can connect to the Omni-Gen Console with the newly created Active Directory user ID, as shown in the following image.
-
Click Sign in.
The Omni Console opens, as shown in the following image.
WSO2 Functions
Omni provides some utilities of WSO2 for frequently utilized functions. These utilities are accessed through the omni.sh (for Linux and UNIX) or omni.bat (for Windows) script, found in the omnigen/OmniServer directory of the Omni installation.
These utilities are not meant to replace the full capabilities of WSO2. Depending on your particular needs, you may still need to access the WSO2 console to properly provision WSO2 entities. For example, if you are creating your own set of users, this work would still be performed in WSO2.
These utilities are not meant to replace the full capabilities of WSO2. Depending on your particular needs, you may still need to access the WSO2 console to properly provision WSO2 entities. For example, if you are creating your own set of users, this work would still be performed in WSO2.
|
Command |
Description |
|---|---|
|
omni.sh wso2-config-list |
Displays current settings for WSO2 host name, WSO2 port, WSO2 admin user name, and WSO2 admin password. |
|
omni.sh wso2-config-host -Dconfig.value=<newHost> |
Allows you to specify a different WSO2 host name for the machine on which WSO2 is running. For example: -Dconfig.value=localhost |
|
omni.sh wso2-config-port -Dconfig.value=<newPort> |
Allows you to specify a different WSO2 port where WSO2 is running. For example, -Dconfig.value=9503 |
|
omni.sh wso2-config-username -Dconfig.value=<newUser> |
Allows you to specify a different WSO2 admin user name. This user is used to create and update users, roles, and policies in WSO2 for use by Omni components. For example: -Dconfig.value=primary/admin |
|
omni.sh wso2-config-password -Dconfig.value=<newPass> |
Allows you to specify a different WSO2 admin password. For example: -Dconfig.value=mypassword |
|
omni.sh wso2-load-entities |
Causes Omni to push the WSO2 entities (users, roles, and policies) that it uses to the configured WSO2. It presupposes that a WSO2 is running at the configured host name and port, and that the admin user name and password allow access to the WSO2. The command will fail if this configuration is incorrect. Note: If an entity already exists in WSO2, it is first deleted before being created. Any manual modification to an entity will be lost as a result of this command. |
Note:
- On Windows platforms, change omni.sh to omni.bat in the above commands.
- Omni services, including the Omni Controller, should all be stopped before running any of these commands. Omni services will
load the WSO2 values at service-startup time, and changing a WSO2 value after the fact may not be reflected in a running Omni
service. Issue the following command prior to running the above commands:
omni.sh stop-all
High Availability Web Services
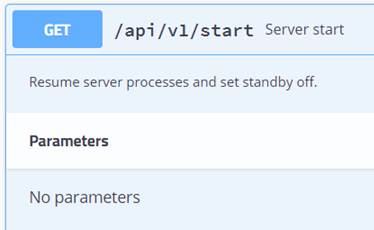
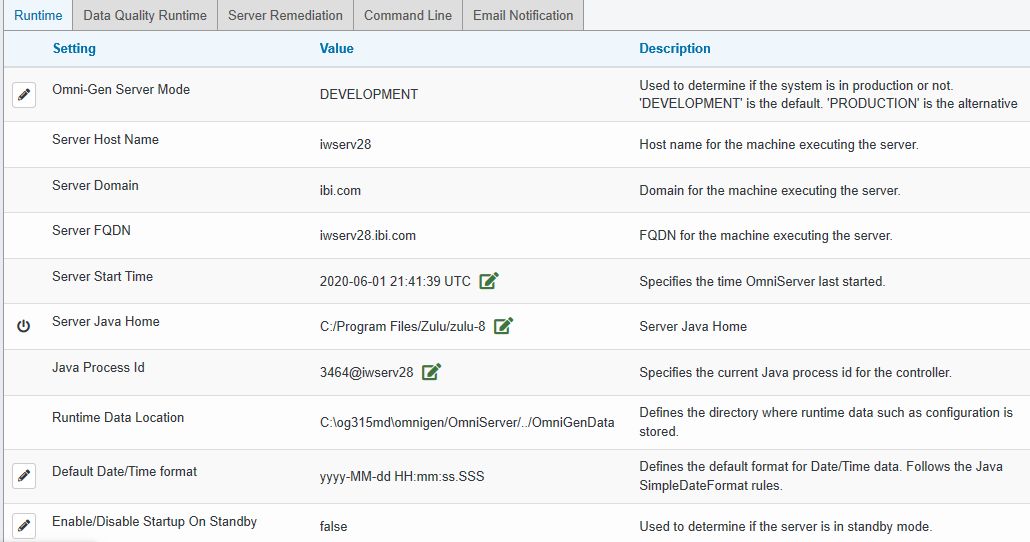
As of Version 3.15, to support High Availability, an Omni Server can be configured to run as a backup to an active server. While waiting on standby, all activity, including work order processing and background processes, is suspended. In the event of a server failure, the backup server can be activated through a web service. A web service can also be used to stop all server activity. A system message will be written when a server is activated and when it is stopped.
The Enable/Disable Startup On Standby setting in the Omni Console, under the Configuration, Runtime tab, is used to determine if the server is in standby mode. You can enable or disable this feature through the configuration or at run time using the REST API Server Endpoint start and stop services, available in the Swagger UI Server service.
Note: The setting should be updated as part of the initial configuration of the backup server. After that the Endpoints control the state of the server.
The Server start service and syntax is shown in the following image.
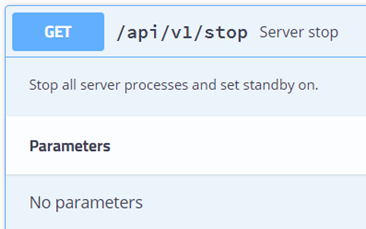
The Server stop service and syntax is shown in the following image.
When the Enable/Disable Startup On Standby setting is true, all server processes will be stopped until the REST API Server Endpoint start service is called to resume server processing. The default value is false.
The Runtime tab, with the Enable/Disable Startup On Standby setting is shown in the following image.
SAML for Omni Governance Console Authorization
As of Version 3.15, SHA256 encryption is supported when using a SAML connection for Omni Governance Console authorization.