Data Tables
|
Topics: |
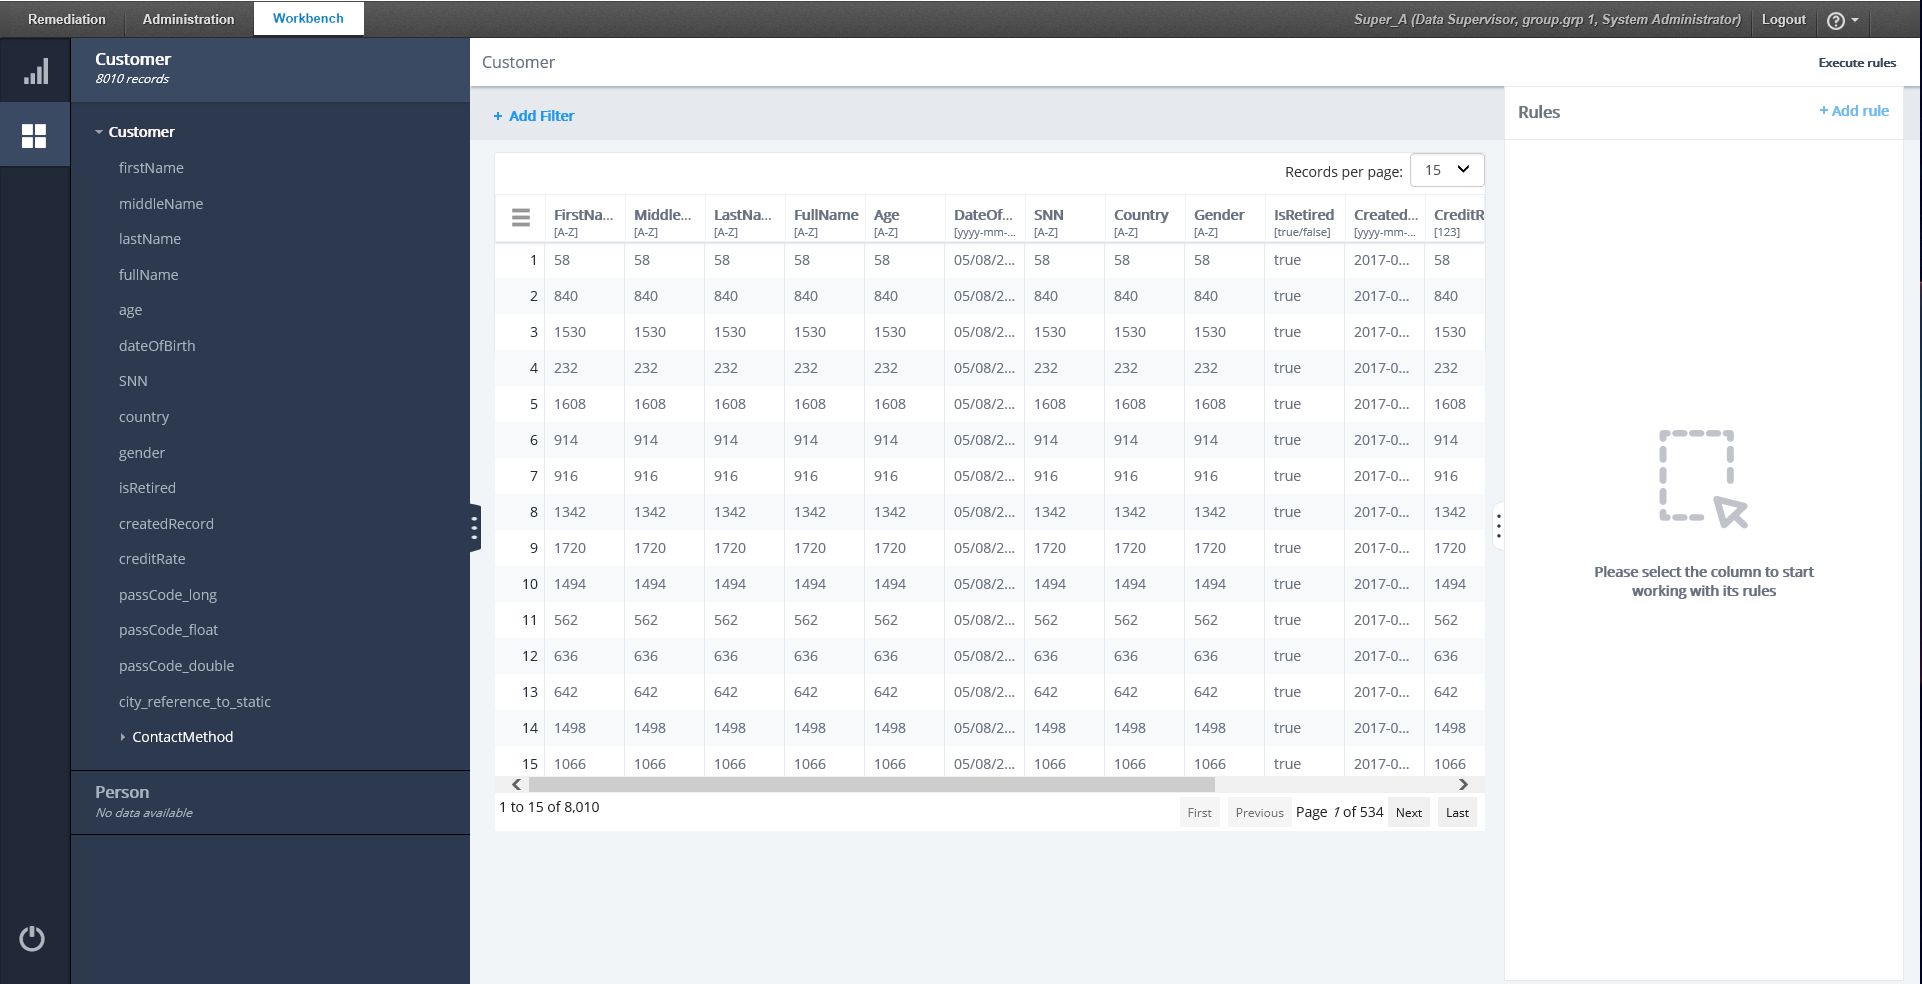
The Data table shows the data for the selected subject in the data tree. It contains columns also named as attributes.
The main operations that can be performed from the Data table include Add Quick Operation and Add to Filter.

You can sort data in ascending and descending order, and reset sorting (which appears only after some initial sorting was performed). You can also hide some columns or compare them to the original (source).

You can also Hide and Show columns, and enable the Compare to Original mode from the menu.

When you navigate to the Data table page, the first table column is selected by default and the On-Screen filter will be collapsed. You can deselect a column by clicking the column header.

Table
|
Topics: |
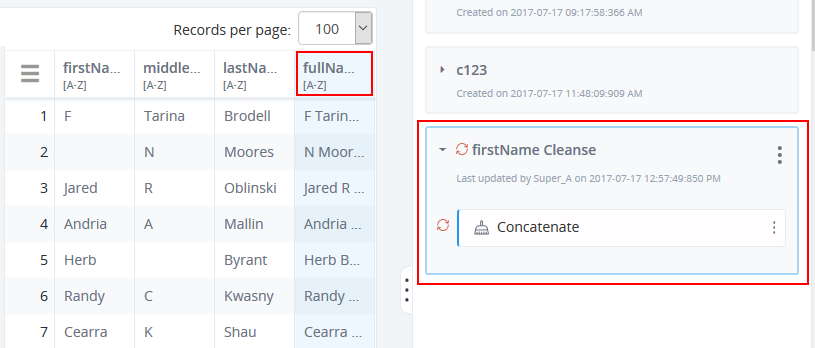
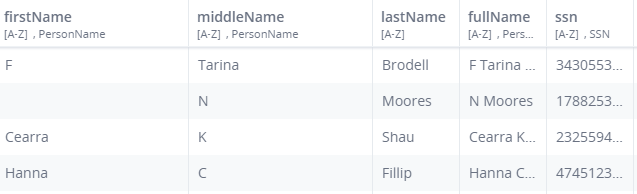
One of the main functions of the Data table is the table where all data is displayed. By default, 100 records are displayed and the first column is selected.

The following list shows the primary components of the table, corresponding to the image above:
- Menu
- Table header
- Number of Records per page
- Record numbering
- Data
- Number of records per page and number of all records
- Pagination
If you select an attribute in the tree, the corresponding breadcrumbs path appears as well as the corresponding table attribute that should be selected:
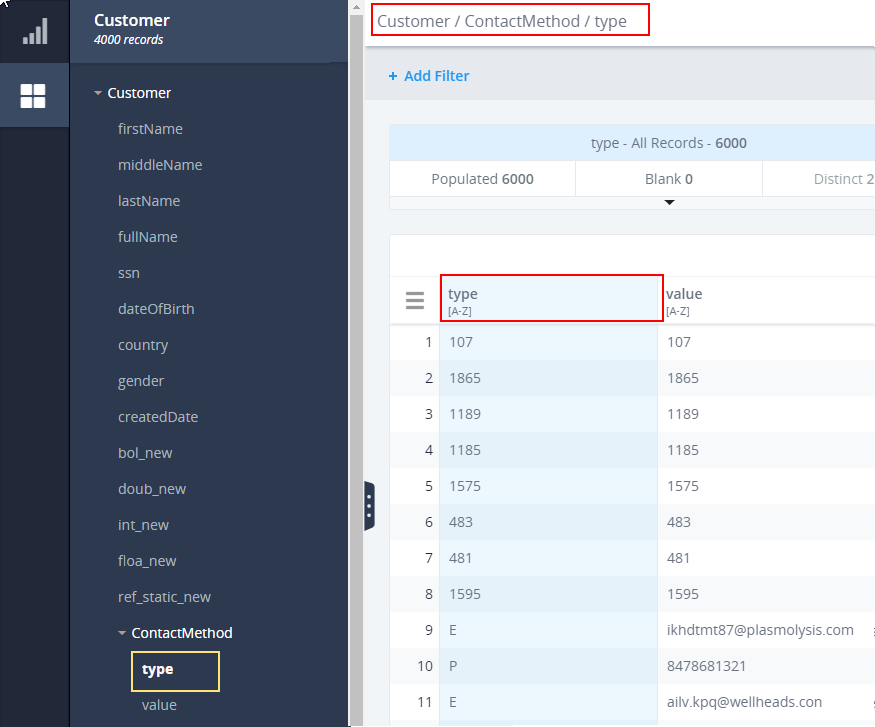
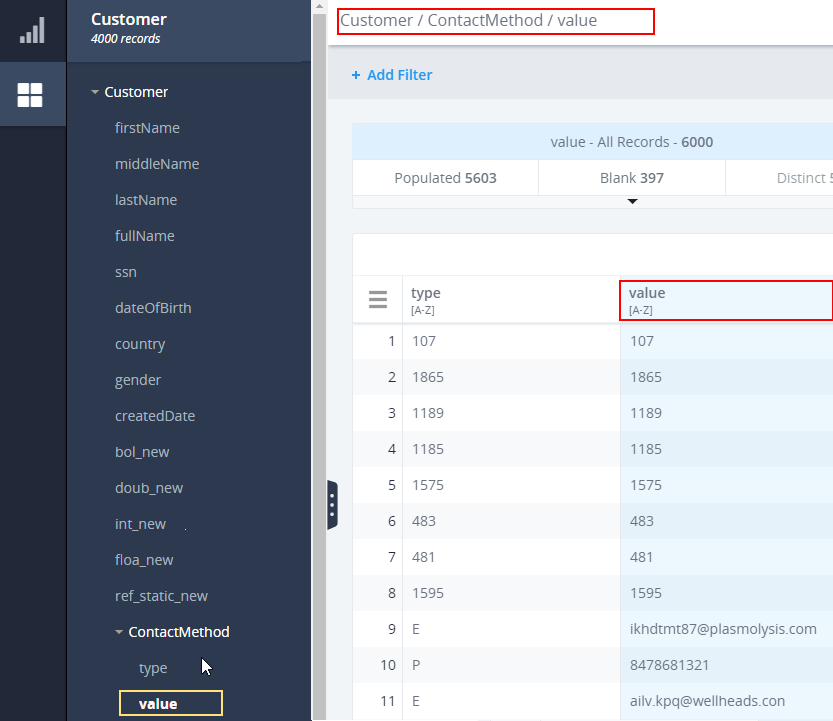
If you select another table or tree attribute, it will automatically update in the breadcrumbs path, table, and model tree:
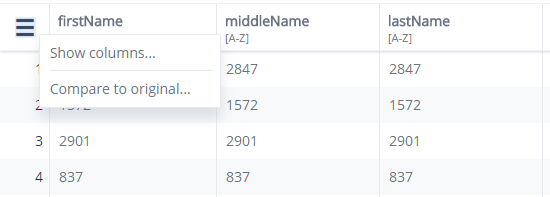
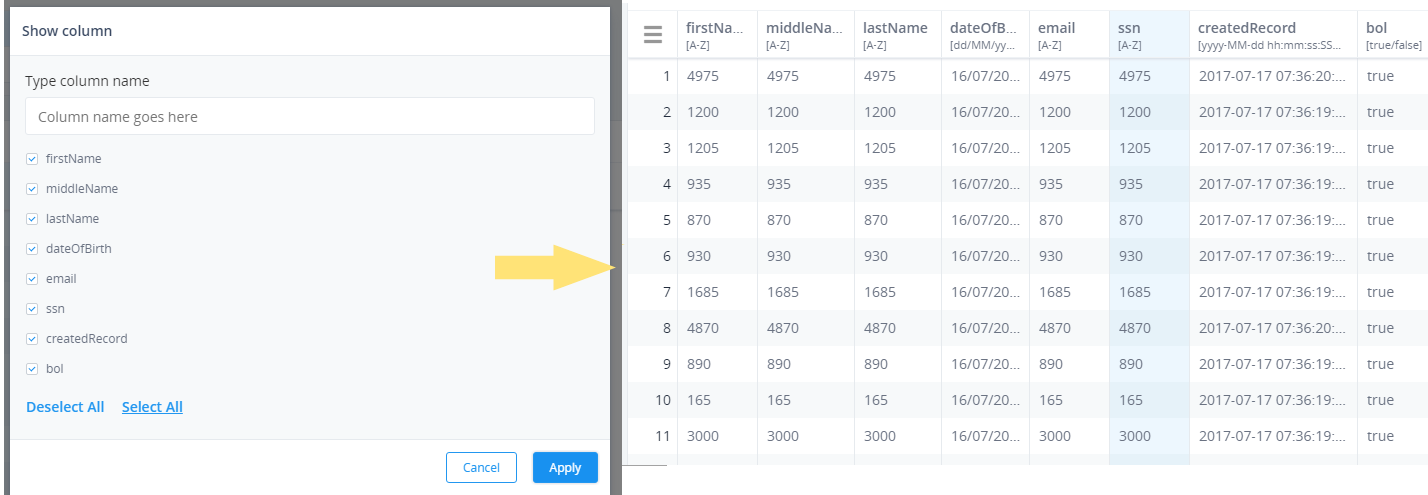
The menu allows you to configure the view of the table. Once you click the menu icon, the Show columns and Compare to original options are available, as shown in the following image.
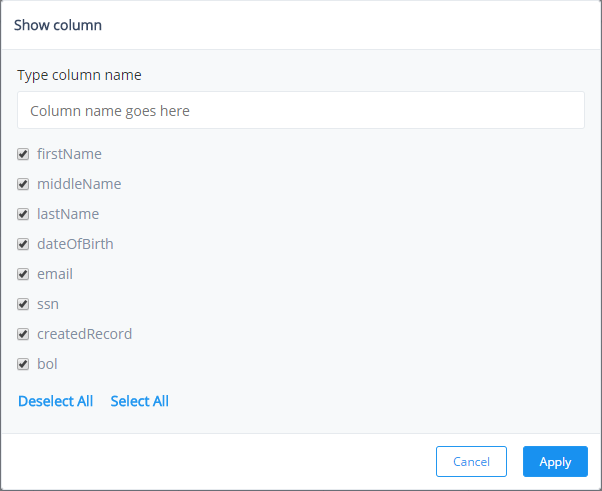
The Show column option opens a dialog consisting of all table columns. The selected columns will appear in the table.
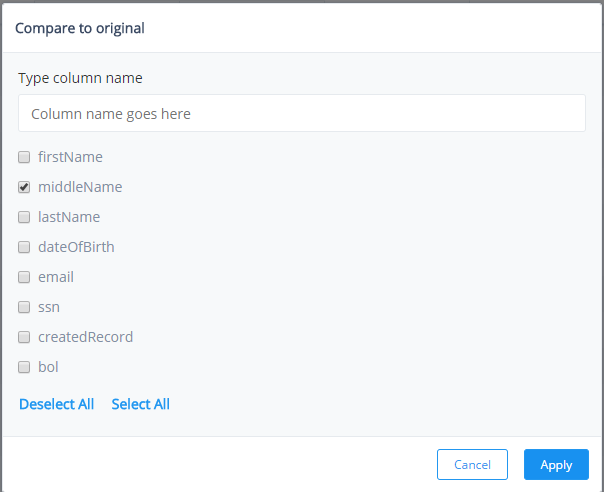
The Compare to original option opens a dialog listing all columns which are cleared by default. This dialog turns on Compare to original mode for the selected columns.
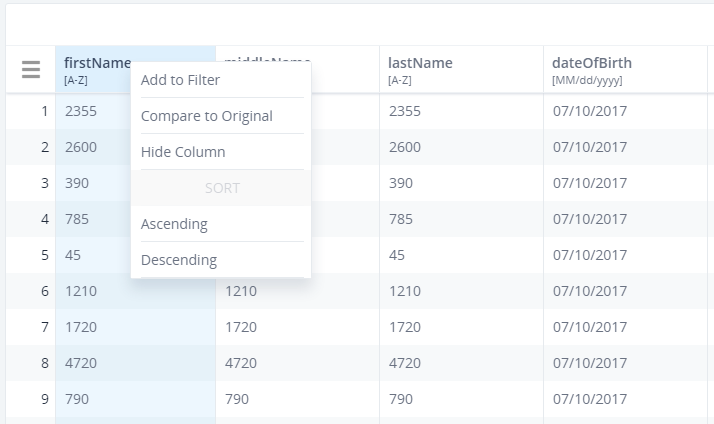
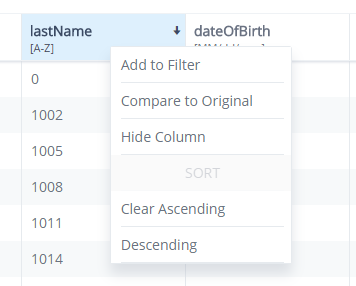
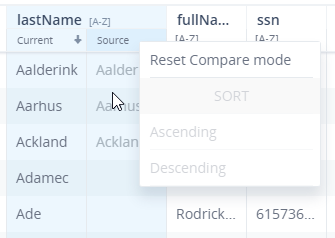
You can right-click on any column header to see the context menu. It contains the following options: Add to Filter, Compare to original, Hide Column, (Sort) Ascending, and Descending.
The Column header consists of a field (attribute) name and type label. Data Types of the attributes (columns values) are displayed in the table header so you can see what data type you are working with:
- String data type is represented with [A-Z] characters.
- All numeric data types (Integer, Long, Double, Float) are represented with [123] characters.
- Date data type is represented with [MM-dd-yyyy] labels.
- DateTime data type is represented with the [yyyy-MM-dd hh:mm:ss:SSS a] label.
- Boolean data type is represented with the [true/false] label.

Columns can be resized if needed.
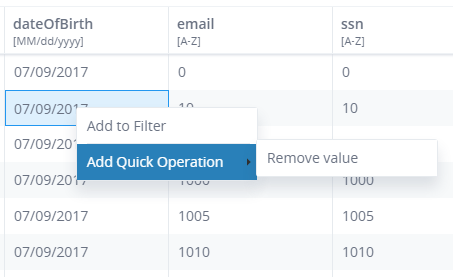
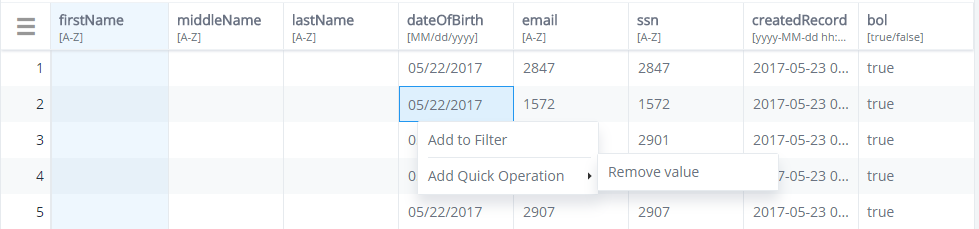
You can open the context menu for every table cell by right-clicking on it.
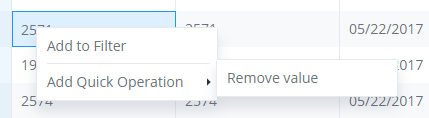
The following options appear in the context menu: Add to Filter and Add Quick Operation. The Add Quick Operation allows you to select more options containing a list of all available operations (for example, "simple = false") in the corresponding .xml file.
Table Sorting
You can sort and reset the table values in ascending or descending order.
Showing and Hiding Columns
You can show and hide columns in the Data table by right-clicking the column header and selecting Hide Column from the context menu.
You selection is saved within a session. The column will be hidden from that moment on.
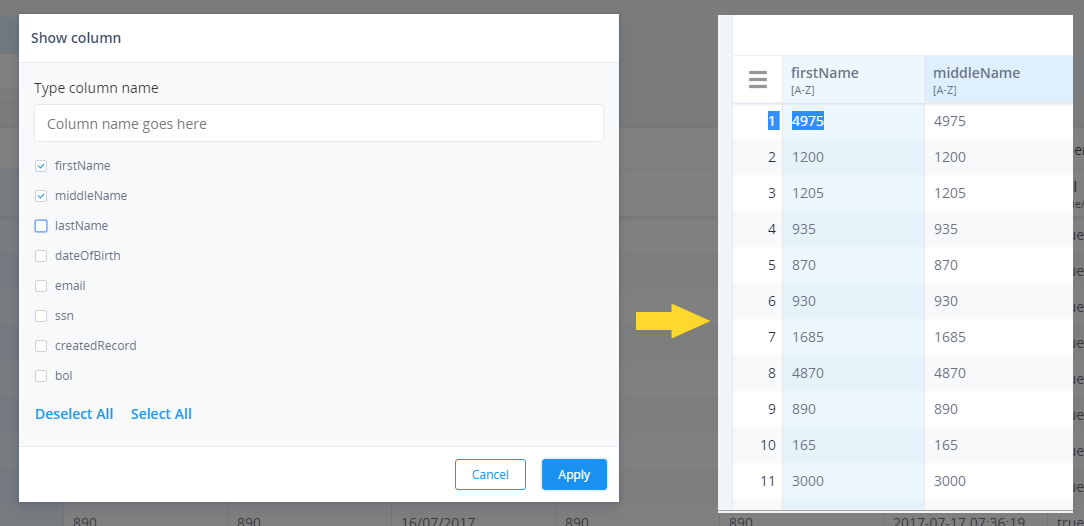
You can make the column visible again by clicking on the menu icon and selecting Show column, and then clicking on the columns you wish to view.
Compare to Original
You can split a column to enable the Source-Current values comparison by right-clicking and selecting Compare to original. To revert from the Compare mode, right-click the configured column and select Reset Compare mode.
The Add to Filter and Sorting functionalities are not implemented yet.
Filter Panel
|
Topics: |
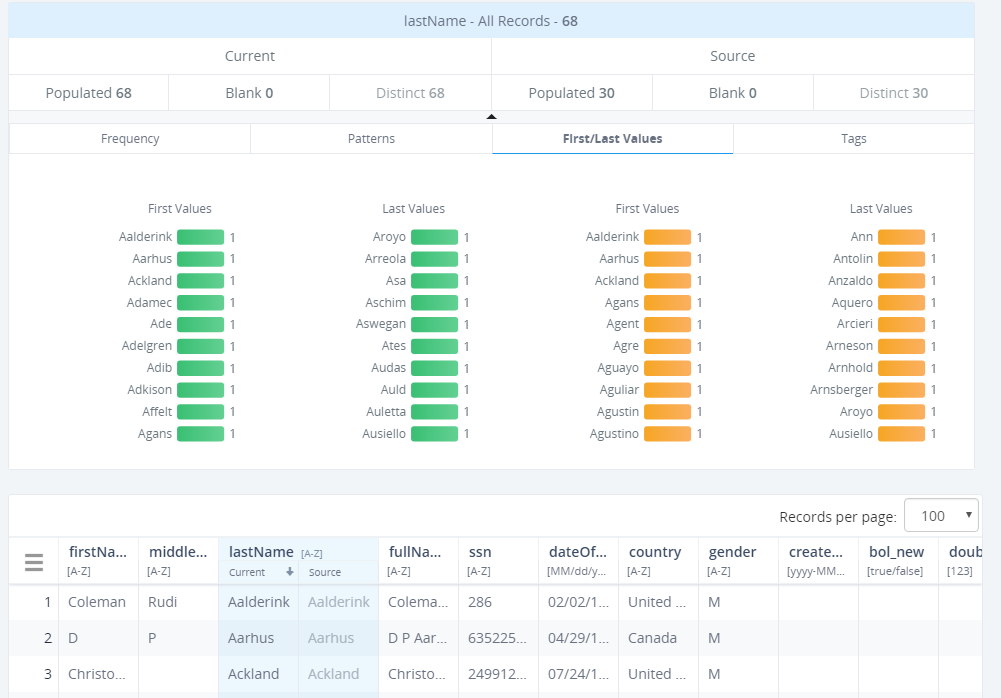
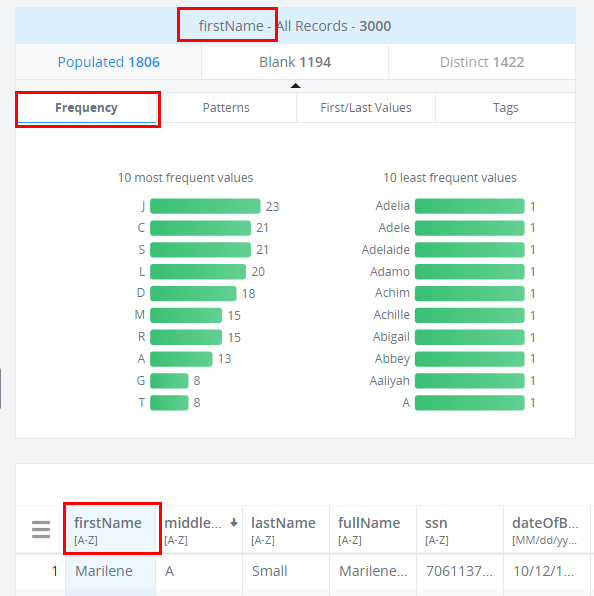
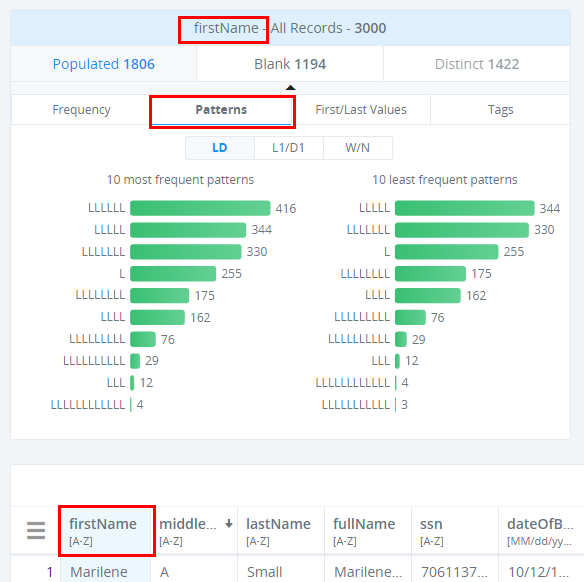
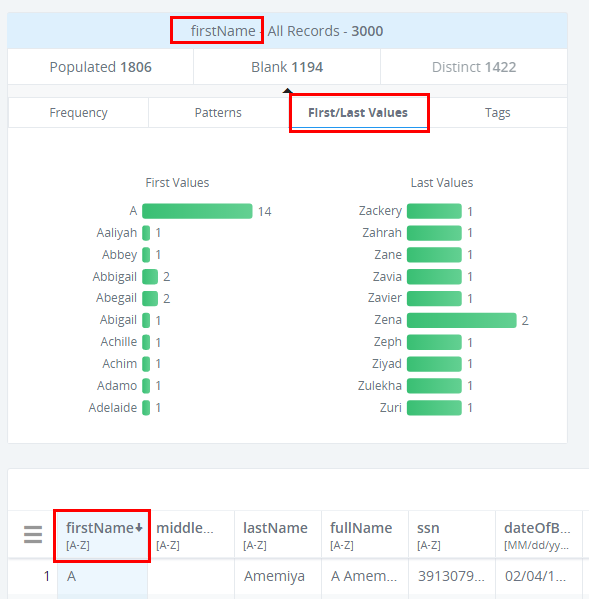
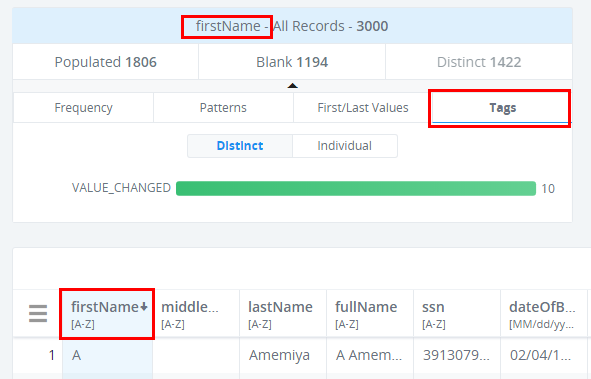
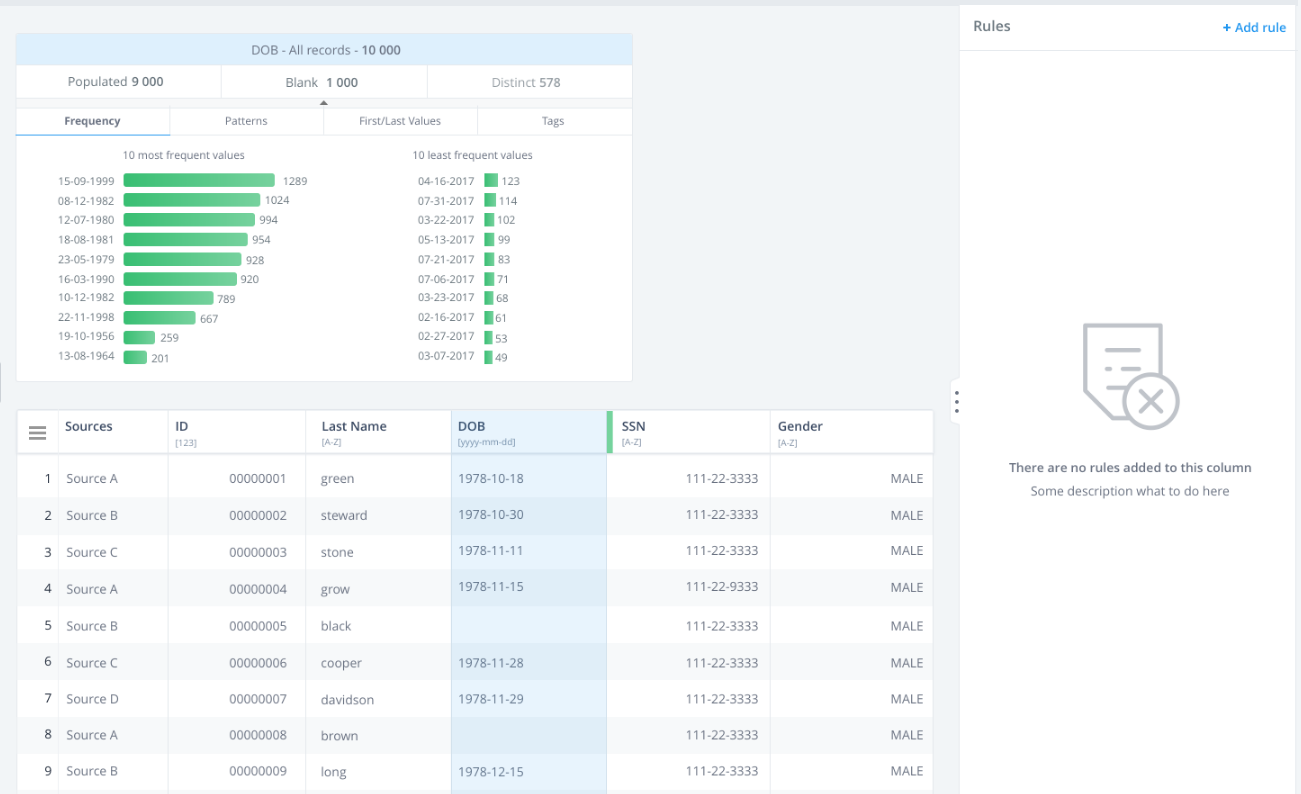
The Filter panel divides data availability (Populated/Blank/Distinct) and specific characteristics (for example, frequency, patters, tags, and first/last values). Each tab has a list of bar charts which helps you understand and visualize filtering.

The filters are represented as a panel with headers named according to the selected column. For example:
- firstName –All records-6001
- tree filter tab: Populated <number populated records>
- Blank <number of blank records>
- Distinct <number of distinct records>
Each filter tab contains several sections:
- Frequency
- Patterns
- First/Last Values
- Tags
Each tab also contains bar charts with labels and a quantity of data records
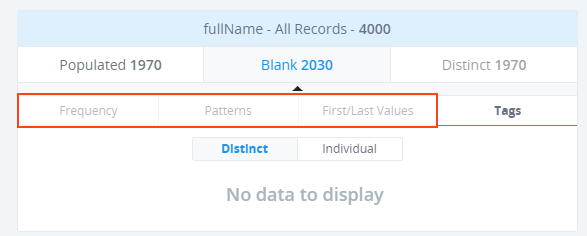
The panel appears only for selected columns. If the column is deselected, filter panel will not be displayed.
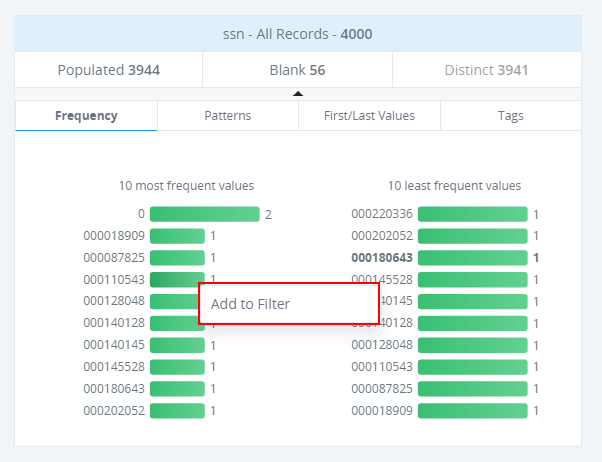
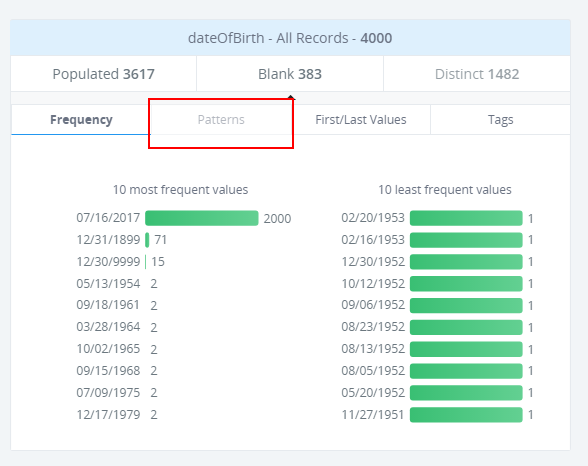
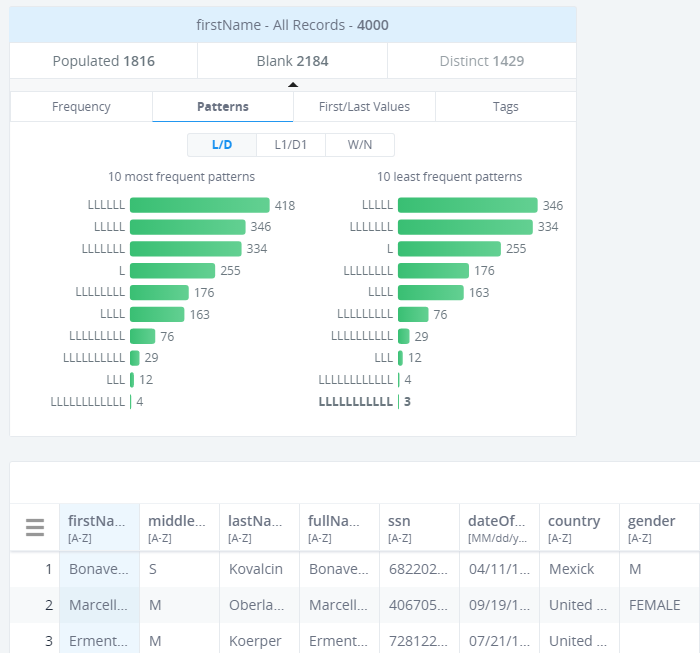
The Frequency tab displays 10 most frequent values and 10 least frequent values for the selected column.
The Pattern tab displays the 10 most frequent patterns and the 10 least frequent patterns for the selected column. Patterns are divided by groups: L/D, L1/D1, and W/N.
The First/Last Values tab displays the first and last values for a selected column.
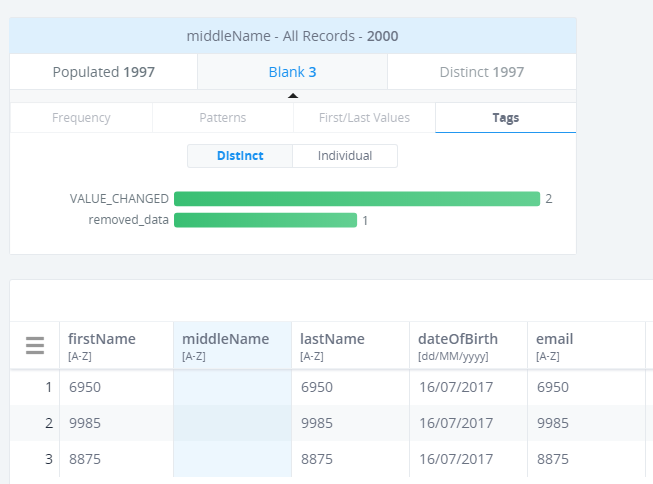
The Tags tab displays tags related to the values of a selected column. Tags are divided into the following groups: Distinct and Individual.
The Quantity, Label, and bar charts are highlighted once they are selected.
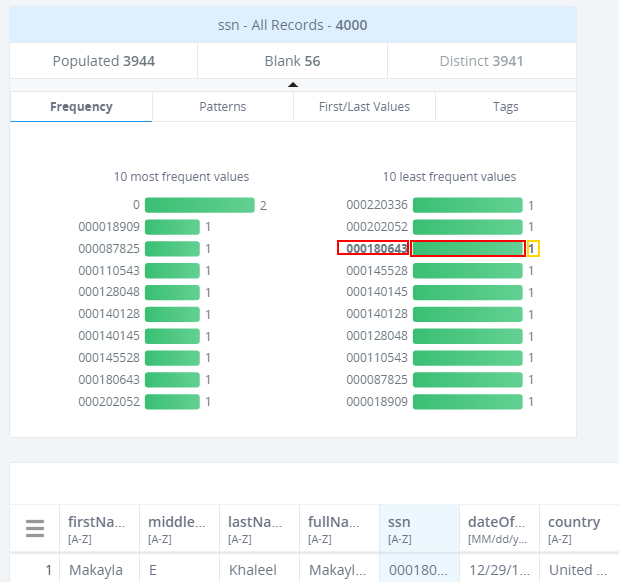
If you right-click on an item, the context menu appears, where you can select the Add to Filter option.
However, not all tabs are available for every attribute type. For example, the patterns tab is not displayed for Date, DateTime, and Boolean data types.
There is also a blank tab available from the filter, but only the Tags tab is enabled. The Frequency, Patterns, and First/Last Values tabs are displayed because there is nothing to show for blank values.
If there were executed rules with operations that were tagged, the following information will appear in the Tag tab.
The Distinct tab in the filter is currently unavailable.
Using Filters
You can right-click the Populated tab to filter the Data table to show only rows with filled-in values for the selected column. Once you select a specific bar chart, the Data table will be filtered again, and show only rows filled with the selected value for the selected column.
You can right-click the blank tab to filter the Data table so only rows with empty cells for the selected column are shown.
Using the Add to Filter Option
All Column profile elements that can be used for filtering can also be right-clicked. Then, select Add to Filter from the context menu.
If you add a filter from the Frequency or First/Last Values tabs, then the filter tag will be added with property = <column name of the selected column>, operand Equals and value=<value user clicked on>.
If you add a filter from the Pattern tab, then a filter tag is added with the property = <column name of the selected column>, operand like, and value=<pattern user clicked on converted in RegEx format>.
If you add a filter from the Tags tab, a filter tag is added with the property = <column name of the selected column>, operand Tagged with, and value=<value user clicked on>.
Rules and Operations
|
Topics: |
If you identify problems or issues with the data and wish to change it, you can use the Rules functionality.
The Rules functionality allows you to edit, mark, and remove data from the interface without using DQS.
It is also used to work with data records (update/remove) by creating data quality rules (Cleansing).
The Rules functionality is represented with the Rules panel and the Execution process.
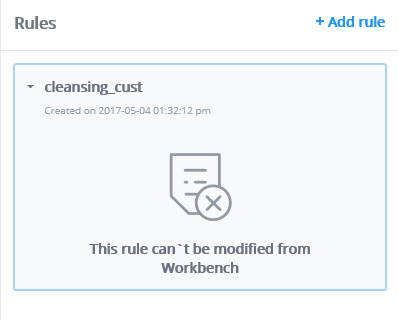
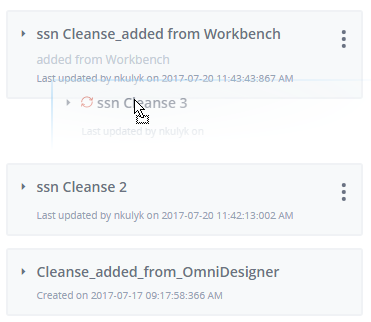
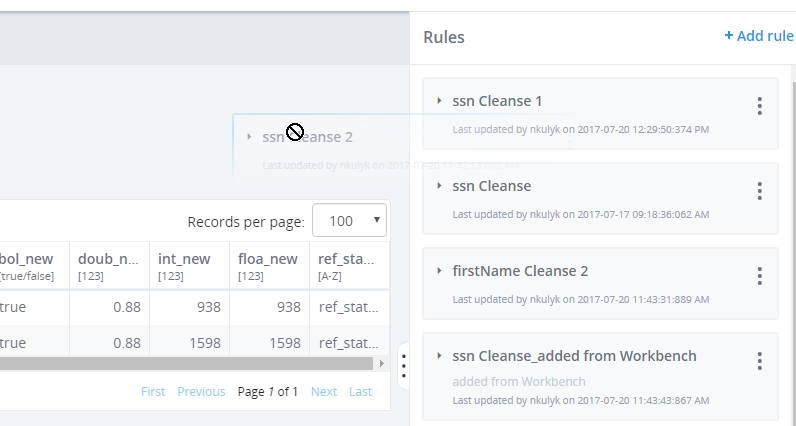
The Rules panel is available for the selected column in the Data table and is collapsed by default. The Rules panel displays a list of rules associated with the selected column. The Rules are collapsed by default when navigating to the Rule panel after working with filters or sorting.
If you are adding a new rule, it is added in the expanded state.
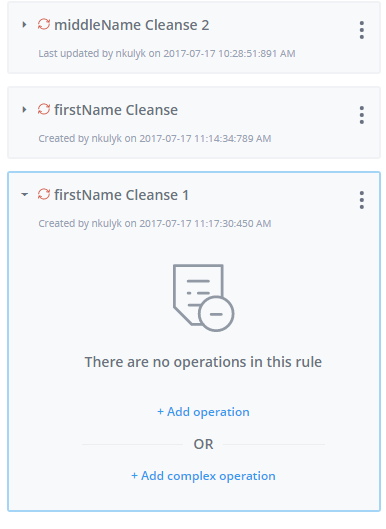
If the column is not selected, the corresponding information is displayed in the Rules panel:
If there are no rules associated with the selected column, the corresponding information will be displayed.
There are two types of data quality rules:
- External rules
- Standard rules (rules that you can create from the UI)
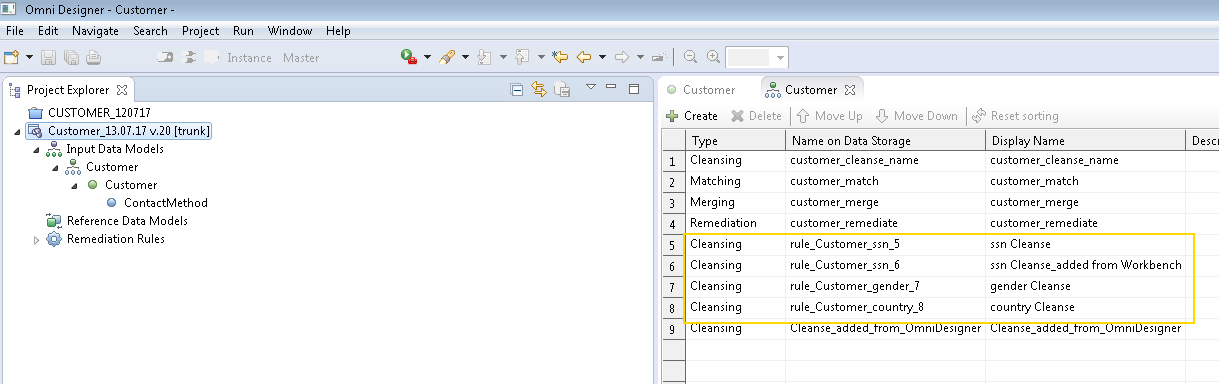
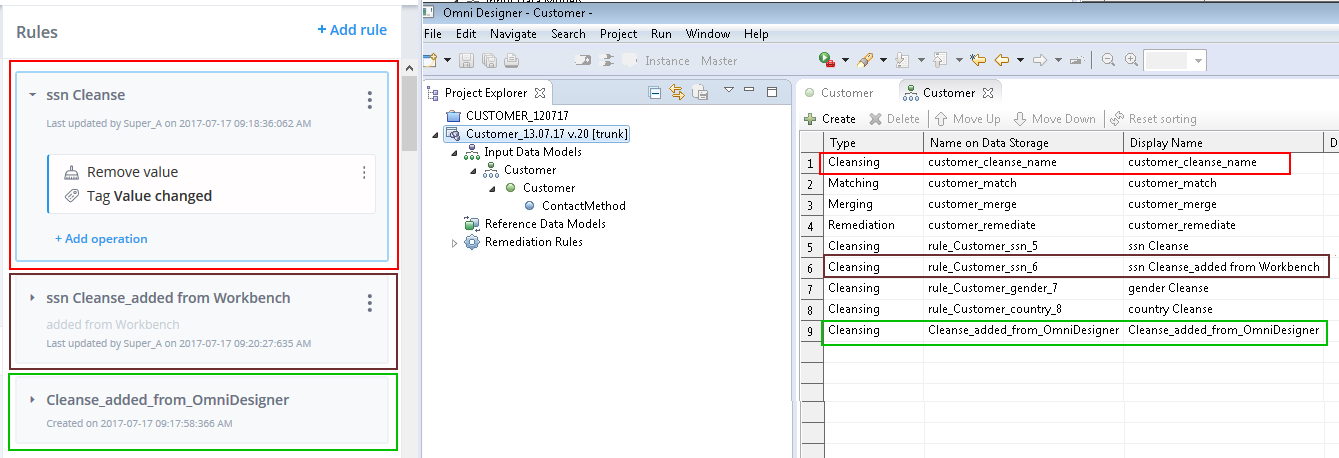
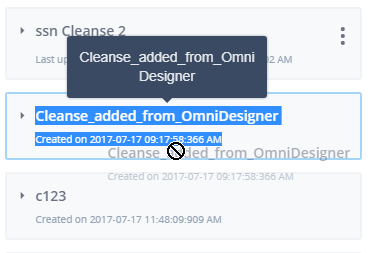
External rules
External rules are created and processed using the Omni Designer tool and deployed to OmniGen.
You can view External rules with limited information, but you will not be able to edit them or add operations.
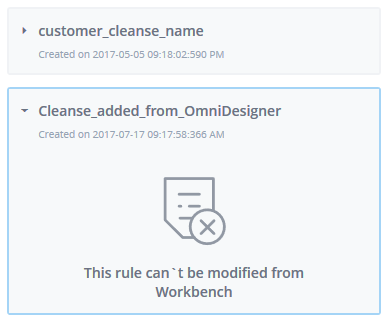
A notification message appears on the rule stating that rules cannot be modified. The Menu button is not available for such rules.
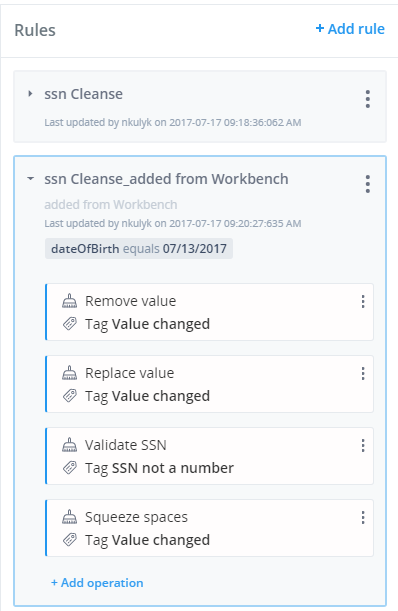
Standard Rules
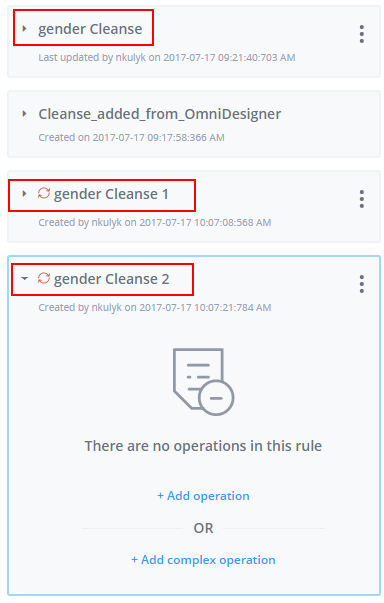
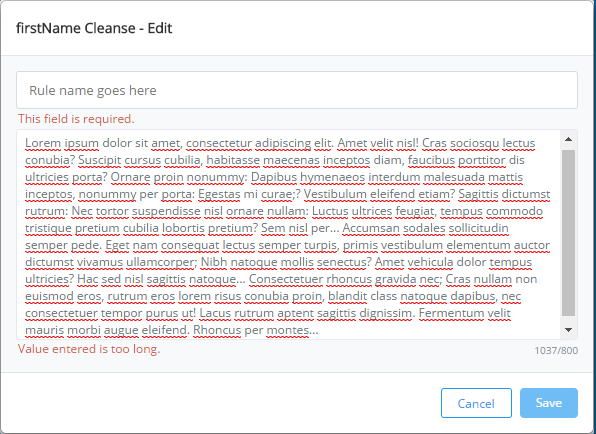
To add a new rule, select the column, expand the Rules panel and click the Add rule button. A new rule is created with a predefined name, for example: <Column name> Cleanse [number representing the last existing rule with this name +1].
The Rule description is empty by default.
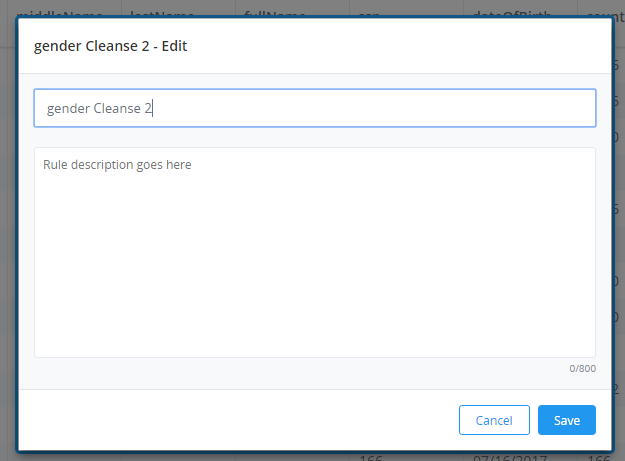
The Rule name and description can be edited. A simple validation is added to the rule edit mode.
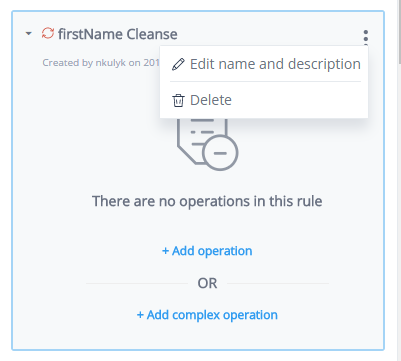
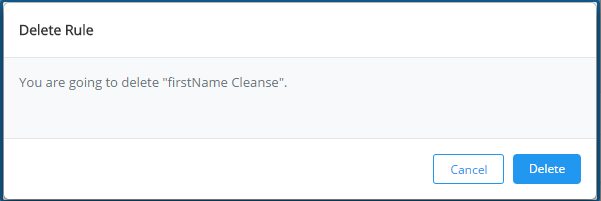
Rules can also be deleted. A confirmation dialog appears when you click Delete.
The rule inherits the global filter of the dataset that is added at the moment of adding the rule.
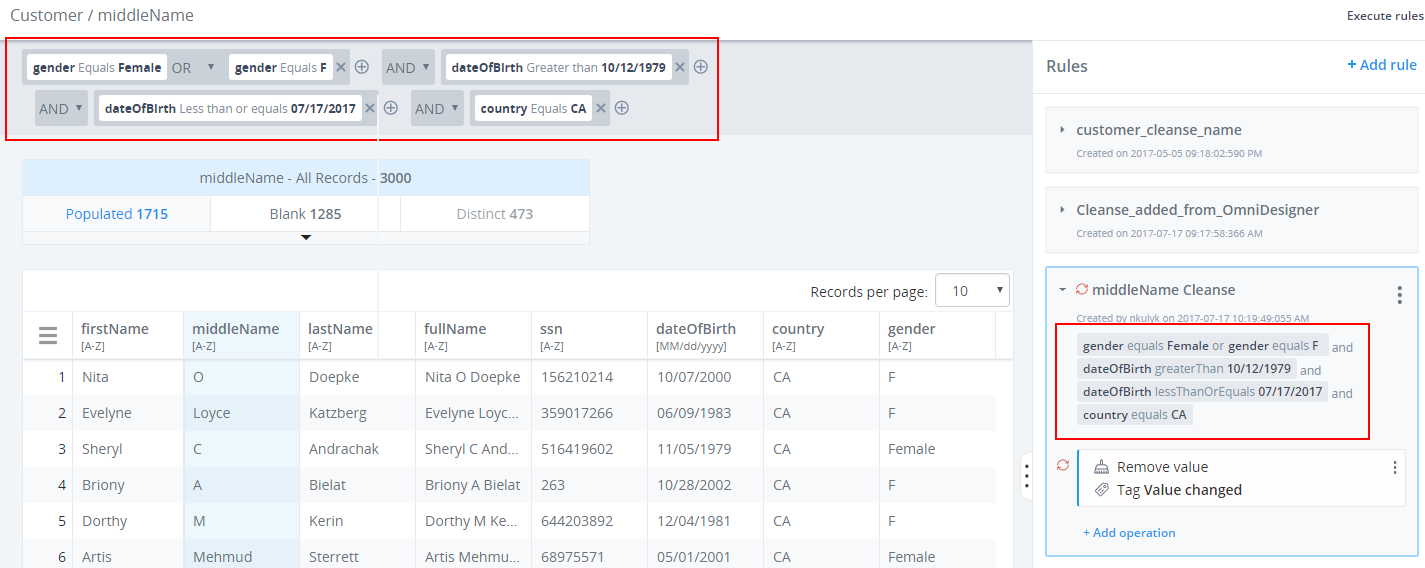
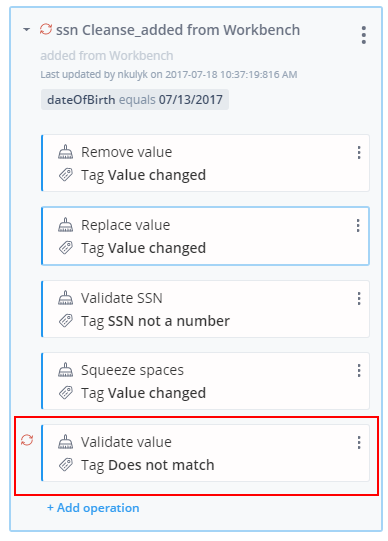
You can click Add operation to add a new operation.

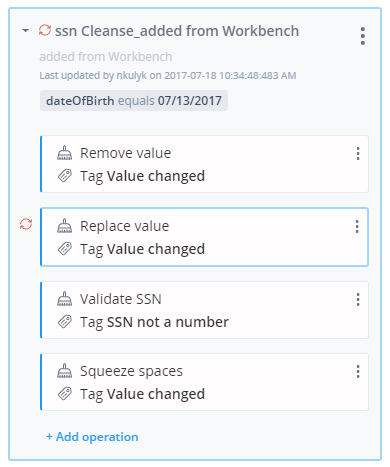
Once you select the rule or operation, it becomes highlighted. The new rule is selected as an uncommitted (orange color) icon as well as a newly added operation.
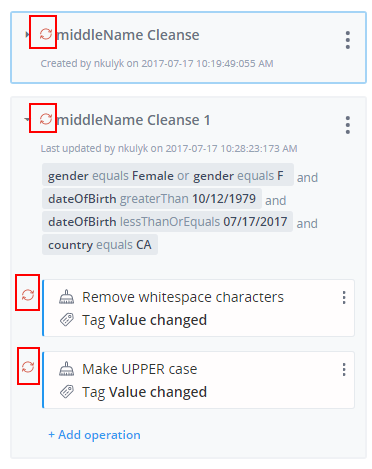
Expand the rule to view a list of operations you can choose from to add to the rule.
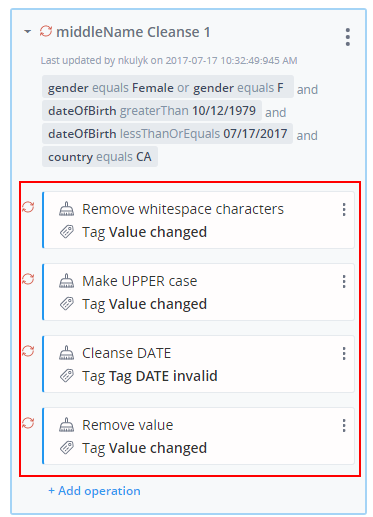
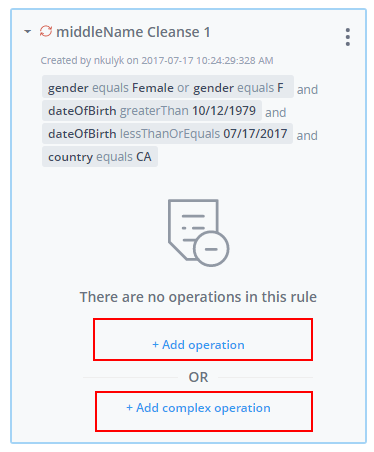
If there are no operations added to the rule, the following message will appear:
There are no operations in the rule.
Working With Operations
The Operation is a single action that allows you to customize the way you view data.
For example, the Uppercase operation turns all data in the selected column into Uppercase characters.
Each operation updates data for a selected column in certain way defined by options (for example, inputs, values, radio buttons, check boxes, and so on) which are set in corresponding XML files and help to distinguish and update data.
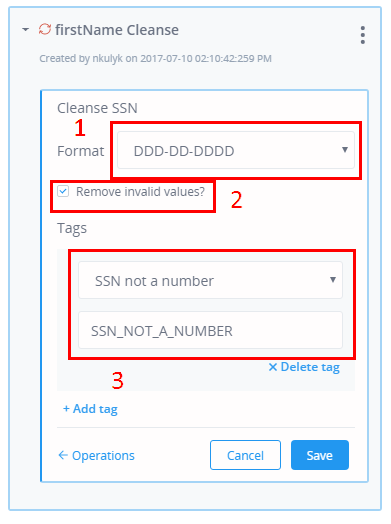
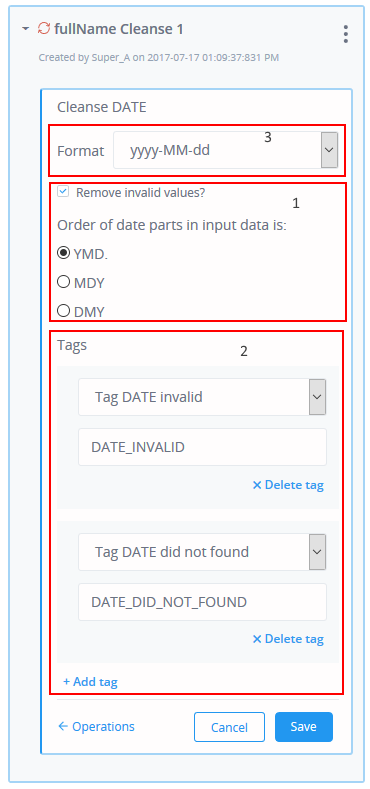
For example, the Cleanse SSN operation contains the following options:
- Format. Indicates what format of data should appear after an operation is applied (nine Digits will be displayed in a specified way).
- Remove invalid values? Select this check box if you want to remove data that does not satisfy a specified format (less or more than nine digits, characters, or special symbols).
- Tags. Added to data and characterizes it according to the set tag value.
The operation content corresponds to the column data type you select. You can set the parameters for any operation you choose.
You can edit the following parameter types:
- Behaviour parameters. What the operation has to execute.
- Tags. Signs off the execution of an operation.
- Output format. A set of possible output format options for the content type.
There are two ways to add an operation: add as quick operation from the table context menu and add from the rule.
There are also two types of operations depending on the affected areas: Simple and Complex.
Simple operations are related to one Attribute and after execution of the rule will affect data only for the selected attribute.
Complex operations involve several attributes and works with data from those attributes that are listed in the inputs and outputs of the operations.
The rule that contains a complex operation will be created for each involved attribute.
You can hover your cursor over the operation and see the name, parameters, and tags inside the corresponding tooltip.

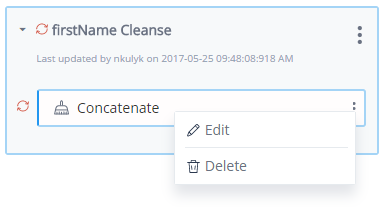
Any operation can be edited and deleted.
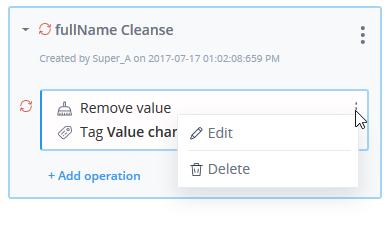
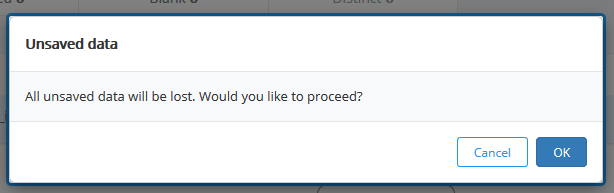
Only one operation per time can be opened in the Edit mode. If you try to open another operation or do another action while the operation is opened, you will be asked to save changes before that.
Adding Operations from the Rules panel
In order to add a rule from Rules panel, select either the Add operation or Add complex operation buttons.
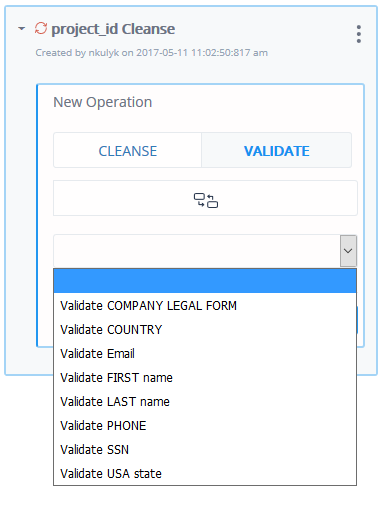
The Operations are displayed by groups and sub groups, as shown in the following image.
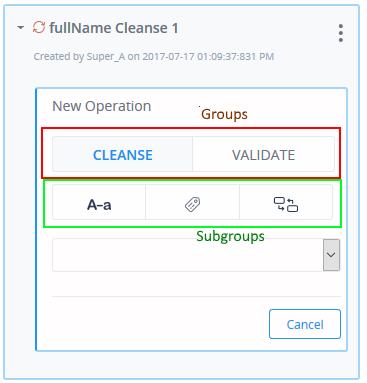
Currently, there are two groups:
- Cleanse
- Validation
The number of subgroups can be different. Groups and sub groups are configured in the corresponding XML file of the operation in a specific folder where the OmniGen system is installed.
If number of operations is more than five, then the operations will be displayed in a drop-down list.
The operation content corresponds to the column data type you select. You can set the parameters for any operation you choose.
You can edit the following parameter types:
- Behaviour parameters. What the operation has to execute.
- Tags. Signs off the execution of an operation.
- Output format. A set of possible output format options for the content type.
For changes that were made with the operation/rule, they will be marked with an uncommitted icon.
Adding Quick Operations From the Data Table
You can add basic operations from the data table value through the context menu:
The mechanism of adding operation is the same as for the Rules panel. When you select the Add Quick Operation option, the Rules panel will be expanded and the operation will be added.
The following list describes the ways how quick operations will be added to a new or existing rule:
- The rule is NOT present in the rules panel or there are just external
rules present.
A new rule and the operation will be added to the new rule. The system automatically generates the name of the rule, for example <Column name>, Cleanse [number representing the last existing rule with this name +1], and empty description. The rule will inherit the Global Filter of the dataset that you used at the moment of adding the operation and the rule is automatically selected and highlighted (it means that user works with this rule at the moment).
- The rule is present in the rules panel.
When the rule is selected:
- If the filter of the rule matches the global filter, then the operation will be added to the SELECTED rule.
- If filter of the rule does not match the global filter, then the latest rule in the rules panel will be verified. If the latest filter of the ruler matches the Global filter, then the operation will be added to the LATEST rule, if not, the operation will be added to the NEW rule.
When the rule is NOT selected, then the latest rule in the rules panel will be verified:
- If the latest filter of the rule matches the global filter, then the operation will be added to the LATEST rule.
- If the latest filter of the rule does not match the global filter, then the operation will be added to the NEW rule.
You can add as many quick operations as you wish. The added operation and the rule will be marked as uncommitted.
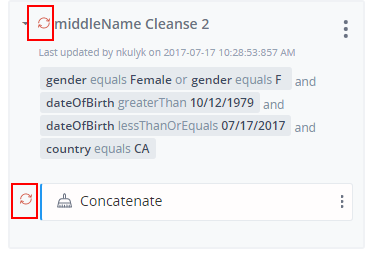
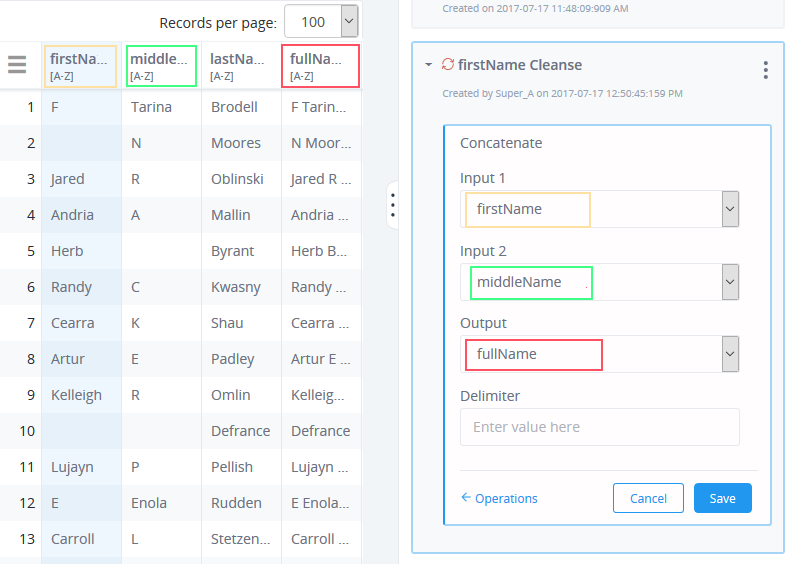
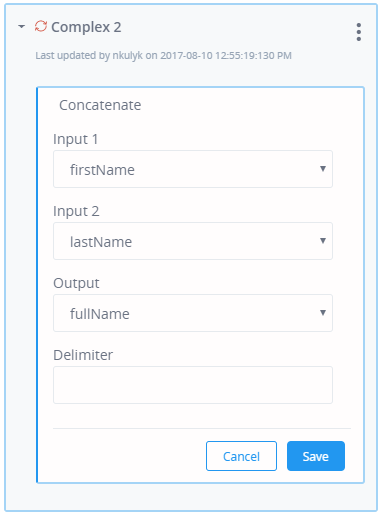
Adding Complex Operations
Complex operations affect more than one input attribute (for example, First name, Middle name, and Last name). This type of operation can be added to every involved attribute as well as attributes that have been created.
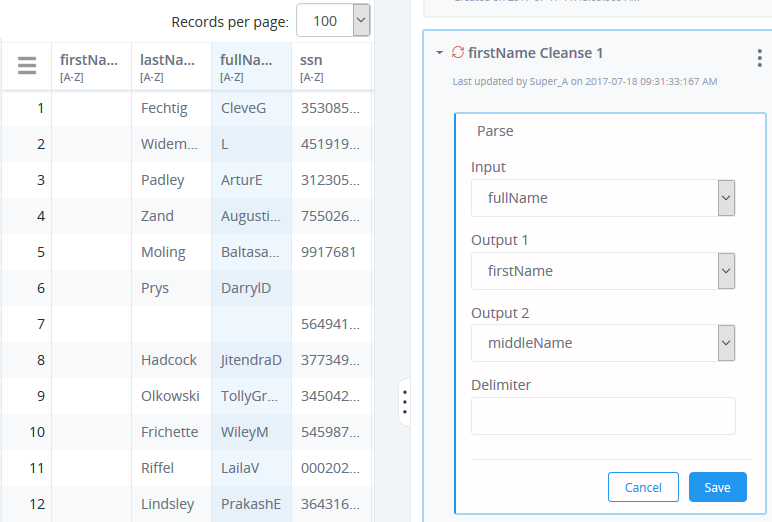
Operations can be edited from every involved attribute.
Only one complex operation can be added to one rule.
Complex operations cannot be added to the rules with standard operations.
Operations can contain up to three sections:
- Behaviour parameters. What the operation has to execute.
- Tags. Sign-offs on executing the operation.
- Mapping
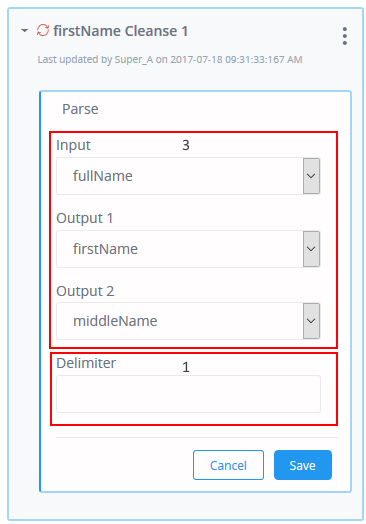
By default, all input fields are unmapped, as shown in the following image.
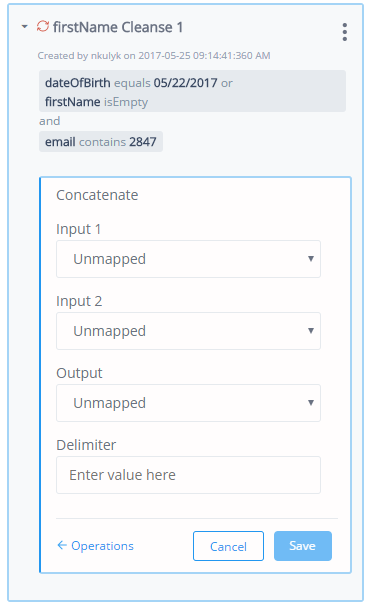
You have to map standard labels for the operation input attributes with particular examples for the data model (for example: First name= Name1, Middle name = Name2, Last name = Name3).
You can add only fields with the same data type as selected.
Any field can stay unmapped.
You can add as many Simple operations as needed, but only one Complex operation can be added.
Processing and Executing Rules
|
How to: |
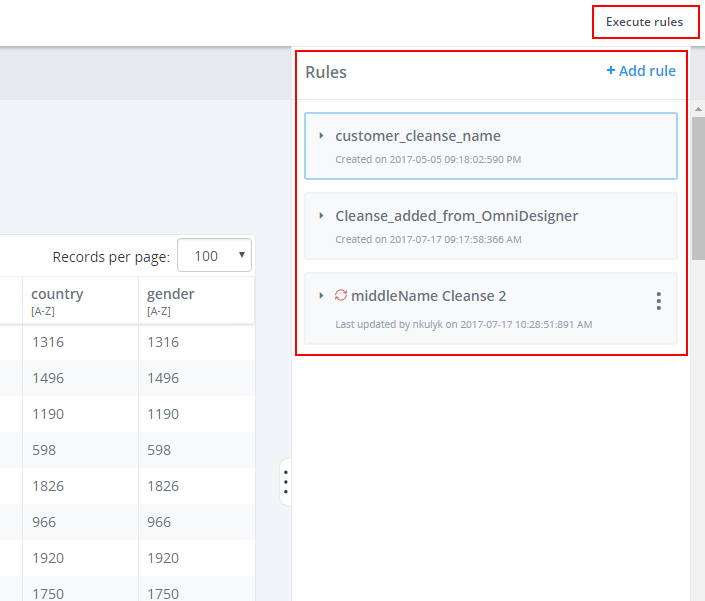
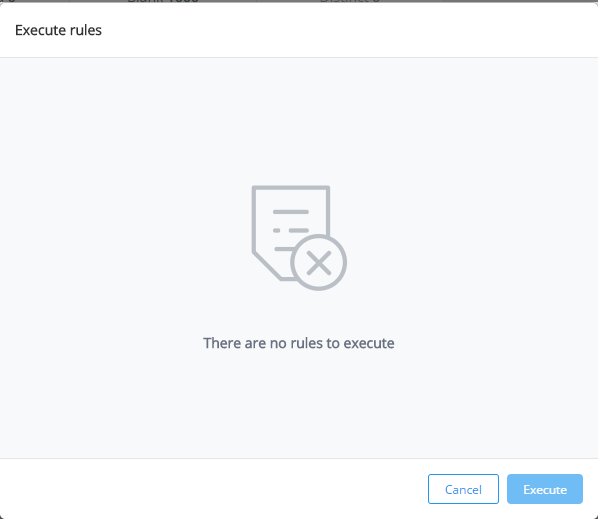
If added rules are not executed, then the data will not be changed. To apply all changes, click Execute rules.
The Execute rules button is available for every Workbench page, as shown in the following image.

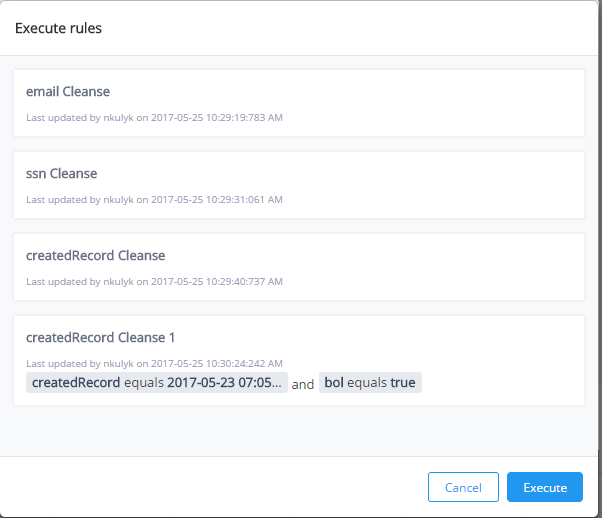
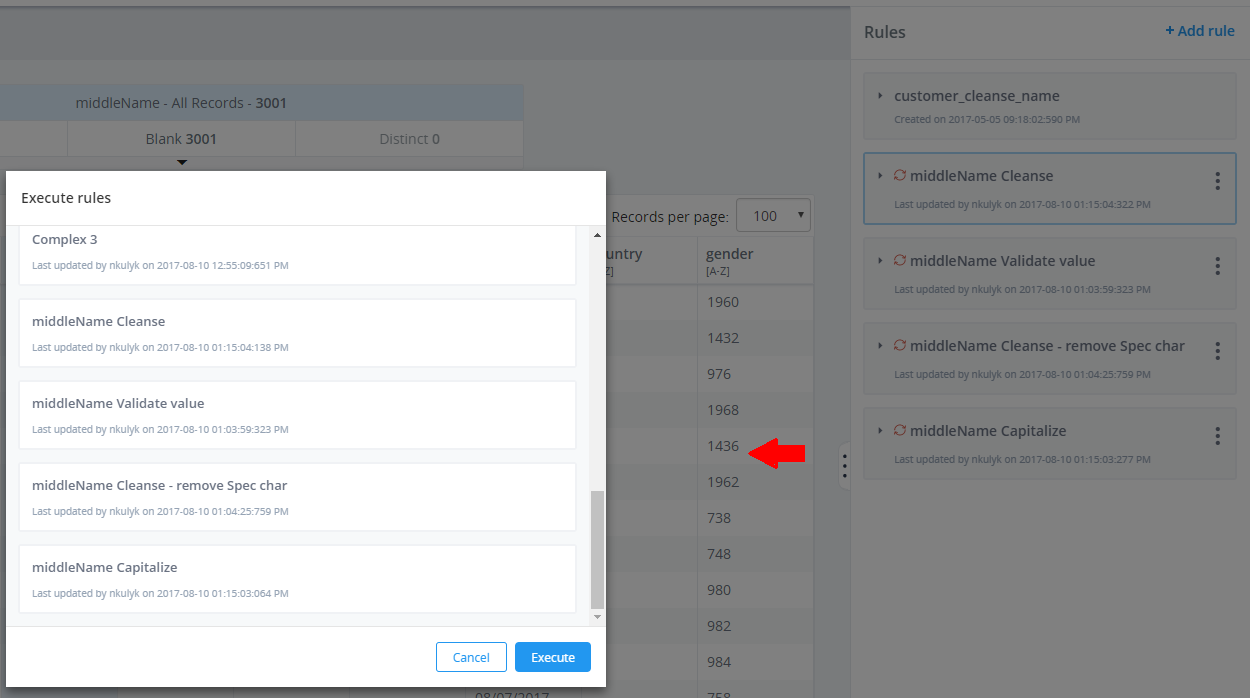
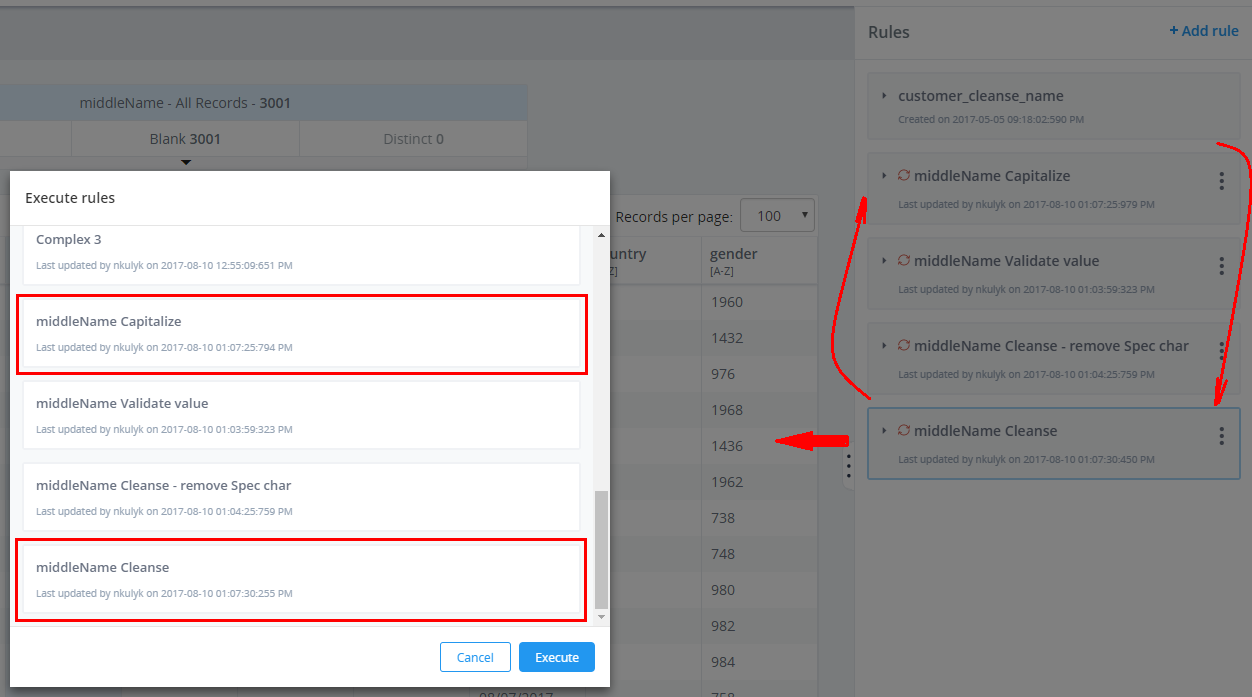
The Execute rules dialog appears. If there are no rules to execute, the corresponding message will be shown.
Every time rules are executed, all created rules will be processed but only those which have modifications will be displayed in the Execute rules dialog, as shown in the following image.
If there were any prior rules created and processed, and you have removed some rules but did not create or modify a new one, then all added rules will be displayed in the Execute rules dialog. Note that removing executed rules will affect the data.
Click Execute to begin executing the rules.
Once Rule processing is started, the Rule panel for the selected column or several involved columns (for Complex operations) are blocked until the rule is processed. This also includes adding Quick operations for a selected column.
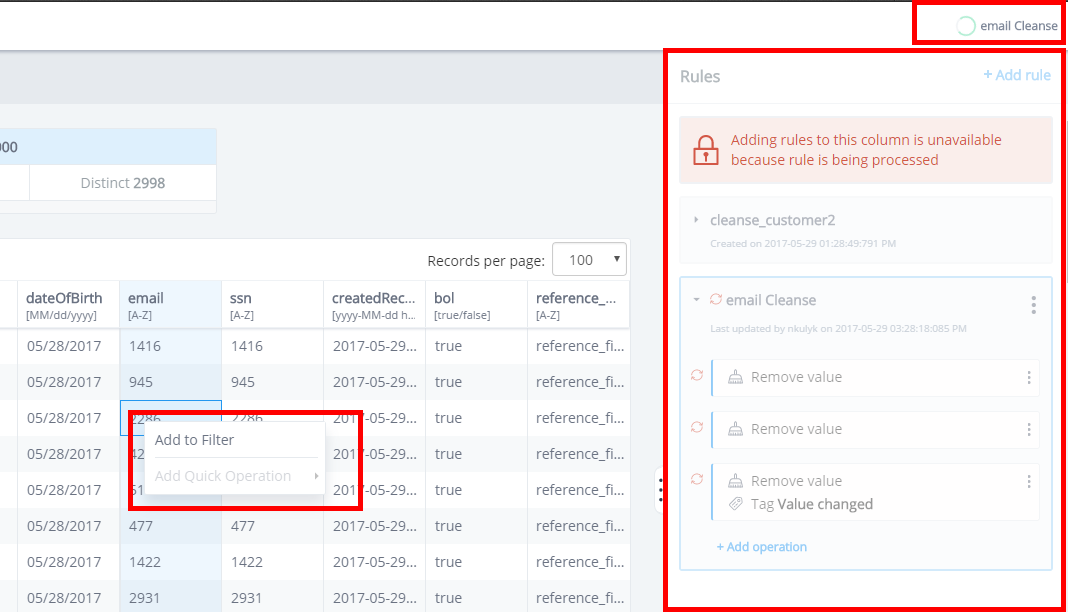
You can receive notifications to the reason behind why the panel was blocked. You can work with other columns and rules for background processing and create rules for other columns not involved while processing. However, the new rules cannot be executed until processing of the previous rules are complete.
While processing, a Rule processing indicator (loader) appears in the bread crumbs area. If only one rule is processed, its name will be displayed instead of the Processing rule. There are no limits for the number of rules that can run in the background simultaneously. If many rules are processed simultaneously, the Rules processing indicator will contain all rules and will be collapsed by default. You can expand it to see the detailed information about the rules which were processed:
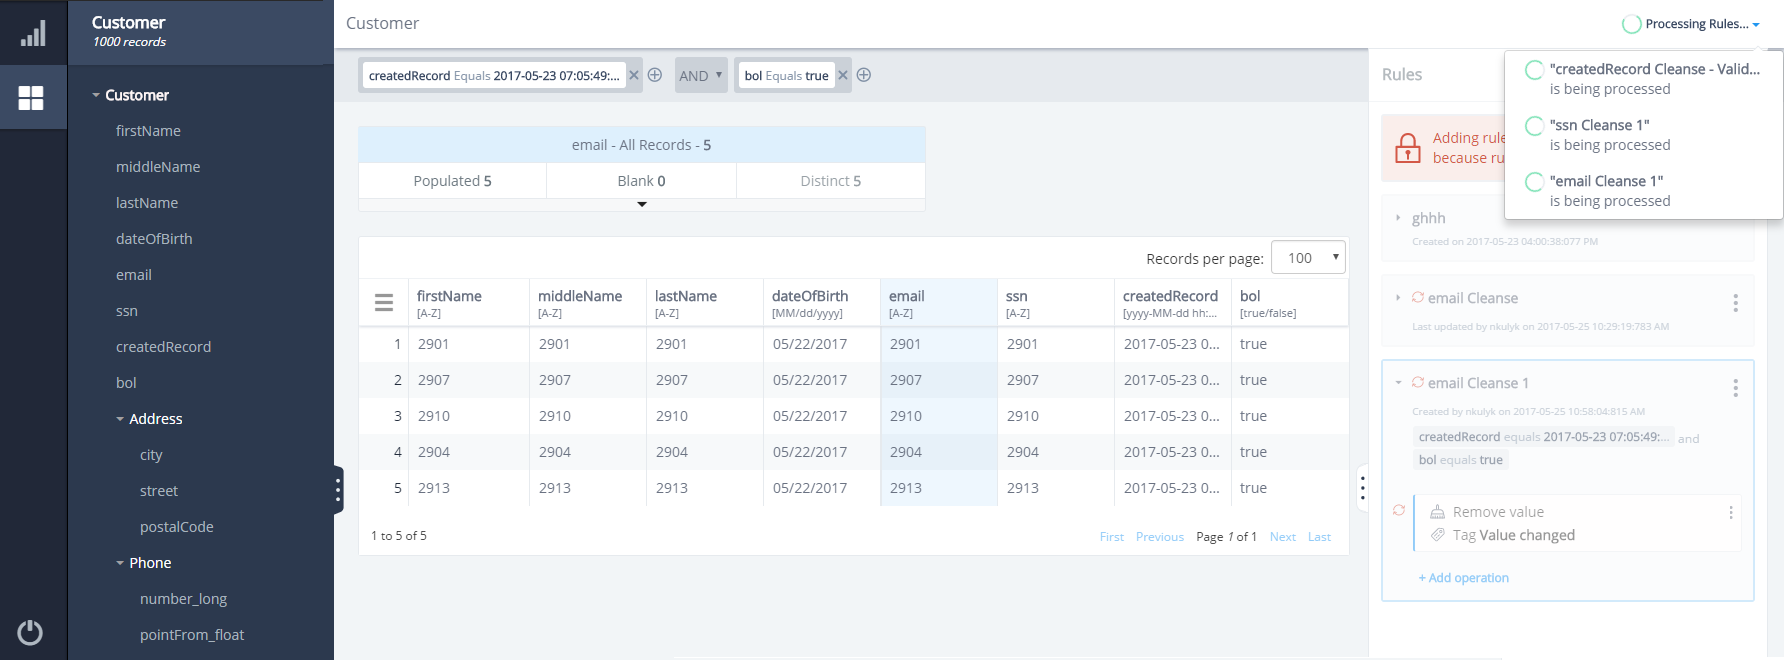
When the rule processing is completed, a notification appears about the completed changes, and the Rules panel is unblocked, as shown in the following image.

You cannot cancel or revert the rules process.
When rules are added from the Workbench interface, it will be visible to you only. Data affected by the executed rules will be also visible only to you. To have those rules and applied data visible to everyone, the project must be re-deployed and installed to the Omni Console.
Procedure: How to Re-deploy the Project
You can add rules with the required operations from the Workbench and execute them. To re-deploy the project:
- Navigate to the workstation where OmniGen is installed using the OmniDesigner
tool (eclipse) and select the project from the Navigation panel (the project
that was uploaded to the OmniConsole).
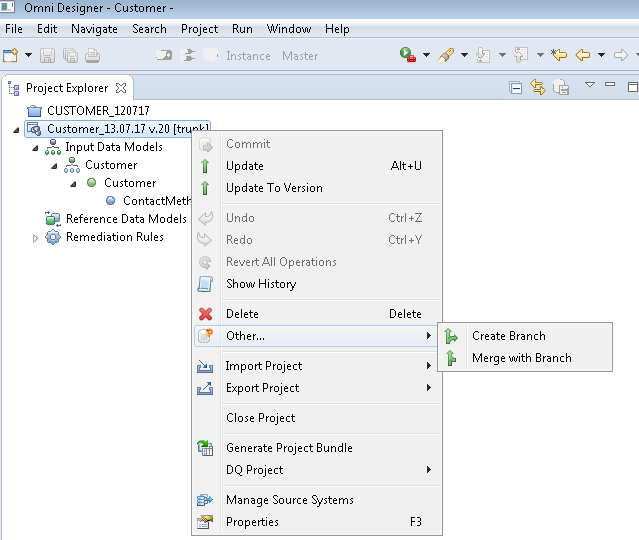
- Right-click on the project, select Other, and then click Merge with Branch and find the branch
you wish to merge with, from the list that appears.
- Right-click on the project and click Commit.
- Right-click on the project again and click Generate Project Bundle.
- Navigate to the Deployment Generator tool in your browser, for example: https://<host>:9554/.
- Refresh the page and select just the generated Release bundle or the Generate Deployment bundle from the project (the green triangle button).
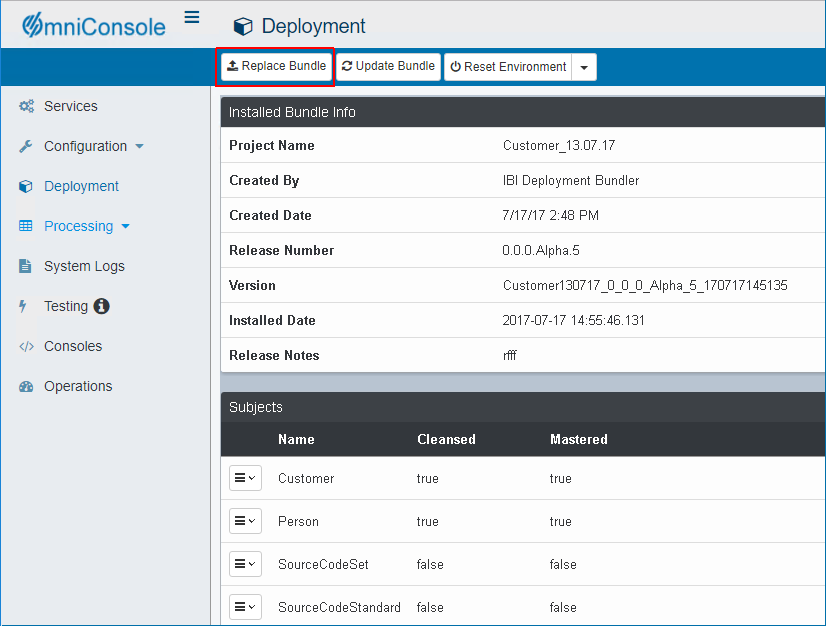
- Navigate to the OmniConsole, select Deployment, and then click Replace Bundle (you can find it through the deployment bundle destination
mentioned in og_configuration.properties, for example, deploytool.dest.dir=C:/OGS/omnigen).
- Start all OmniGen processes (https://<host>:9600/Services)
and generate data using the DQS tool.
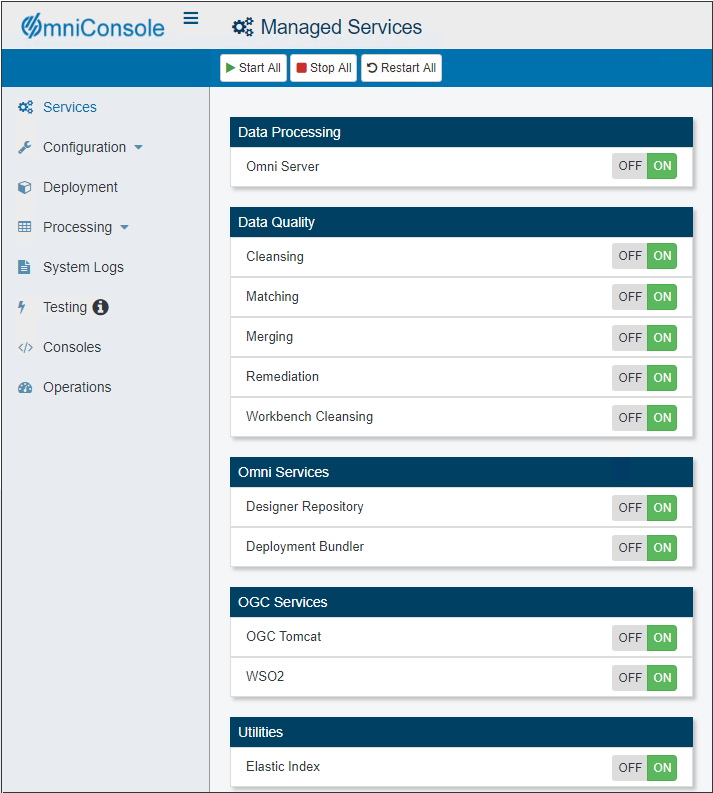
- Restart the Workbench service and the OGC Tomcats.
- Navigate to the Workbench and verify that the added Cleanse rules
are available..
The deployed rules should not have uncommitted icons.
The operations for the deployed rules should also not have uncommitted icons
The deployed rules can be edited and re-executed in the same way as the new rules that were created from the Workbench.
After the operations or rules are updated, the uncommitted icon will appear:
If a new operation was added to the deployed rule, it will be marked with an uncommitted icon as well as the deployed rule, as shown in the following image.
Reordering Rules and Operations
Reordering rules and operations allows you to change the position of Rules and Operations in order to execute them in another sequence.
Dragging and Dropping Rules
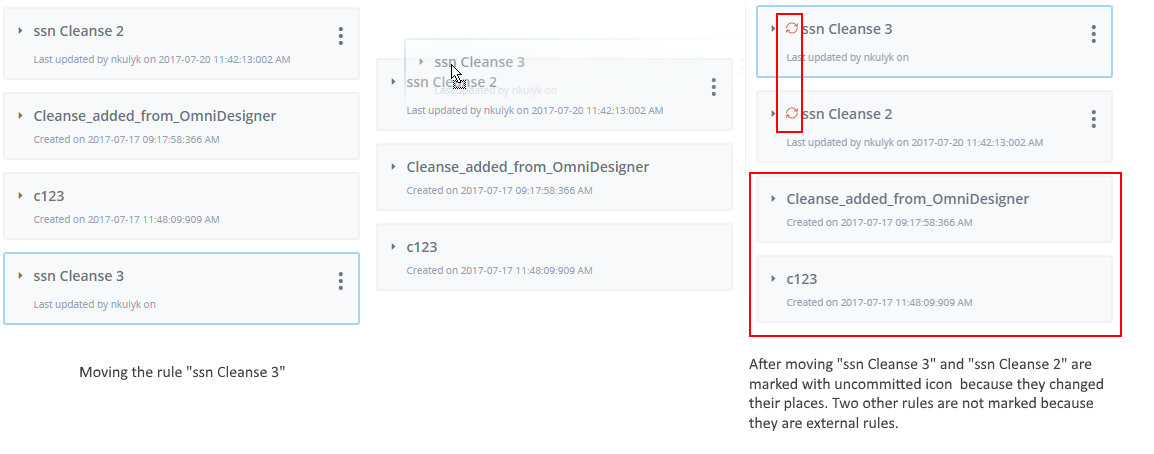
To move the rule to another area, select the rule, and then drag and drop it to any area you wish. A special icon appears for the Rule that is being dragged.
Only new and deployed rules can be moved. However, you will not be able to move External rules (created from Omni Designer tool).
Rules can be moved to any location in the Rules panel, but you cannot drop the rule outside of it.
Rules can be moved even if they are either expanded or collapsed.
When the rule is moved, all other remaining rules in the rules panel will be marked with an uncommitted icon. External rules will not be marked.
Reordering rules with simple operations will not affect the list of rules for other columns since simple operations are related to single attributes, except in a few situations when rules contain complex operations that are related to several attributes.
For example, if multicolumn rule was a complex operation with multiple columns and rules, reordering them will impact the order of the rules for other attributes.
Reordering Multicolumn Rules
Rules containing a Complex operation affects several columns mentioned within the complex operation. There are several main principles:
- The rule containing the Complex operation is moved below the rule with simple operations and will not affect the position of the rule in other columns, as described below in Example 1.
- The rule containing the Complex operation is moved below the rule with complex operations and affects the position of the rules in other columns, as described below in Example 2.
- The Rule containing the Complex operation is moved below the external rule, and the rule with complex operations will affect the position of the rules in other columns, as described below in Example 3.
The following lists shows how the lists of rules for the three attributes appear before reordering:
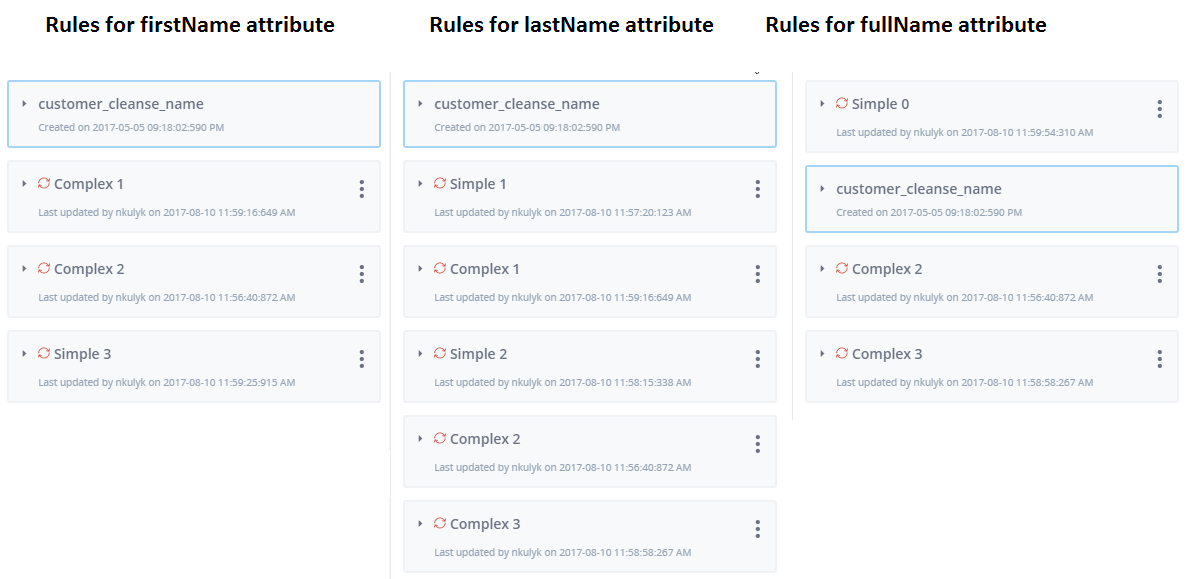
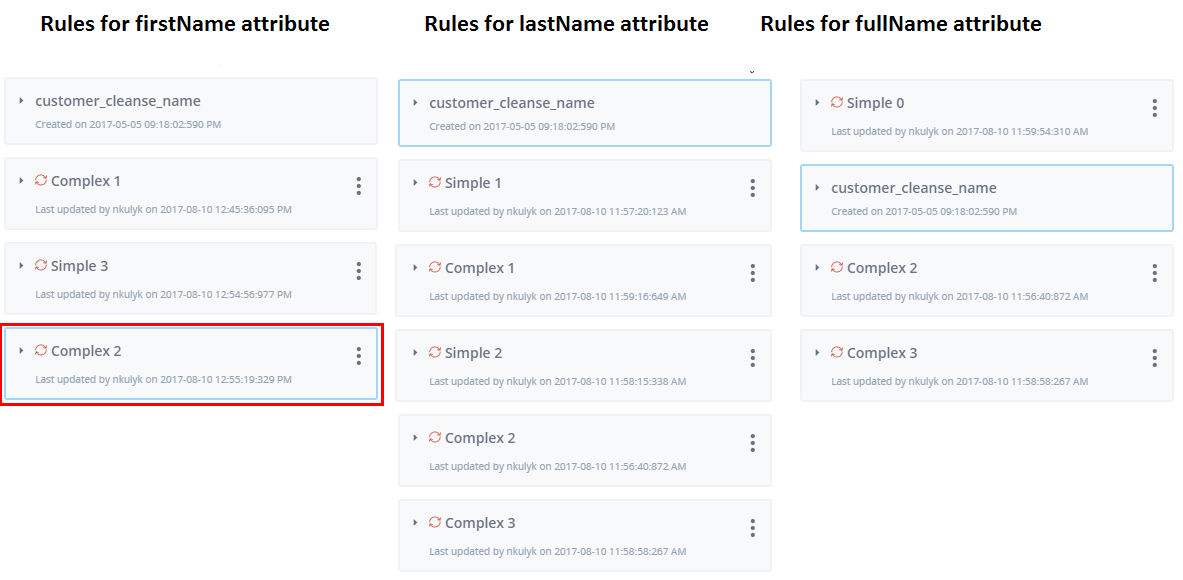
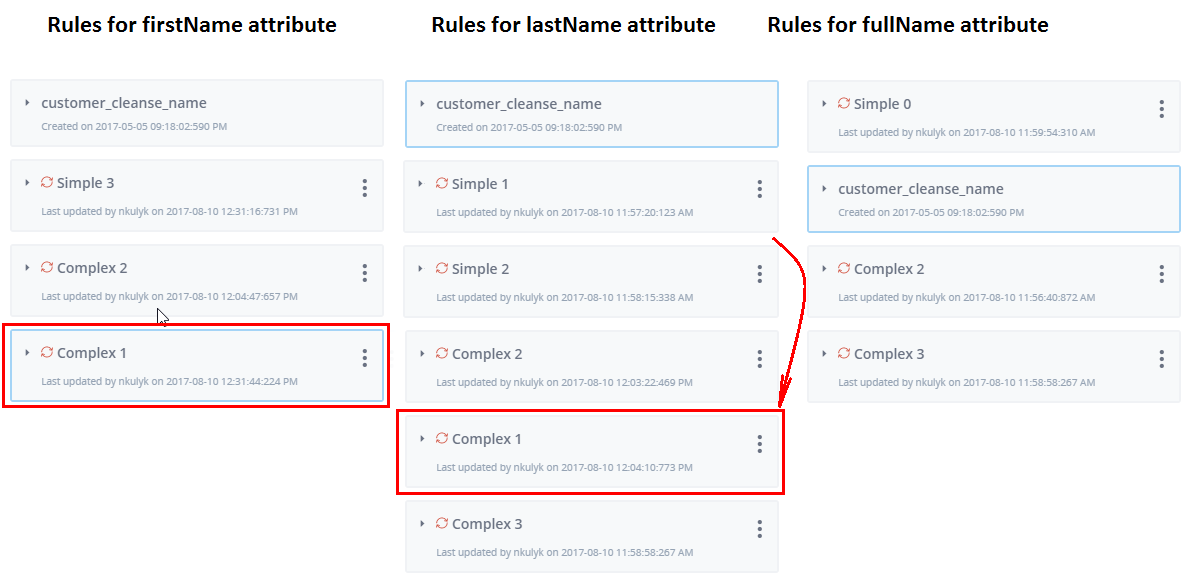
Example 1. The following image shows the firstName attribute where a complex operation rule called Complex_2 was moved below a rule with a simple operation called Simple_3.
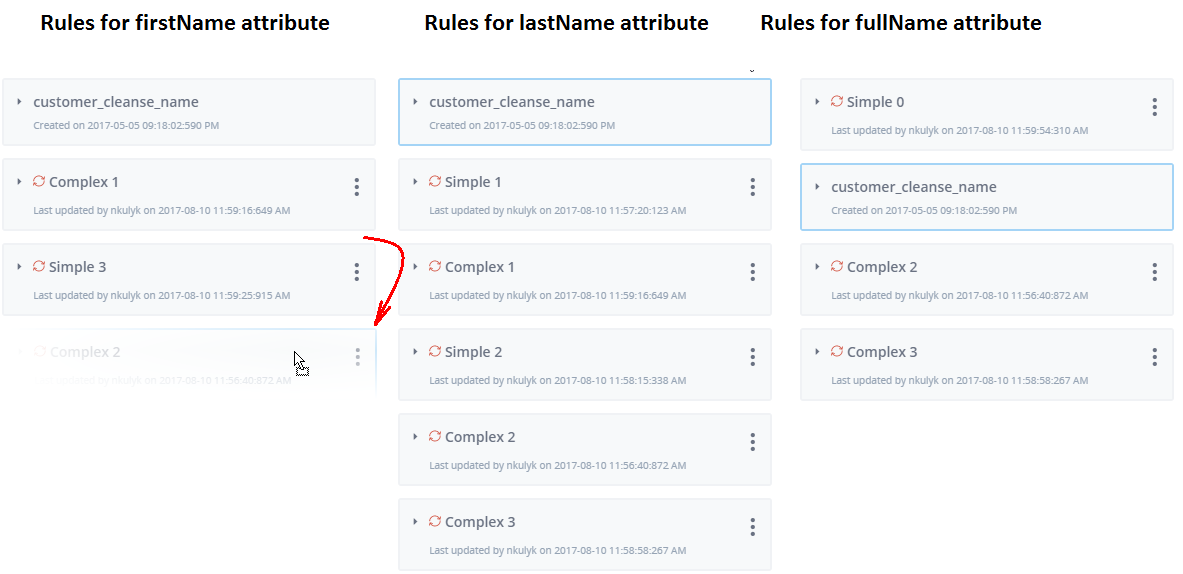
Only the firstName column is affected:
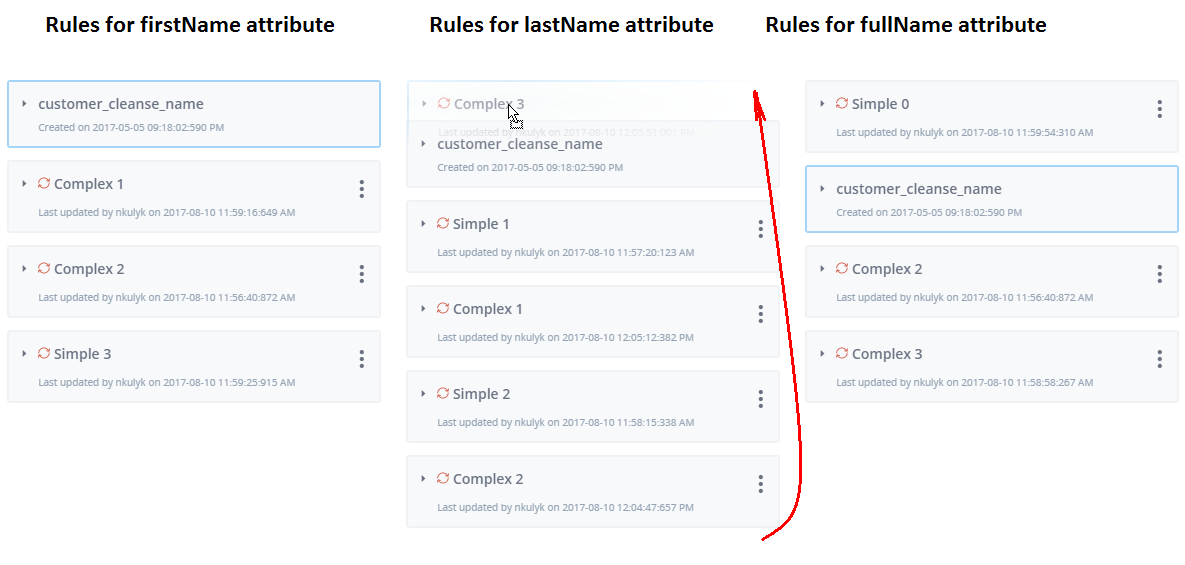
Example 2. The following image shows the firstName attribute where the rule with a complex operation called Complex_1 was moved below a rule with simple operations called Simple_2 and another rule with a complex operation called Complex_2.
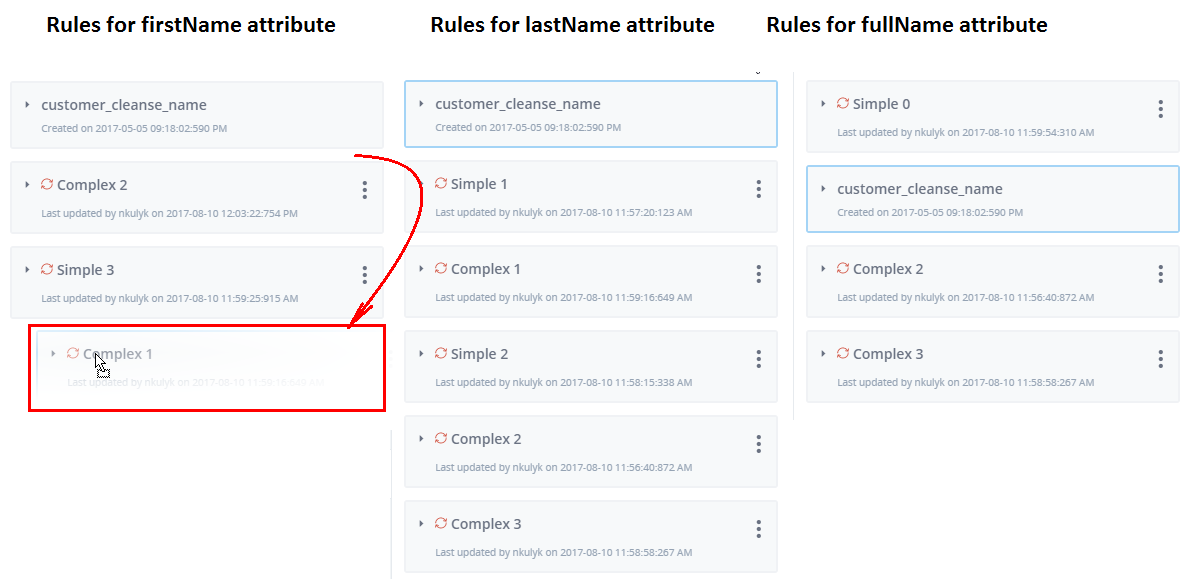
The firstName and lastName attributes are affected, as shown in the following image.
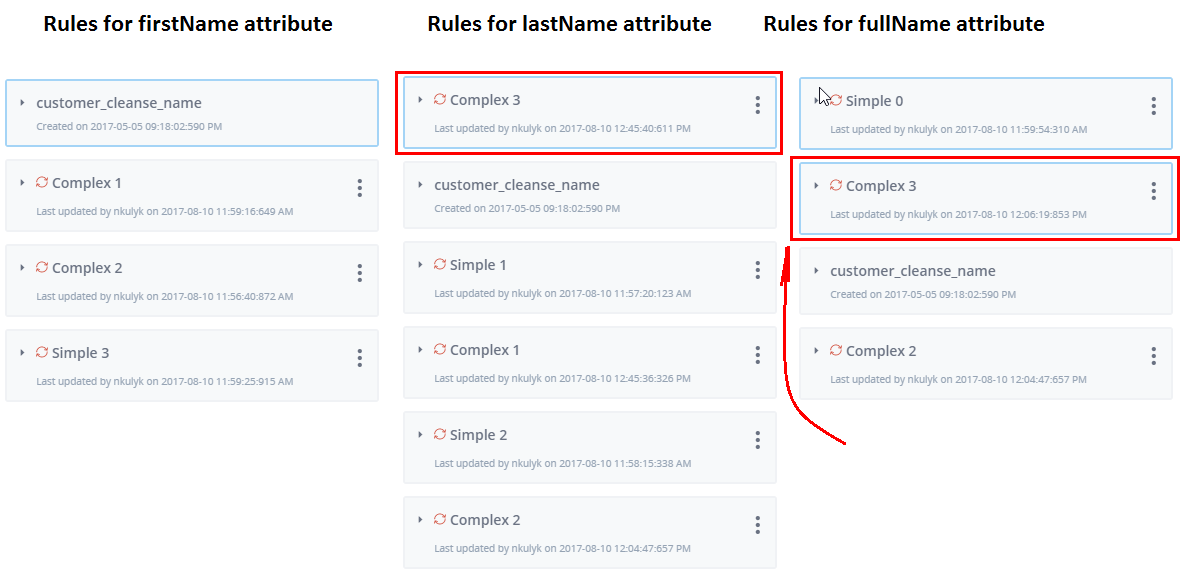
Example 3. The following image shows the lastName attribute where a rule with a complex operation called Complex_3 was moved to the top, below the External rule and other rules with simple and complex operations.
The lastName and fullName columns are affected, as shown in the following image.
Reordering and Execution
Once Rules are reordered in the Rules panel, they will change their place in the Execute rules dialog as shown in the following image. As a result, Rules will be executed in a new order and operations will be applied in different way.
After rules are reordered in the Rules panel, they will change their place in the Execute rules dialog according to the order of their new position or location.
Dragging and Dropping Operations
To move an operation to another location or position, select the operation and then drag and drop it in the order or location you wish. A special icon appears for the Rule that is being dragged.

Only collapsed operations can be moved. Operations cannot be moved if other operations inside the rule is opened in configuration mode.
Operations can be moved to any place within the Rules. You will not be able to drop the operation outside the Rules panel.

Operations can be moved within the new and deployed rules. If an operation is moved inside the deployed rule, the Rule operation and other operations that changed places, will marked with an uncommitted icon.
Complex operations cannot be moved. If you try to drag and drop a complex operation, all rules will be dropped.
Content Types
|
Topics: |
Functionality Content Types is aimed to create alternative types of data related to real data attributes. This is some custom data type that you can relate to any attribute or operation that works better with specific information and avoid problems with inconsistent data types.
The difference between data type and content type is that data type is a predefined column in data base, while content type is specific type of data that can be mapped to real data, or data that comes in a system-source data.
Sometimes data can have strange data types or data type that differentiates from data type sets in a database, and it is better to map content types with data so the system can work with data without errors.
For example, the attribute DateOfBirth can have either date or the datetime data type, but there is information that it has a date data type in the database. When real data appears, containing a datetime data type, it can cause problems. To avoid this situation, the dateOfBirth content type with both date or datetime data type is created and mapped to the attribute.
Content Types in Omni Designer
Content types are taken from the repository service and can be created in the corresponding *.xml file or directly in Omni Designer.
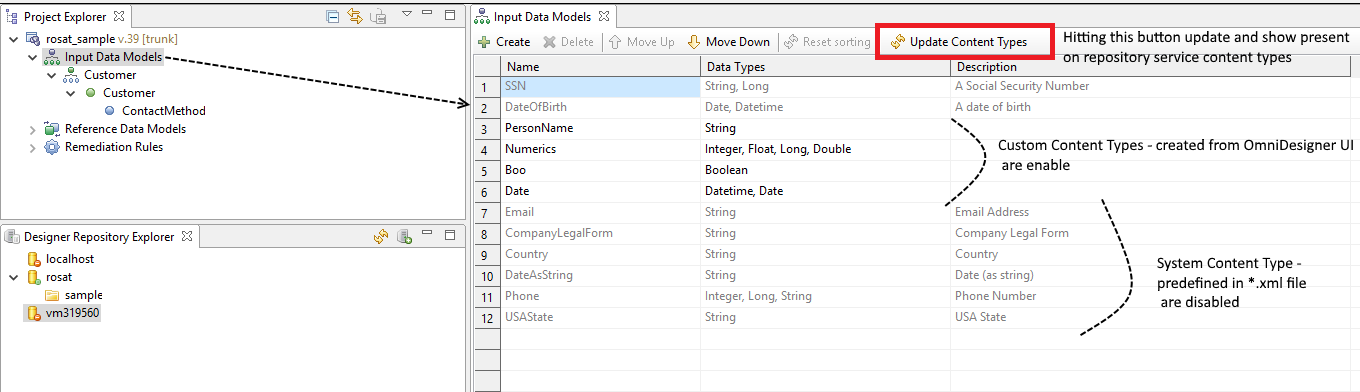
There are two available kinds of Content Types:
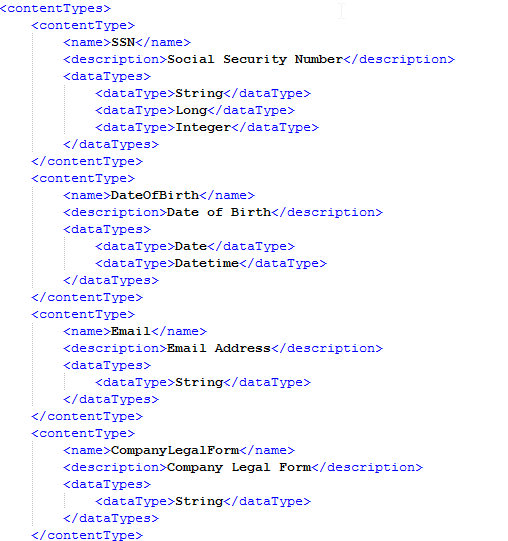
- System Content Type. A content type taken from contentTypes.xml
which is located by following path:
\omnigen\OmniDesignerRepository\webapps\com.iwaysoftware.omni.designer.repositoryservice\WEB-INF\classes\contentTypes.
The contentTypes.xml is extracted from the com.iwaysoftware.omni.designer.repositoryservice.war file and contains the following content:
You can add as many Content Types as is needed into the XML file and edit or remove existing types once. After updating the OmniDesigner/InputDataModels editor, the Update Content Types button will be available on the OmniDesigner user interface.
- Current Content Type. a content type created from the OmniDesigner/InputDataModels
editor page.
The Data type(s) must be obviously specified for both types of content types.
Available Content Types can be mapped to Subject fields from the subject editor page, as shown in the following image.
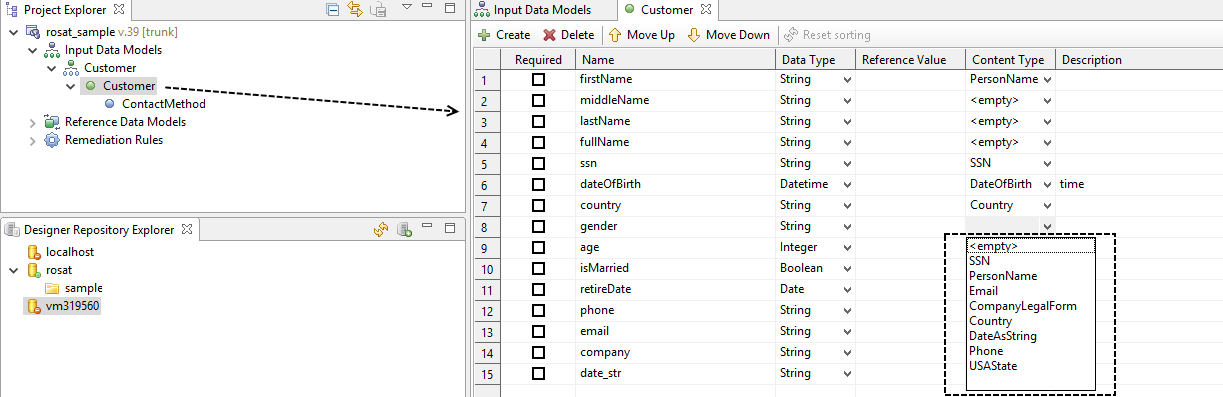
Only content types having the same data type as the field could be mapped to this field.
Note: Fields with data types reference and identified do not have mapped content types.
To have Content Types added or mapped from OmniDesigner and appear in the Workbench, you must generate project and deployment bundles and deploy bundles to OmniGen.
Content Types in the Workbench
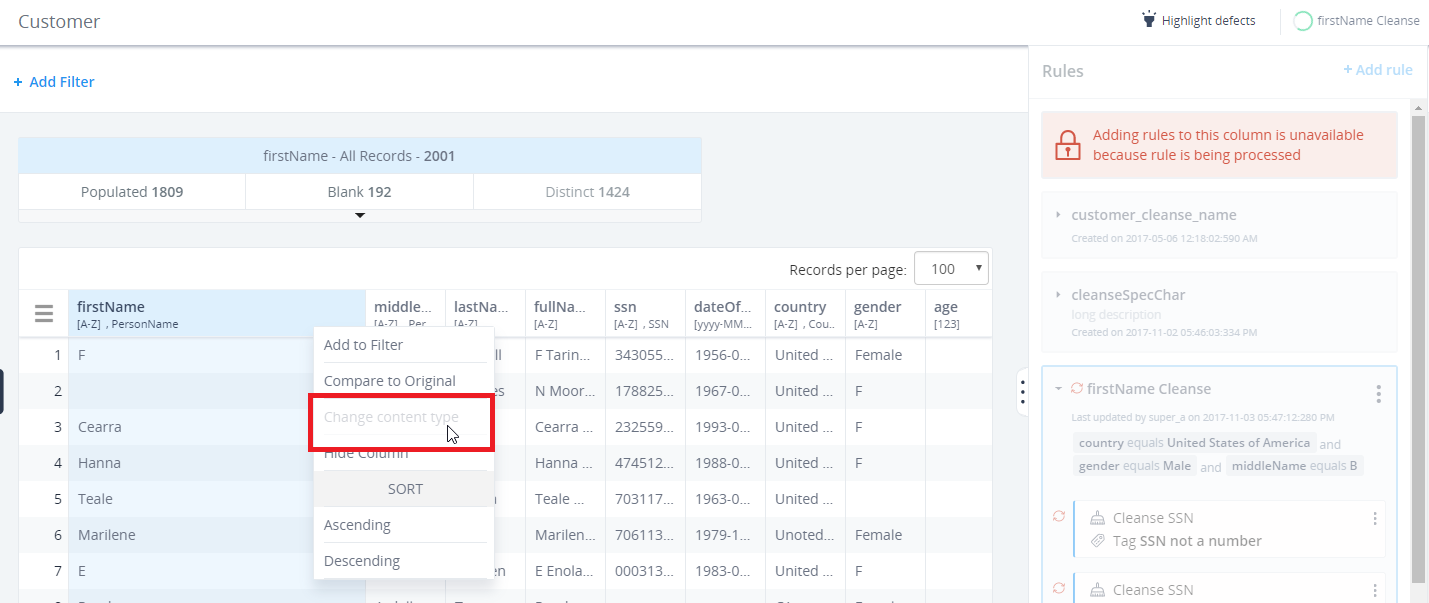
You can change the content type in the Workbench by clicking Change content types in the context menu from the repository service.
Content types can be added from table header content menu, as shown in the following image.
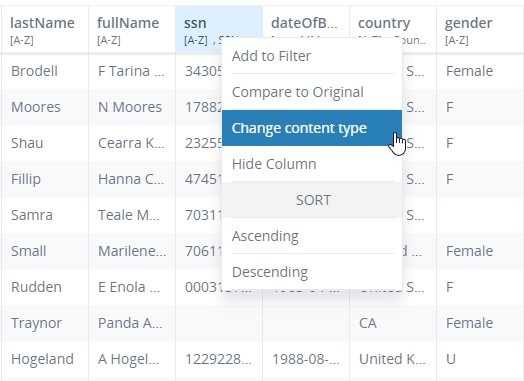
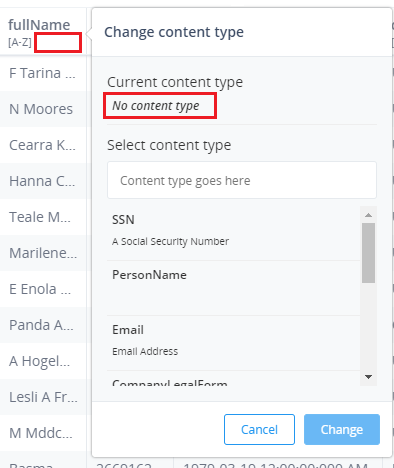
When you select the Change content type option in context menu, a dialog opens where you can select and change the content type.
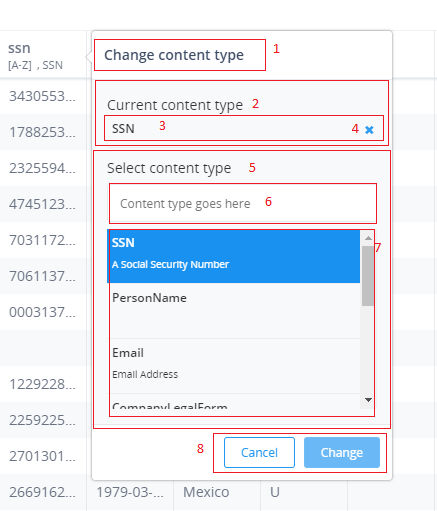
The following list shows the corresponding sections to the image above.
- Change content type header
- Current content type section
- Selected current content type
- Delete current content type section
- Selected current content type
- Search content type field
- Content type list
- Cancel /Change buttons
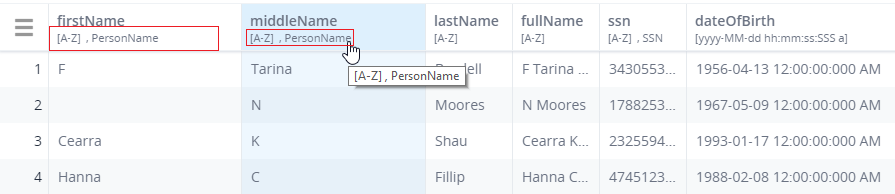
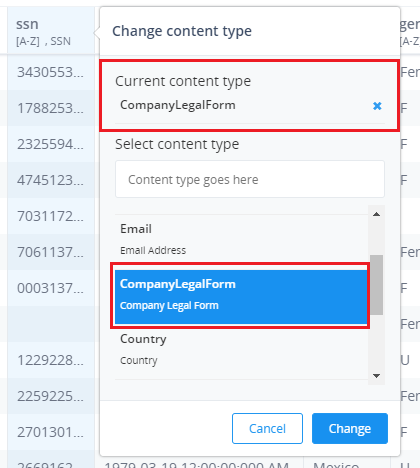
The Current content type section displays information regarding the current content type mapped to the attribute. If there is a content type already added, it will appear in the table header, as shown in the following image.
If there is no content type added, there will be no content type in the table header, and the corresponding information will be displayed in the Change content type dialog.
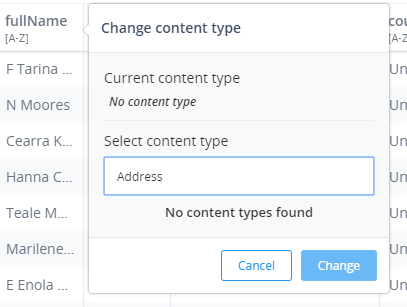
The Select content type section contains information regarding all available content types.
There is also a search field that allows you to search for content types.
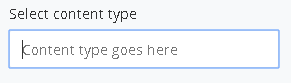
If there is no content type found, then the appropriate information appears.
The following image shows a list of available content types (created or uploaded on the repository service). The Content type name and description are displayed for each content\ item.
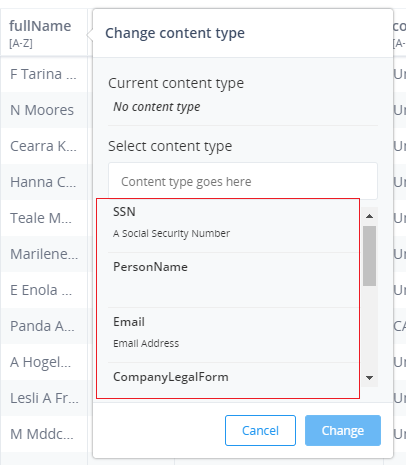
The Name and Description of content types are predefined in the contentTypes.xml file and in OmniDesigner.
If the FieldType was specified inside the contentTypes.xml file on the OmniDesigner side, then the content types displayed in the list of the dialog corresponds to the data type of the selected attribute. If FieldType was not specified in the context_type.xml file, then this content type will be displayed for all attribute data types.
Once you select a content type in the list, it will appear in the Current content type section. Clicking Change will make it appear in the Column header.
To delete content type from the selected column, delete it from Current content type section and click Change.
To delete content type from all over the attributes, Enter the content type in the Select content type field from the list and click Delete. The Delete button appears when you hover the cursor over the content type.
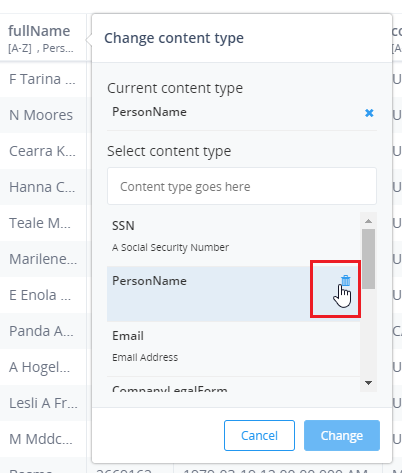
Only Current Content Types (created from OmniDesigner) can be removed. System Content Types cannot be removed from the list, because the delete button does not appear for them.
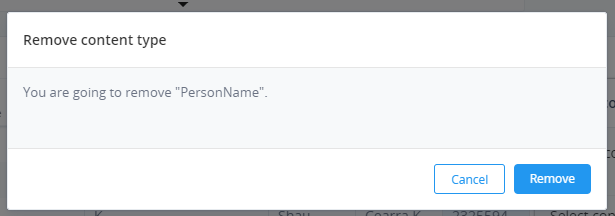
The following confirmation message appears when you delete a Content Type from the list.
After clicking Remove, the rules panel will appear and the content type will be deleted from all the attributes. All operations added for the removed content type will also be deleted.
You can remove content types from all over the application during any user session.
To revert deleting from the application, click Reset Session. The application returns to the default state.
To map content types to the selected column, you must first select it from the list and click Change. The Content Type will appear in the Current content type section.
One attribute can have only one Content Type assigned, but one content type can be related to several attributes.
Content Types and Operations
Both Data Type operations and Content Type operations are available for cleansing.
Attributes that have added Content Types can be cleansed using Operations configured for that Content Type, but it cannot work with operations configured for another Content Type. The configuration of the Content Type inside the operation is made in the following property:
<contentType> </contentType>
Changing the content type of an attribute that is being executing is disabled. However, you can change the Content Type or remove it from other attributes.
If you remove a Content Type from the list of dialogs, all operations added for that content type will also be removed. Once the rules have been executed, the rules data will be updated accordingly.