Configuring Remediation Pages
|
Topics: |
This section describes the configurations for the remediation pages.
Issues Page
|
Topics: |
The Administration panel is available for users with the System Administrator role.
You must first identify which grid on the Issues page needs to be configured.
- If the Parent grid needs to be configured, click the Tables tab and select the WF Cases table from the list of tables.
- If the Inline grid needs to be configured, click the WF Tickets table from the list of tables.
Case Issues Grid
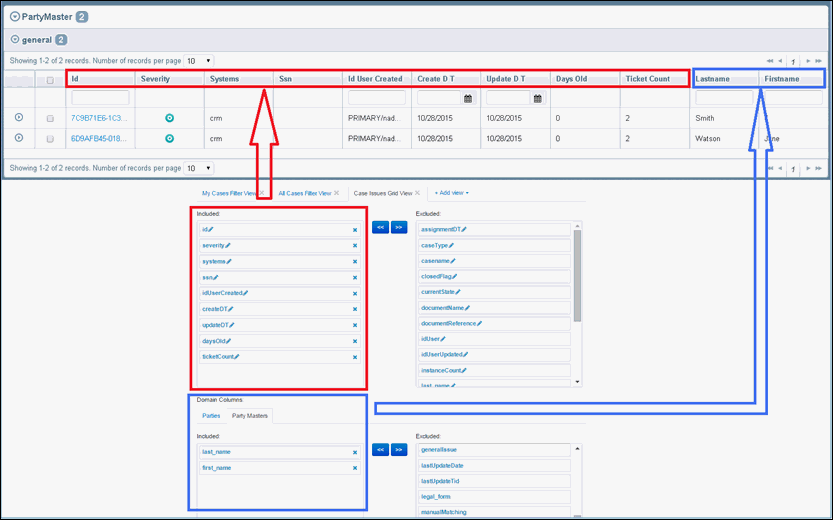
The Case Issues Grid view is responsible for the looks and appearance of the Case Grid in the All Cases and My cases tab of the Issues Search page. The view consists of the following parts:
- general
- domain
The general-related part includes columns which are common for all domains and configurations in the main Included section of the Case Issues Grid view.
The domain columns are displayed next to the general columns in the grid and can each be preconfigured for the current user domain.
In order to configure how the Case grids appear on the Issues Search page, click the Tables tab and select WF Cases from the list of tables. The table should consist of the following views:
- My filter Issues Grid
- All Filter Issues Grid
- Advanced Search View
- Case Issues Grid View
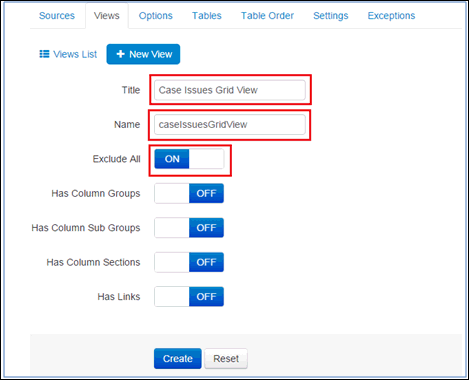
First, check if the current metadata contains a particular view in Views List. If the Case Issues Grid View is not created yet, delete the existing Master Issues Grid View, then click the New View button and fill in the required fields, as shown in the following image.
Click Create and then click the Tables tab, open the WF Cases table, and click Edit Table.
Add the required Views from the Add View drop-down list and exclude any that are not required.
To rearrange the columns in the view, drag the required column from the Excluded section to the Included section, especially if you wish to include the column in the view.
Click the X icon if you wish to exclude a column from the view.
Ticket Issues Grid
The Ticket Issues Grid View is responsible for how the Inline grid appears, which is used to display Ticket details. In order to configure the Inline grids in the Issues Search page, click the Tables tab and select WF Tickets from the list of tables. That table should consist of the following views:
- My filter Issues Grid
- All Filter Issues Grid
- Ticket Issues Grid View.
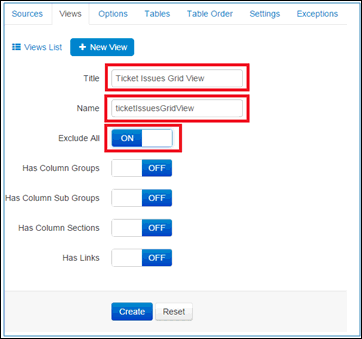
Check if the current metadata contains a particular View in Views list. If the Ticket Issues Grid View is not created yet, delete the existing Instance Issues Grid View, then click the New View button and fill in the required fields, as shown in the following image.
Click Create, and click Tables tab, then open the WF Tickets table and click Edit Table.
Add the required Views from the Add View drop-down list and exclude any that are not required.
To rearrange the columns in the view, drag the required column from the Excluded section to the Included section, especially if you wish to include the column in the view.
Click the X icon if you wish to exclude a column from the view.
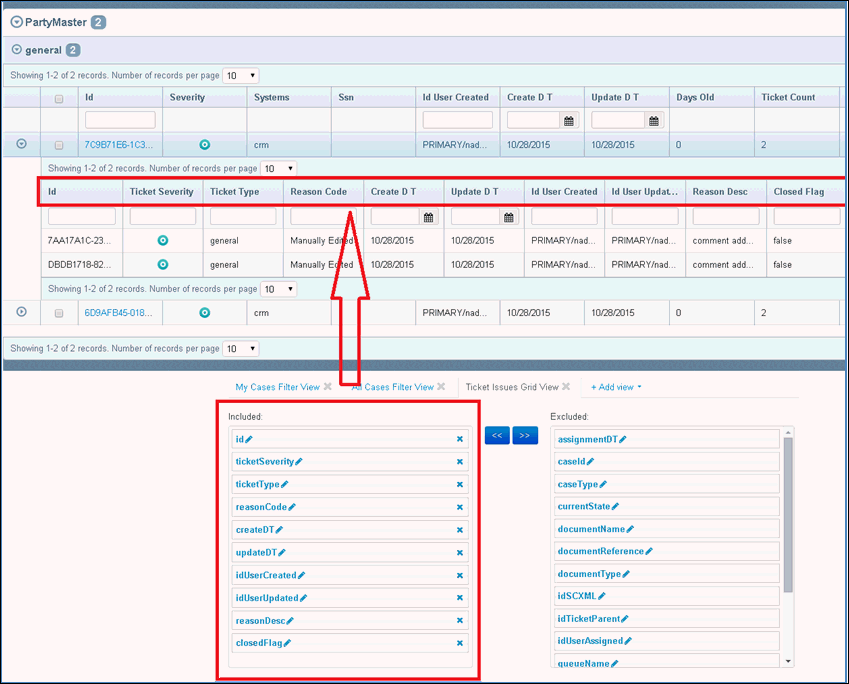
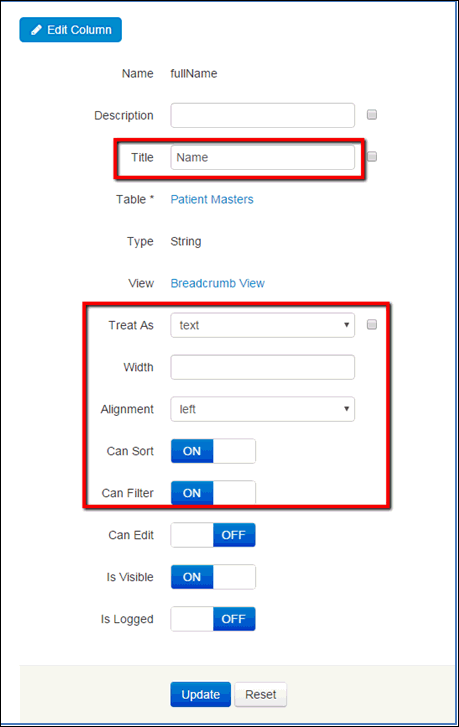
The configuration of nested columns (for example, display name, sortable, filterable) are available by clicking the pencil (edit) icon for the appropriate columns and updating the corresponding options.
Filtering Panel on My Cases Tab
In order to configure the Filtering Panel for cases on the Issues page, click the Tables tab and then click WF Cases from the list of tables. If the Filtering panel for tickets needs to be configured, then the WF Tickets table should be edited.
The My Cases Filter View is responsible for the list of filtering criteria displayed in the Filtering panel of the My Cases tab, as shown in the following image.
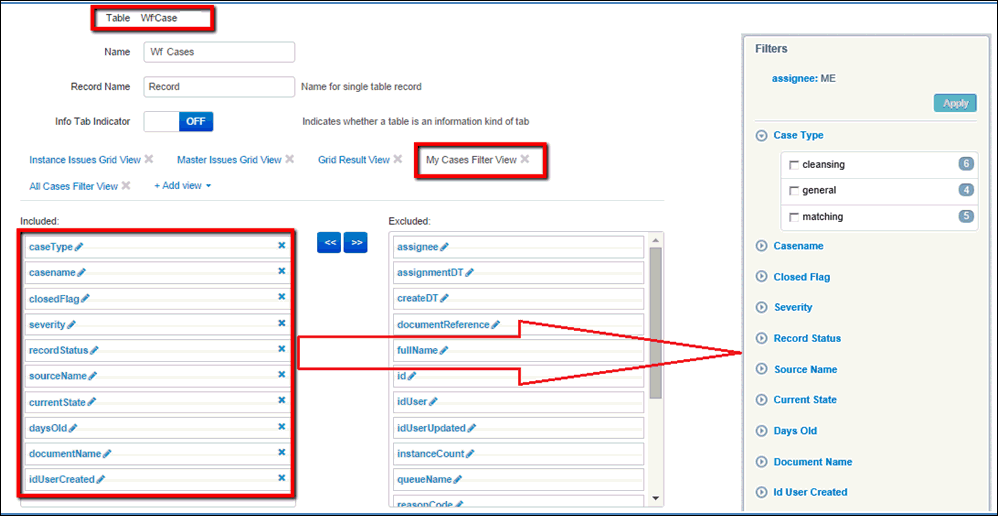
To rearrange the columns in the view, drag the required column from the Excluded section to the Included section, especially if you wish to include the column in the view.
Click the X icon if you wish to exclude a column from the view.
Filtering Panel on All Cases Tab
In order to configure the Filtering Panel for cases on the Issues page, click the Tables tab and then click WF Cases from the list of tables. If the Filtering panel for tickets needs to be configured, then the WF Tickets table should be edited.
The All Cases Filter View is responsible for the list of filtering criteria displayed in the Filtering panel of the All Cases tab.
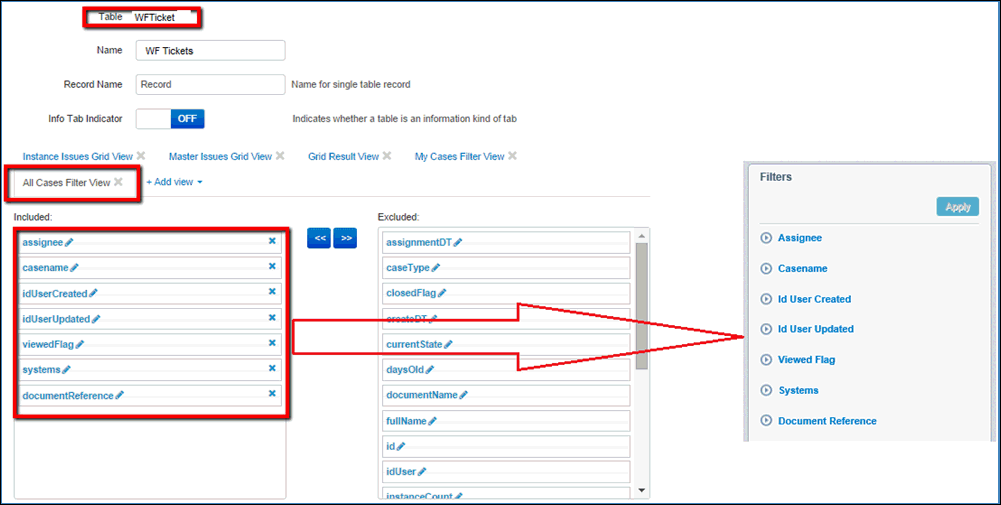
To rearrange the columns in the view, drag the required column from the Excluded section to the Included section, especially if you wish to include the column in the view.
Click the X icon if you wish to exclude a column from the view.
Number of Filtering Criteria Sections Expanded by Default
In order to change the number of Filtering criteria sections expanded by default, click the Settings tab and select Issue Filter Sections Count from the list.
The number entered in the Value field corresponds to the number of sections to be expanded by default in the Filtering Panel of the Issues page.
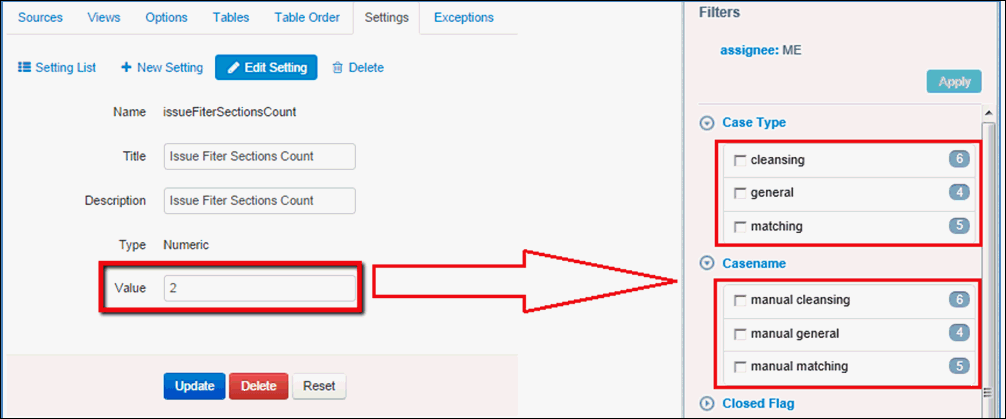
This setting is applied to Filtering panels on both the My Cases and All Cases tabs.
Default Filtering on My Cases/All Cases Tab
In order to have default filters in the issue search page, you must create the following options accordingly:
- DefaultFiltersMyCases
- DefaultFiltersAllCases
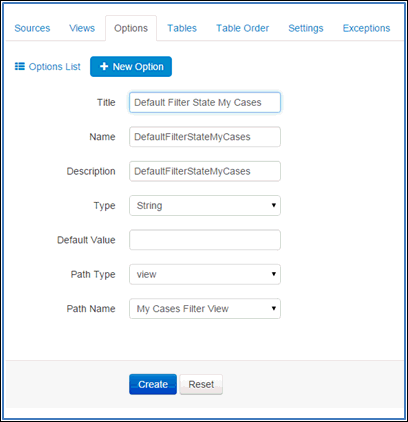
You must perform the same steps for the All Cases tab.
When the options are created, they will appear in a list of options, as shown in the following image.
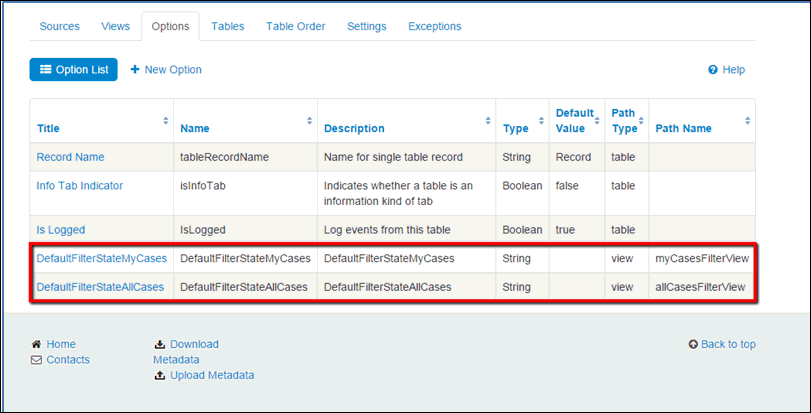
After the options have been added, add the required values to the default filtering section for the corresponding tab of the WF Cases table.
The following image shows the columns that are in the Included section of the My Cases and All Cases filter view.
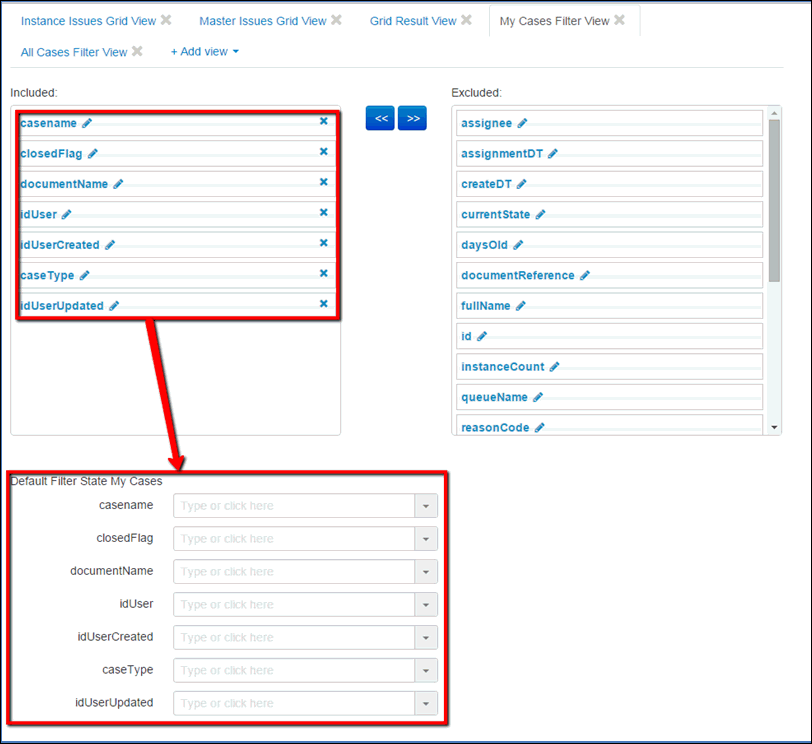
If a column is moved to the Excluded section, it will automatically disappear from the Default Filtering section.
You can select any required value for the field from the drop-down list. You can also start typing in the field and then select any of the results that meet your criteria, as shown in the images below.
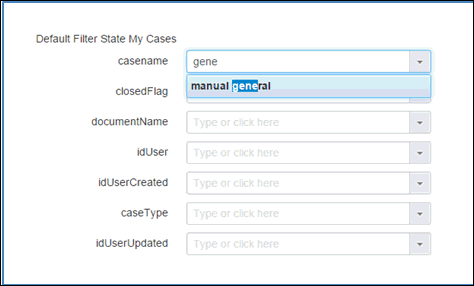
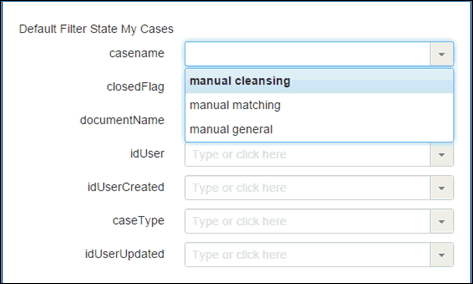
More than one value can be selected per field if needed:
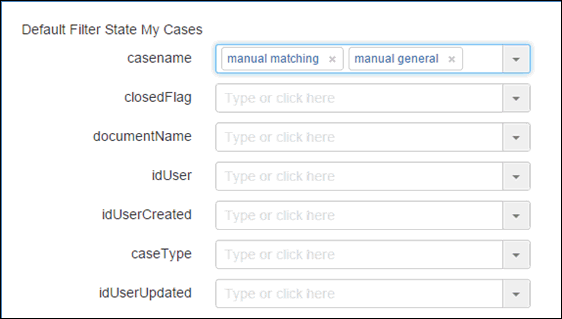
After the required values are set, click Update to apply the changes.
Switching ON/OFF of Multiselect Drop-down List on My Cases/All Cases Tabs
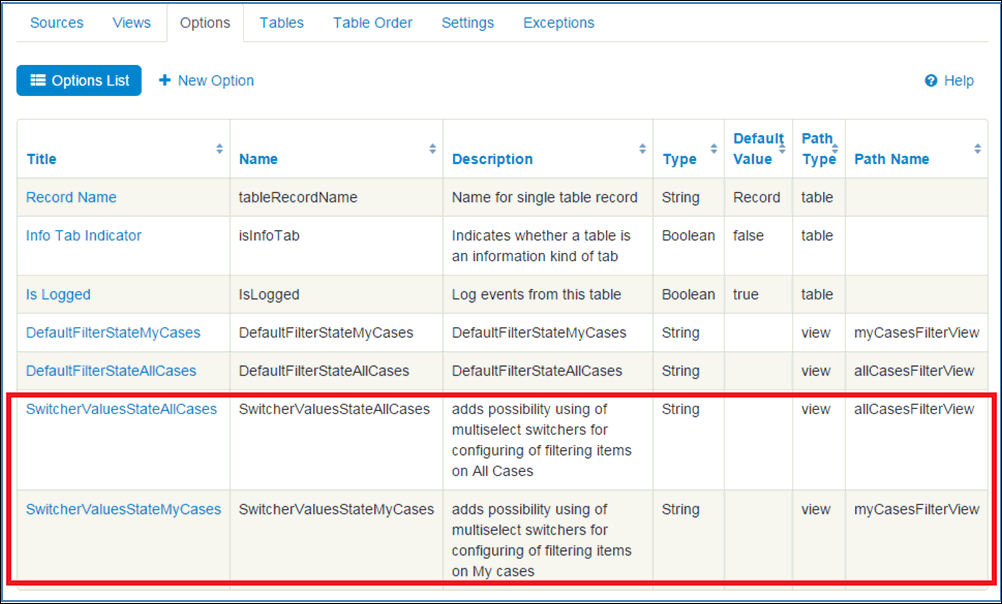
To enable fields with multiselect drop-down lists on the Filtering Panel Issue search page, you must create the following options:
- SwitcherValuesStateAllCases
- SwitcherValuesStateMyCases
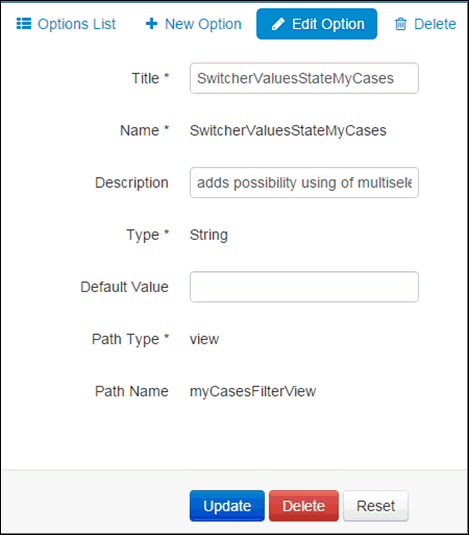
You must also create the same options in the All Cases tab.
When the options are created, they will appear in the list of options, as shown in the following image:
After the options have been added, switch the WF Cases or WF Tickets to either ON or OFF for each multiselect drop-down list option. Columns that are in the Included section of the My cases or All cases filter views of the WF Cases table will automatically appear in the Default Filtering section along with the multiselect switches, as shown in the following image:
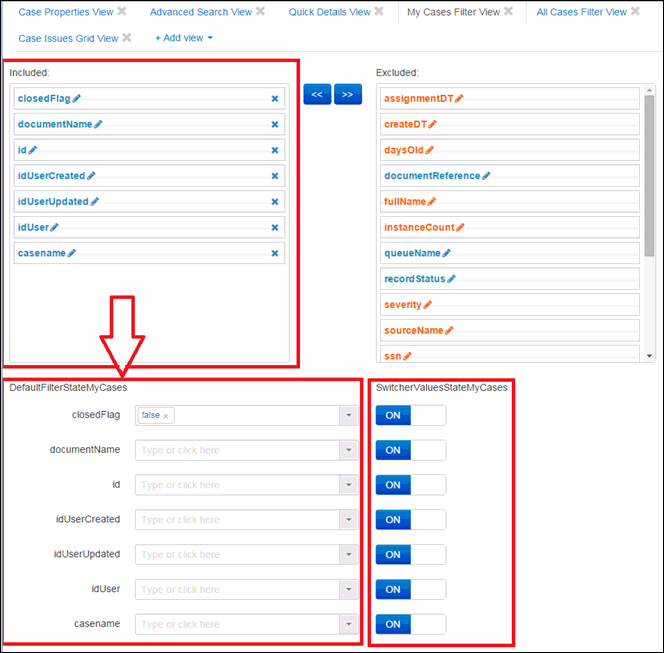
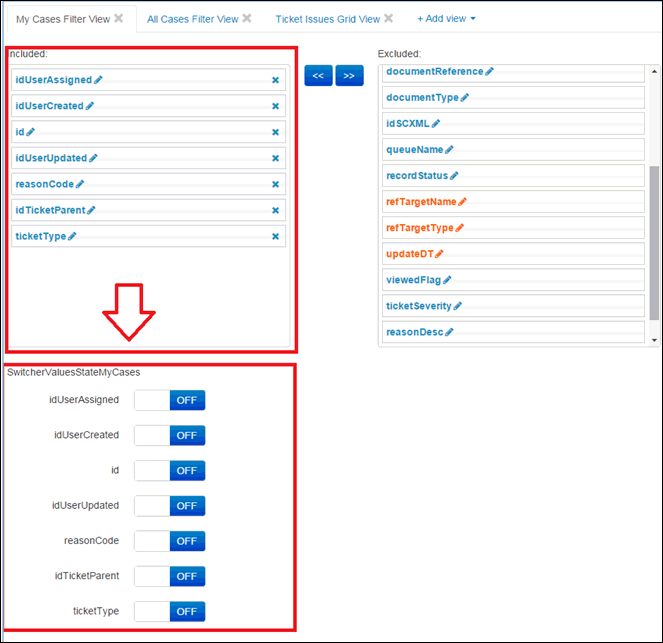
The Default setting of the multiselect switch is set to OFF, and the UI of the fields are displayed with check boxes. If a column is moved to the Excluded section, then it will automatically disappear from the Default Filtering section.
The Multiselect switches appear only for the WF Tickets table and display the appropriate views, as shown in the following image.
After the required values are set, click Update to apply the changes.
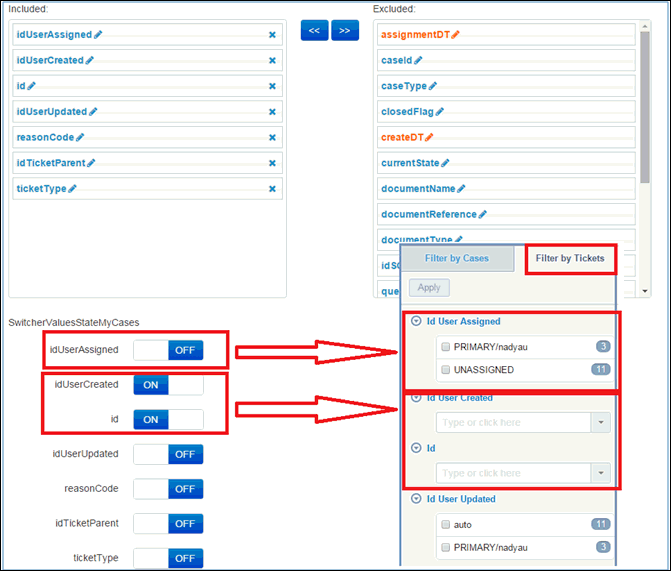
The Filtering Panel on the Issues Search page reflects the preconfigured settings on the appropriate view of the Administration page, as shown in the following image.
Override Matching Page
|
Topics: |
The Administration panel is available for users with the System Administrator role.
Instance Details Panel
To configure the Instance Details panel, click the Tables tab and select an Instance table (for example, Provider, Worker, and so on).
The table consists of many views. Click Full Info View, as shown in the following image.
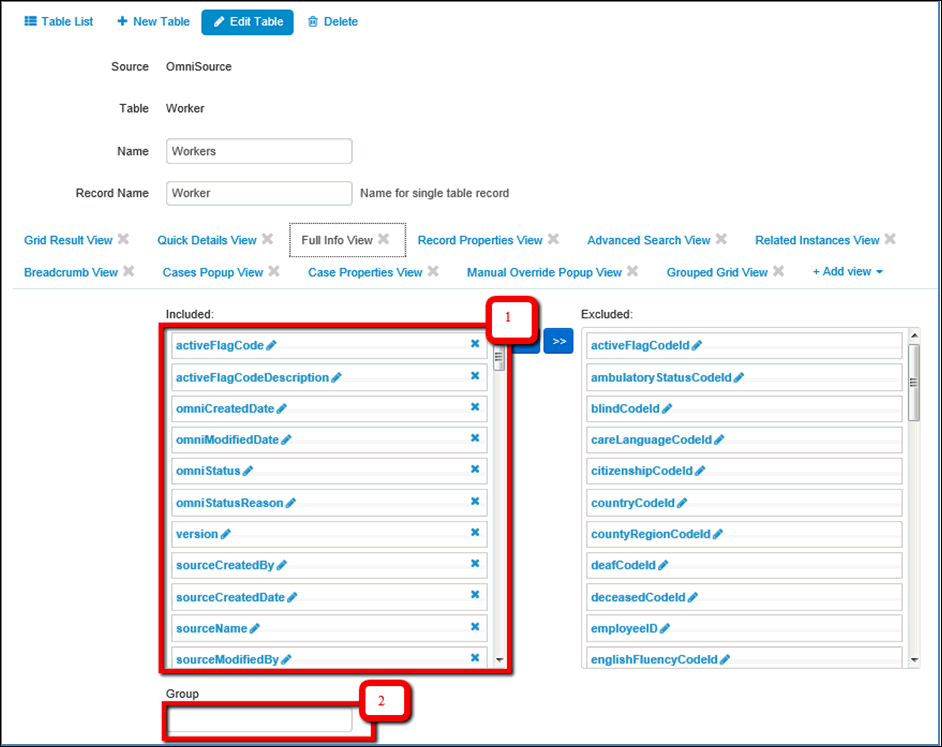
To rearrange the columns in the view, drag the required column from the Excluded section to the Included section, especially if you wish to include the column in the view.
Click the X icon if you wish to exclude a column from the view (1).
If you wish to separate the columns into Groups, add the appropriate group to the Included section (2).
Case Properties Panel
You can configure the Case Properties panel in the Override Matching page. The WF Cases table can be found in the list of tables, and the view that needs to be configured is the Case Properties View.
Note: Configuring the Case Properties View affects all Remediation case pages, including: Override matching, manual cleansing, and General Issue cases.
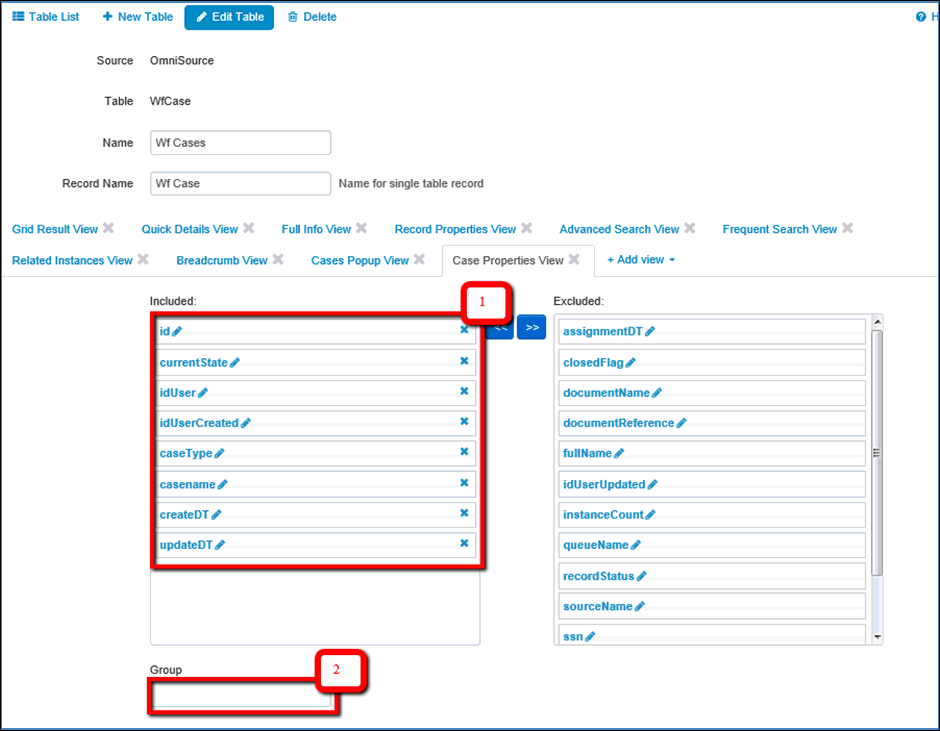
To rearrange the columns in the view, drag the required column from the Excluded section to the Included section, especially if you wish to include the column in the view.
Click the X icon if you wish to exclude a column from the view (1).
If you wish to separate the columns into Groups, add the appropriate group to the Included section (2).
Note: For this view, the names of groups will not be displayed. A horizontal line will appear instead.
Manual Cleansing Page
|
Topics: |
The Administration panel is available for users with the System Administrator role.
Workspace Panel
To configure the Workspace panel, click the Tables tab and select an Instance table (for example, Provider or Worker).
The table consists of many views. Click Full Info View, as shown in the following image.
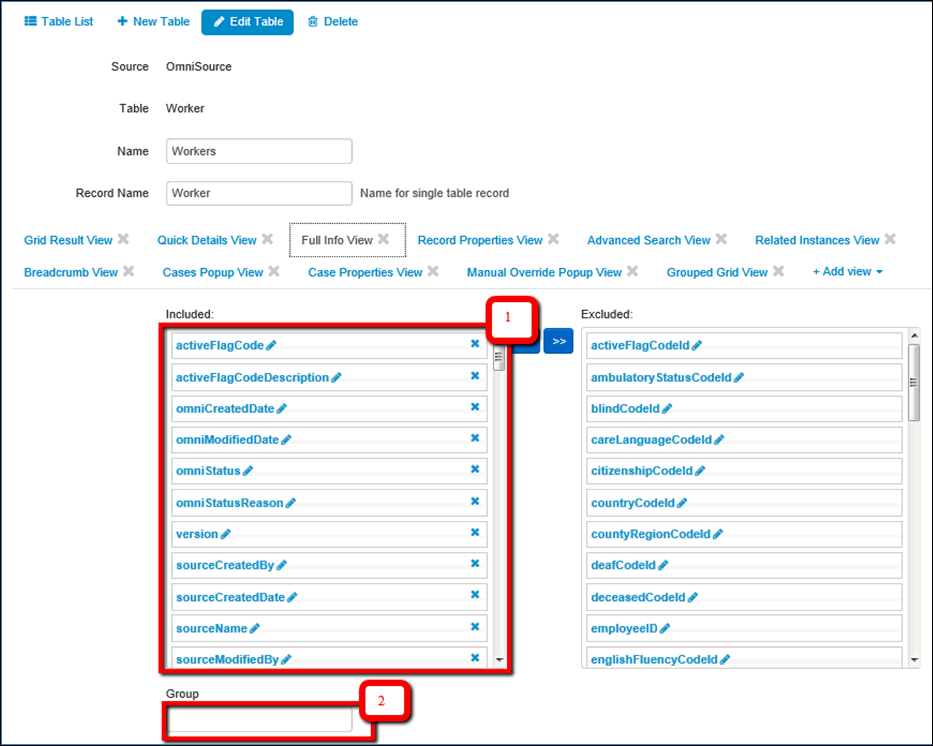
To rearrange the columns in the view, drag the required column from the Excluded section to the Included section, especially if you wish to include the column in the view.
Click the X icon if you wish to exclude a column from the view (1).
If you wish to separate the columns into Groups, add the appropriate group to the Included section (2).
Ability to Allow/Prohibit Editing for Fields
To configure the ability to edit fields in the workspace panel, edit the nested columns (for example, display name, sortable, or filterable). This can be done by clicking the pencil (edit) icon for the corresponding columns in the Full Info View of the selected table and updating its parameters accordingly.
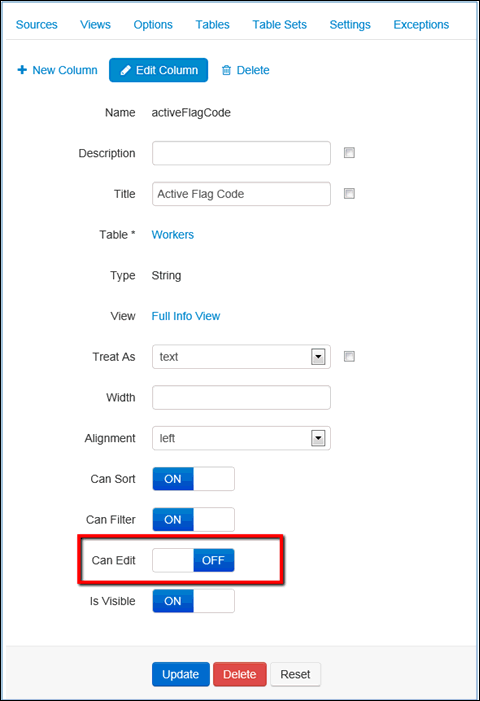
If a field needs to be disabled for editing, select the OFF option. Otherwise, select ON if there are no changes.
Case Properties Panel
You can configure the Case Properties panel in the Manual Cleansing page. The WF Cases table can be found in the list of tables, and the view that needs to be configured is the Case Properties View.
Note: Configuring this view affects all Remediation case pages, including: Override matching, manual cleansing, and General Issue cases.
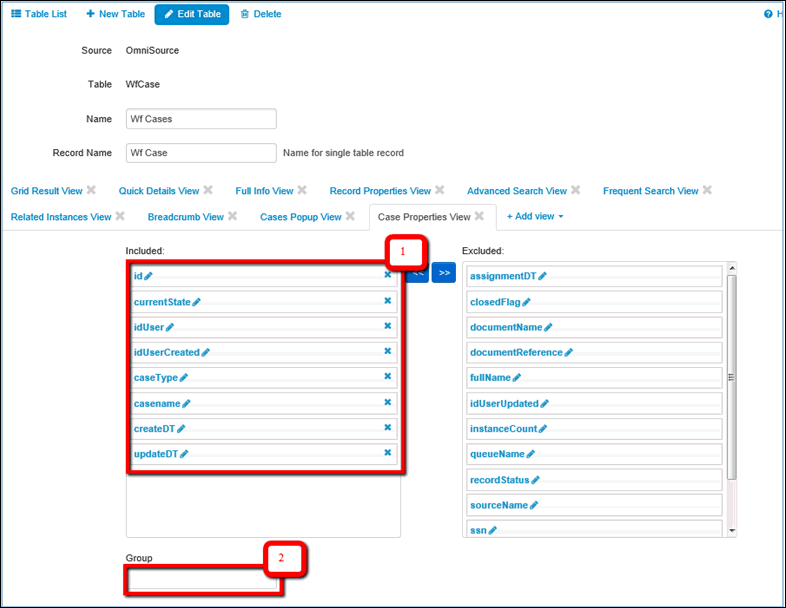
To rearrange the columns in the view, drag the required column from the Excluded section to the Included section, especially if you wish to include the column in the view.
Click the X icon if you wish to exclude a column from the view (1).
If you wish to separate the columns into Groups, add the appropriate group to the Included section (2).
Note: For this view, the names of groups will not be displayed. A horizontal line will appear instead.
General Issue Page
|
Topics: |
The Administration panel is available for users with the System Administrator role.
Workspace Panel
To configure the Workspace panel for the General Issue of the Instance record, click the Tables tab and select an Instance table (for example, Provider or Worker).
The table consists of many views. Click Full Info View, as shown in the following image.
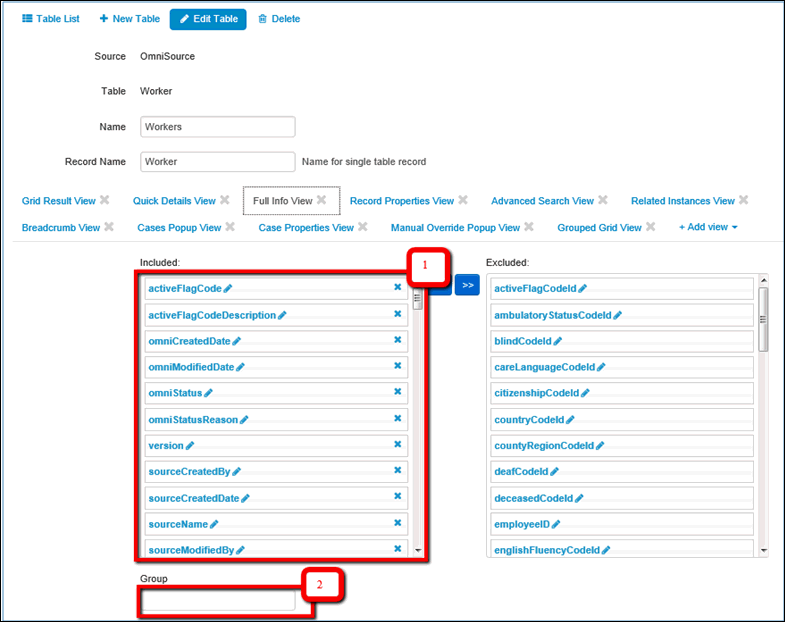
To rearrange the columns in the view, drag the required column from the Excluded section to the Included section, especially if you wish to include the column in the view.
Click the X icon if you wish to exclude a column from the view (1).
If you wish to separate the columns into Groups, add the appropriate group to the Included section (2).
Note: When the Workspace panel of the General Issue page for the Golden record needs to be configured, follow the same steps mentioned above. However, the Master table must be edited (for example, Provider Masters or Patient Masters).
Case Properties Panel
You can also configure the Case Properties panel in the General Issue page. The WF Cases table can be found in the list of tables, and the view that needs to be configured is the Case Properties View.
Note: Configuring this view affects all Remediation case pages, including: Override matching, manual cleansing, and General Issue cases.
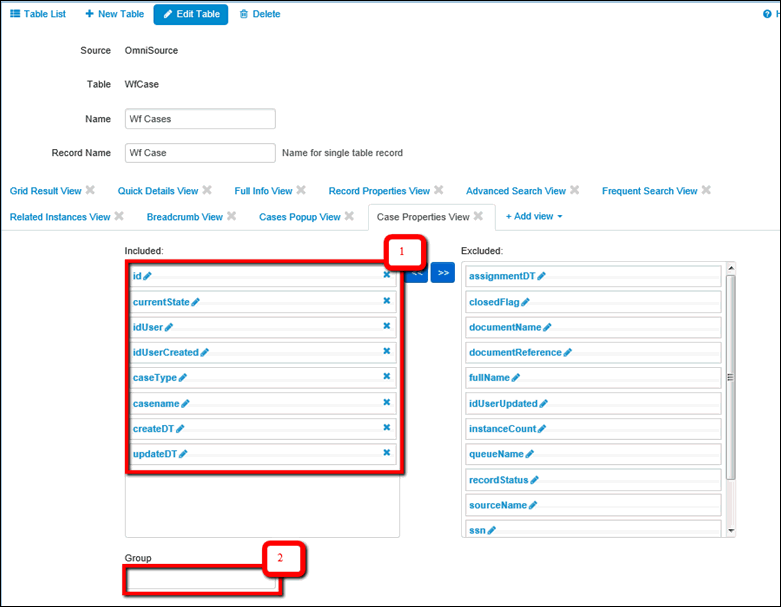
To rearrange the columns in the view, drag the required column from the Excluded section to the Included section, especially if you wish to include the column in the view.
Click the X icon if you wish to exclude a column from the view (1).
If you wish to separate the columns into Groups, add the appropriate group to the Included section (2).
Note: For this view, the names of groups will not be displayed. A horizontal line will appear instead.
Issues Pop Up
The Administration panel is available for users with the System Administrator role.
To configure the Issues pop up, click the Tables tab and select an Instance table (for example, Provider or Worker) from the WF Case list of tables.
The consists of many views. Click Quick Details View.
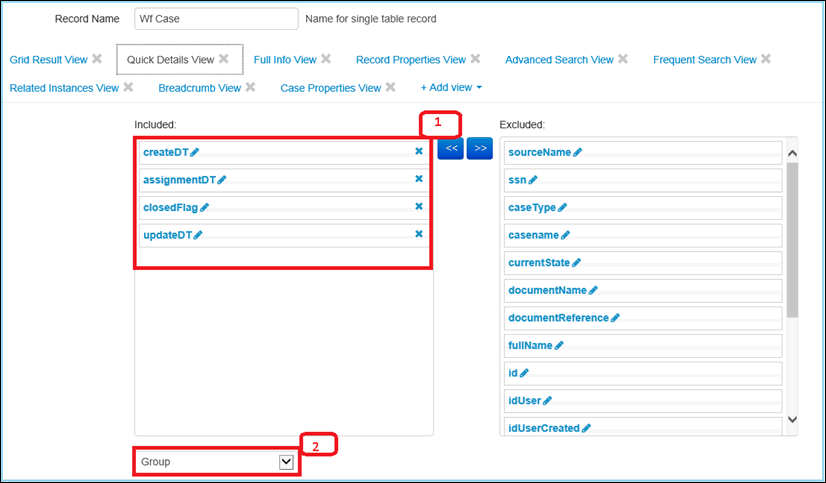
To rearrange the columns in the view, drag the required column from the Excluded section to the Included section, especially if you wish to include the column in the view.
Click the X icon if you wish to exclude a column from the view (1).
If you wish to separate the columns into Groups, add the appropriate group to the Included section (2).
Domain Grid Configuration
To configure sections and their attributes, include or exclude the necessary columns in the Full Info View of the appropriate table.
The following image shows the steps required to configure the domain grid.
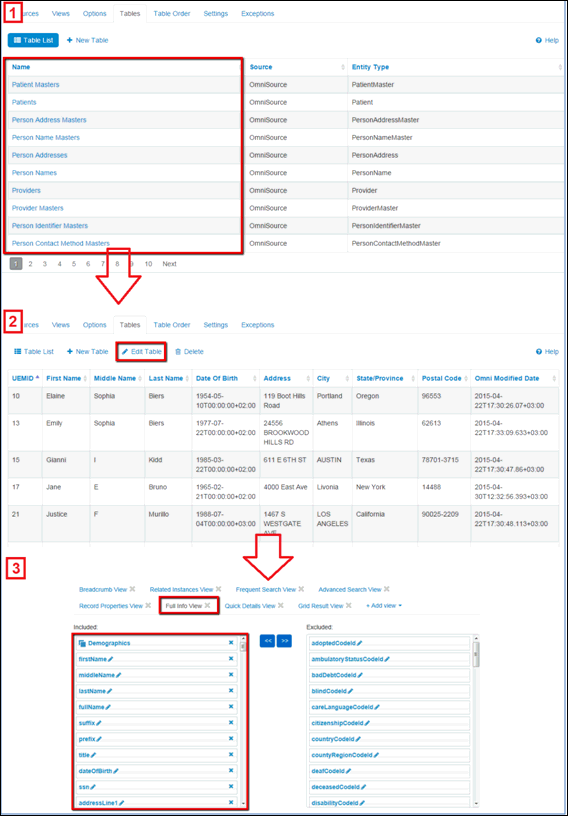
- Find the required table in the list of tables.
- Edit the table.
- Click Full Info View
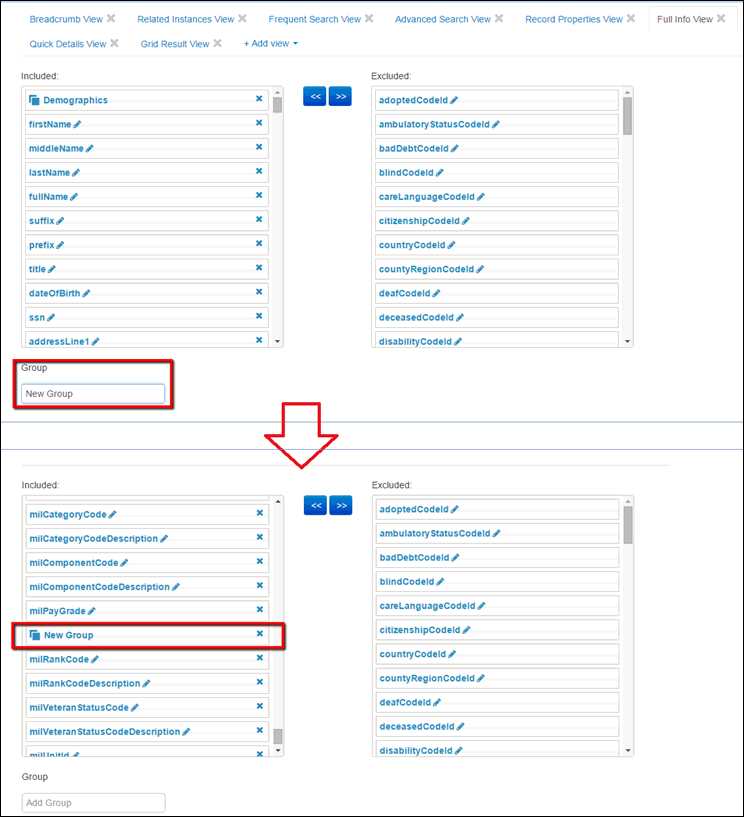
To divide the fields on the page into sections, edit the Group field and press Enter (Full Info view). The header of the section will be added into the list of included columns.
Drag the header and drop it above the columns that are required for the section.
Breadcrumbs Configuration
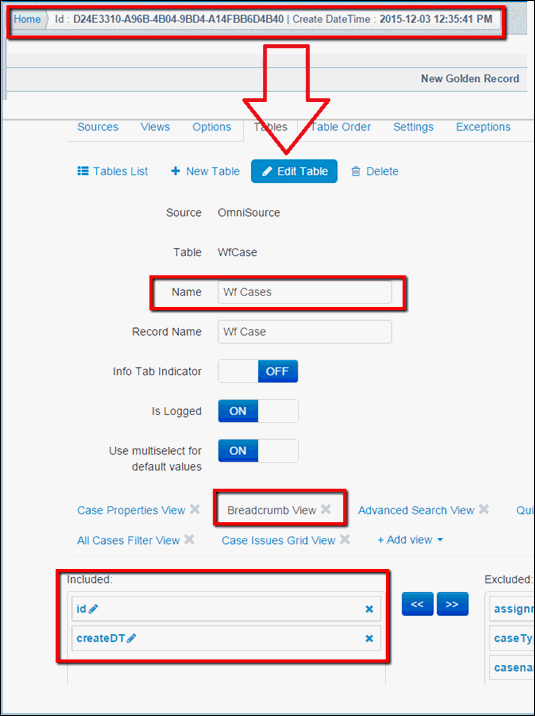
Breadcrumbs are configured through the Breadcrumb View in the WF Case table, as shown in the following image.
Sub-domains Configuration
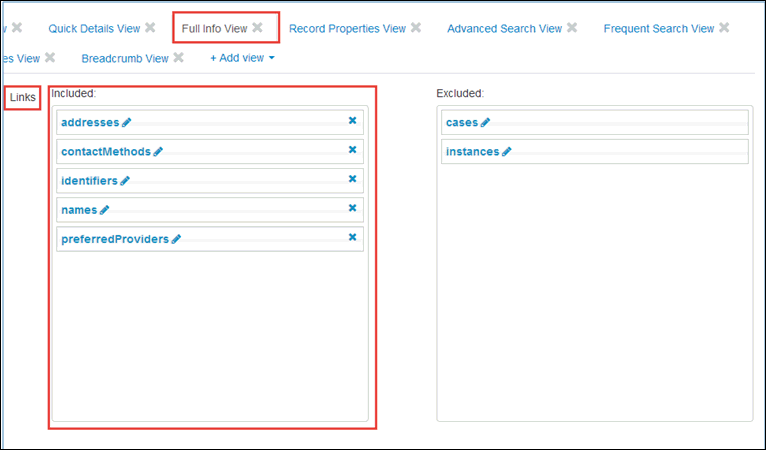
To configure subdomains in the Add New Document page, edit the Document table and include or exclude the required links in the Full Info View, as shown in the following image.
