Using and Managing DQ Components
|
Topics: |
The DQ Components table is available only for shared projects. When a project is not shared, the following message appears:
Project is not shared. Adding/Importing a new DQ Plan functionality is not available. Please share the project first.
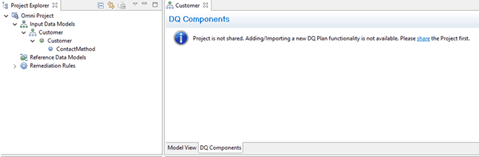
When you click on the share link, the sharing dialog opens.
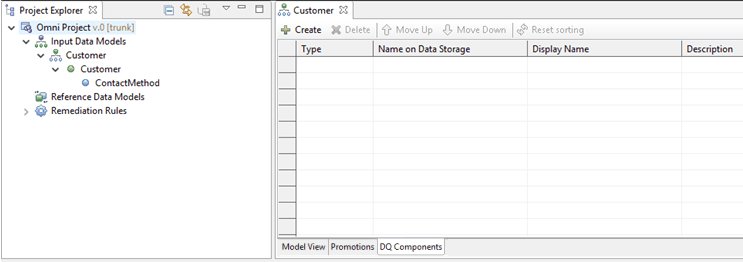
After sharing the project, the DQ Components pane appears, as shown in the following image.

The following plans are available for the entire Input Data Model:
- Cleansing
- Matching
- Merging
- Remediation
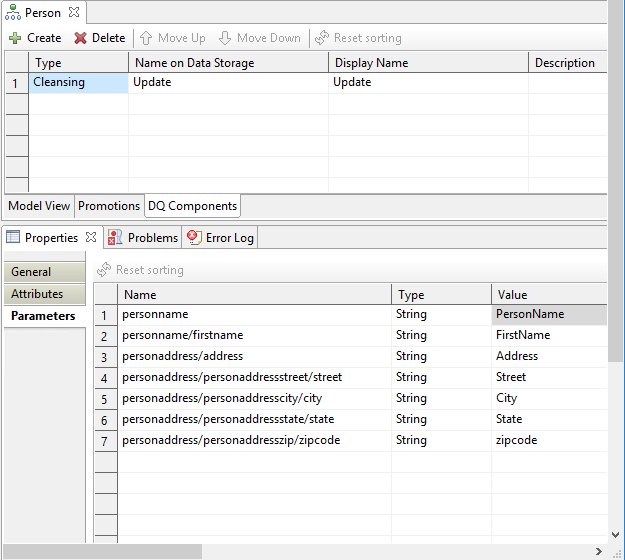
You can manage these plans on the DQ Components section of the Input Data Model Editor. They are displayed in the table as columns.
|
Column Name |
Description |
|---|---|
|
Type |
You cannot modify this column, which is used for cleansing, matching, and merging. Remediation values will be available depending on the created DQ Plan. |
|
Name on Data Storage |
Unchangeable |
|
Display Name |
The display name is required and can be modified. |
|
Description |
Adding a description is optional and will match the short description in the Properties tab. |
You can create or import many Cleansing DQ Plans for one Input Data Model. There are no restrictions for the quantity of Cleansing DQ Plans.
You can also create or import many Matching Plans for one Input Data Model. However, if there are multiple Matching Plans for one Input Data Model, the Type cells of the Matching Plans will be marked as invalid in the DQ Components table, and the Input Data Model will be marked with validation in the Project Explorer.
You will not be able to import Merging and Remediation DQ plans.
You can remove any of the DQ plans by selecting DQ Plan and clicking Delete or pressing Delete on your keyboard.
Data Quality Projects
You can create and import DQ plans only for Omni Designer Projects that are associated with Data Quality (DQ) Projects.
After a selected Omni Designer Project is shared, you will see the Associate option in the Omni Designer Project context menu, after selecting DQ Project, as shown in the following image.
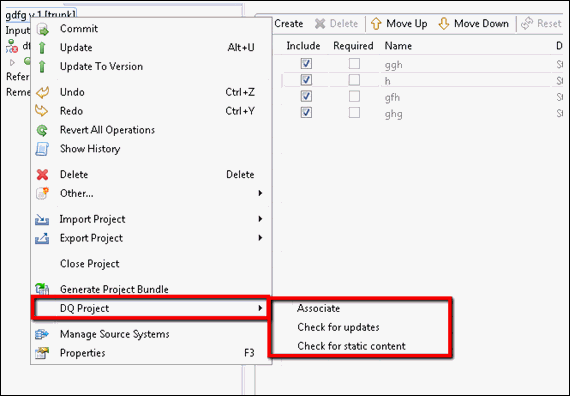
If the project is shared, you can associate it with any DQ Project from the development server.
If the Omni Designer project is associated with the DQ Project, then the Check for updates and Check for static content buttons will be enabled, which allows you to update to the latest version of the DQ Project.
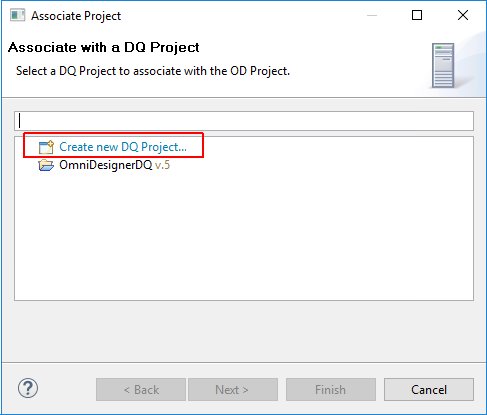
After sharing the Omni Designer Project, you can create a new DQ Project, as shown in the following image.
There are two ways to associate an Omni Designer Project with a DQ project:
- From context menu by right-clicking on the Omni Designer Project.
- Open a DQ Components page and then click Create. If the Omni Designer Project was not previously associated, you will be prompted to associate it with a DQ Project.
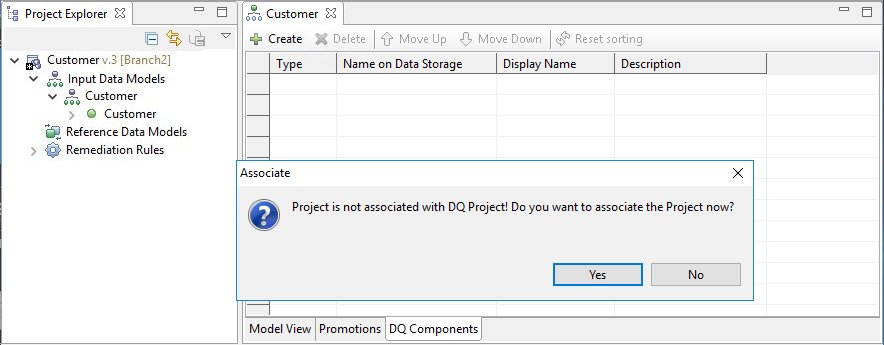
A message asking you to confirm the project association is displayed, as shown in the following image.
If you click Yes or selected the Associate with DQ Project option from the context menu, the Associate Project wizard opens, as shown in the following image.
If you are associating an Omni Designer Project for the first time, you will not see any selections in this dialog and the Finish button will be disabled.
You can click Finish only after a project has been selected from the list.
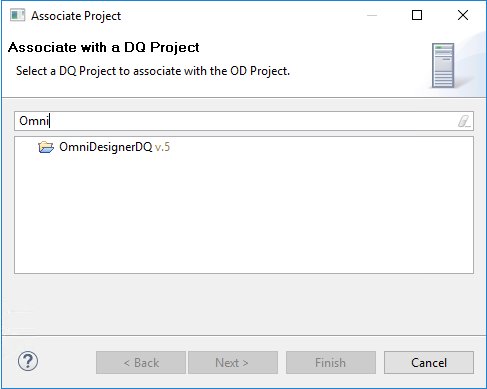
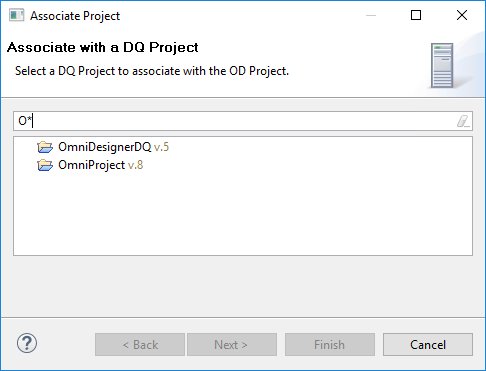
The Associate Project wizard also supports filtering. If you many projects, then you can filter through them by typing the name of the project in the field, as shown in the following image.
After an association with a DQ Project is completed, the Omni Designer Project includes additional information about the associated DQ Project in the Properties tab, as shown in the following image.
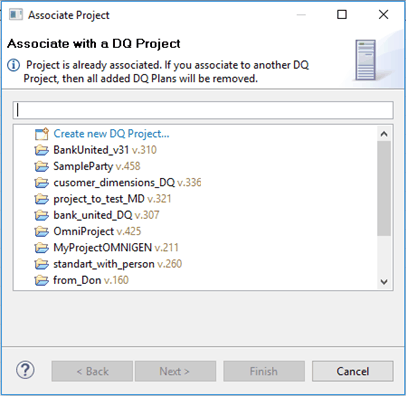
You can also associate an Omni Designer Project to another DQ Project even if the Omni Designer Project is already associated to some project on the development server. However, in this case, the following message is displayed:
Project is already associated. If you associate to another
DQ Project, then all added DQ Plans will be removed.
In the event that the development server is not started or could not be reached, the list of projects will be empty and the following message is displayed:
Development server could not be reached at the moment.
Open Error Log to see more details.
If the project is already associated, the list will exclude the current associated DQ Project, showing only the different ones. The description of the wizard will also change to contain the information of the projects that are currently associated. When finished, the final confirmation dialog will be shown.
You will then be able to re-associate the Omni Designer Project to another DQ Project at any time. In this case, all DQ Plans added to the project within the previously associated DQ Project will be removed from the DQ Plans Grid.
While associating the Omni Designer Project to the DQ Project, the DQ Project will be verified through the consistency of static files. If the DQ Project does not contain any static files, then the DQ Project will be automatically added and committed.
To see the DQ Project structure template, navigate to \webapps\com.iwaysoftware.omni.designer.repositoryservice\WEB-INF\classes\templates\dqproject.
You can also open com.iwaysoftware.omni.designer.repositoryservice.war and navigate to WEB-INF\classes\templates\dqproject.
All structures contained in this folder should be identical, similar to the SVN/GIT DQ Project after the first association.
A notification dialog will appear if there are no DQ Projects on the Development Server.
If there are no connections to the Development Server (Tomcat or Bridge is not started or not started correctly), then the following error message will appear:
Failed to retrieve DQ Projects due to an error. Connection to
http://localhost:8888 refused. Open Error Log to see more details.
Checking for Updates to the DQ Project
Updating the DQ Project to the latest version checks whether the new version of the DQ Project exists on the Development Server. If it does, then it will update to the latest version and show the status. Viewing Properties will be updated as well.
- Missing DQ Plans. If some DQ Plans (created in the
Input Data Model) do not exist anymore on the Development Server
in the new version of the DQ Project, then the following message
will appear:
DQ Project version has been updated to '74'. Some artifacts do not exist anymore.
Refer to validation problems view for more details.
Plans will not be removed automatically from the grid. Instead, the plans will be indicated as missing, and the corresponding tooltip will be displayed. Errors will be shown when viewing Problems.
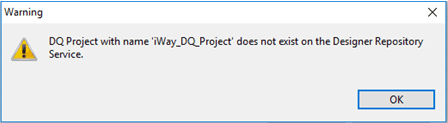
- Missing DQ Project. If the DQ project does not exist
anymore (for example, it exists in the specific revision, but is
missing in the current revision on the Development Server because
the DQ Project is removed or renamed), then the following warning
dialog will be displayed:
The project will be updated to new version where the DQ project is missing. The following image shows this information in the Property column:
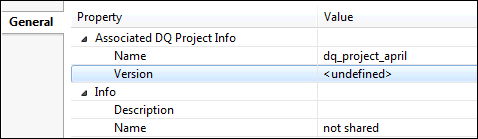
Use validations to detect missing DQ projects and indicate them as messages in the problems view. Creating DQ Plans will be disabled, but you can use the Undo action to clear missing projects.
If the current DQ project version is the latest one, then the following message dialog appears:
The current associate DQ project is up-to-date. You do not need to update.
If the current DQ project version is not the latest one, then the following message dialog appears.
The current associate DQ project is not up-to-date.
Checking for updates can be also performed while creating a new DQ Plan.
If the DQ Project version was updated, you can proceed to the Add DQ Plan wizard and create a new DQ Plan. After clicking Finish, a new version notification dialog appears, and the project will automatically be updated to the latest version. A new DQ Plan is added, and missing DQ Plans will be highlighted in the grid.
Checking for Static Content
When checking for static content, a check is performed whether missing content exists or not, and prompts you to generate the missing content or update the DQ project. When generating project bundles, the server will also check for missing content. If it is missing, the server will automatically add it to project bundle zip file, but not to the DQ project on SCM.
Using the Add Plan Wizard
|
Topics: |
To add a Plan to the Input Data Model, click the Create button on the table.
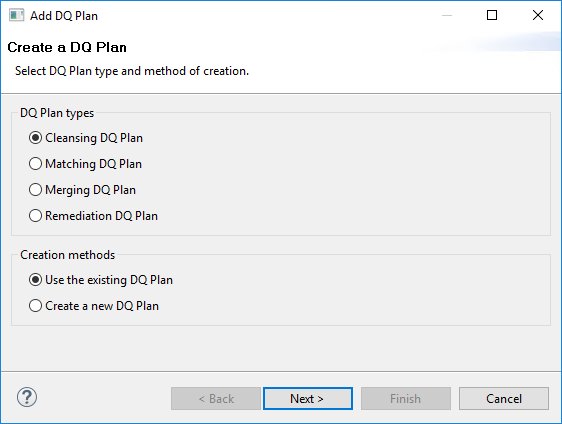
In the Add plan window that appears, select a plan type and a creation method, as shown in the following image.
Using an Existing Plan
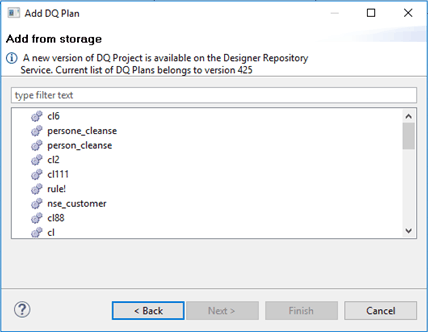
You can use an existing plan after importing one from the data storage.
However, if a DQ Plan is associated to an older version while a newer version exists in the Designer Repository Service, you will be notified accordingly.
Once you have selected a plan, click Next.
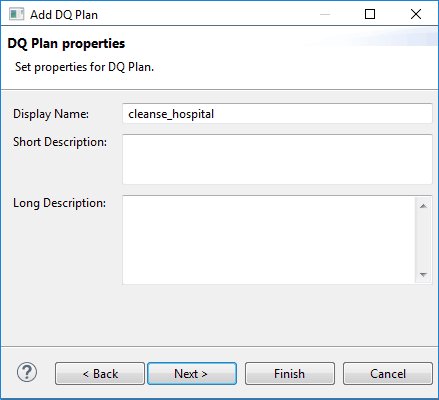
When a plan is selected, you can change the Display Name that appears, and then optionally provide a description in the Short Description or Long Description fields. Adding a display name is mandatory and will be highlighted with validation. The Next button will be available once a display name is provided.
You will not be able to add new parameters or delete/change existing parameters in the imported DQ Plan.
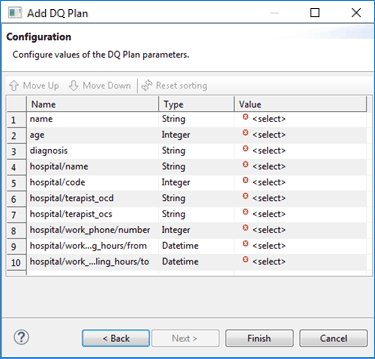
The Create Plan wizard page that appears contains a table with the following columns:
- Name
- Type
- Value
The Name and Type columns are disabled, but the parameter value can be set according to the chosen parameter type. The text field can be modified for each type except Field type. The Value parameter is required, and the Finish button is available even if the Value field is not set.
Creating a New DQ Plan
|
Topics: |
If a Project is associated with a DQ Project, and you wish to create a new DQ Plan, click Create. The Add DQ Plan wizard opens.
If a Project is not associated, the Associate Project dialog appears after clicking Create, where you can associate it with a DQ Project. After association, when you click Finish, the Add DQ Plan wizard will appear.
After selecting the Create New DQ Plan method, a window appears where you must create a name for the Data Storage (name that will be saved on developer server) and add its parameters.
Verifying Missing Plans or Projects
If a plan or project is missing and it is updated to the latest version (check for updates is performed), the following error will appear with all of its options disabled, as shown in the following image:
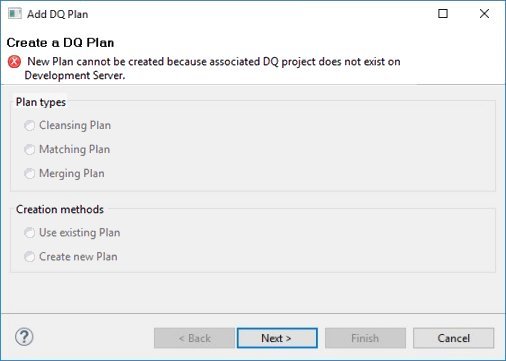
If a plan or project is associated with another plan or project, but the plan or project is missing or does not exist from the on the Repository Service (is renamed or removed in the new version), the following validation error appears, and the Next button will be disabled, as shown in the following image:
New DQ Plan cannot be created because the associated DQ project does not exist on the Designer Repository.
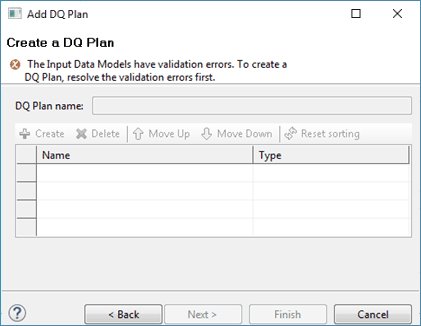
Note: You can create plans only for a Committed Project with the Valid Input Data Models node.
If the project is not committed or the Input Data Models node contains invalid changes, then the following error message will be displayed, and the buttons in the dialog box will be disabled, as shown in the following image.
The Plan name is required. If there is no Plan Name, the Next button will be disabled and the Name field will be highlighted with validation.
The Plan name should not match with a name already existing in the Repository Service. If a name matches and exists, an error message will appear. Additionally, the Next button will be disabled, and the Name field will be highlighted with validation.
Adding Parameters are required. DQ Plans cannot be created without parameters.
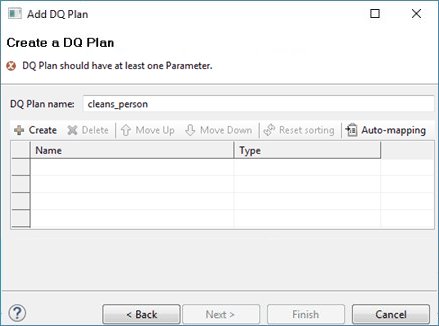
You can add parameters manually or use Auto-mapping. Auto-mapping is available for Cleansing and Matching DQ plans.
When you click Finish, the DQ Plan is added to the Input Data Model (displayed in the DQ Components table), and it is created on the Repository Service. You can use the newly created DQ Plan to add it to another Input Data Model or add it to the same Input Data Model again.
If you click the Auto-mapping button, the Fill parameters dialog appears, as shown in the following image.
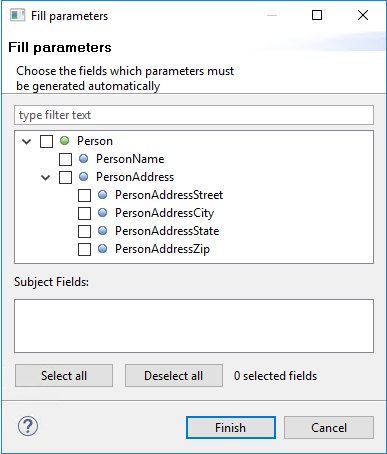
The Select all and Deselect all buttons allow you to select or deselect all fields from the current subject.
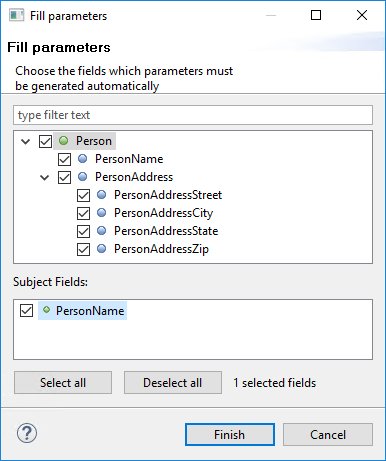
When creating parameters, select the check box next to the subject and fields you need. By default, all fields will be selected within the subject that you choose, as shown in the following image.
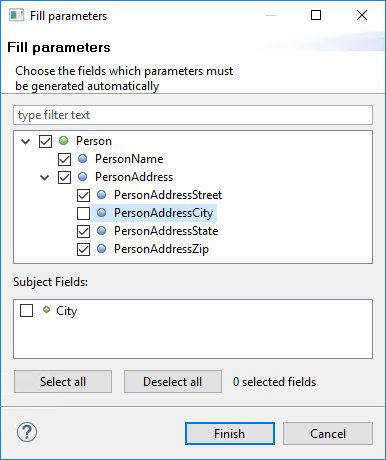
If at least one field for a subject is cleared, the check box in the Tree view will be changed to a filled-in square, as shown in the following image.
After clicking Finish, parameters for selected subjects and fields will be created and displayed in the parameters table. The appropriate parameters types will also be set.

Mappings for the created parameters will also be set, as shown in the following image.
You can change the parameter names and mappings.
The following table lists and describes the plan parameter types:
|
Parameter Type |
Description |
|---|---|
|
Cleansing |
|
|
Matching |
|
|
Merging |
The plan parameter types will be taken from the Subject fields data types. |
Mapping Values
|
Topics: |
When you double click a Value field from the properties pane, the Value Selector dialog opens.
There are two options you can use to set the Value.
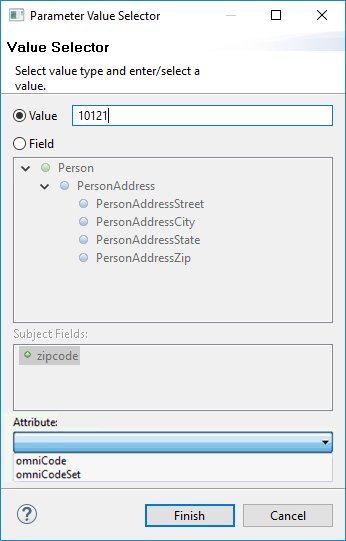
- The Value radio button allows you to map either the Value entered into the field, or the field from the Input Data Model. The Subject fields section will shows the fields that matches the type of the parameter, except for the parameter with the String type. If the Type is String, all field will be visible.
- The Field radio button allows you to select any field from the entire Input Data Model if the Plan parameter contains no value. If
other parameters contain values, then you will be able to select a new field that belongs to one of the Subjects from the
longest path or from any Subject under the last Subject of the longest path, as shown in the following image.
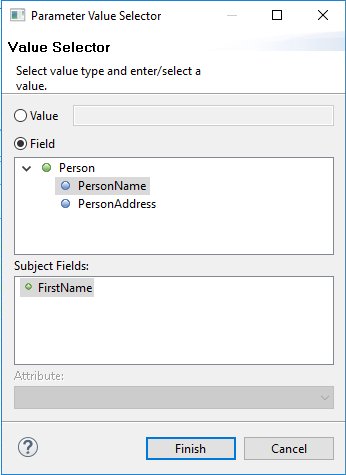
All of the fields from all of the Input Data Model subjects from the Instance Model and corresponding data types can be selected. If you open the Field selector for the Integer Plan type, then you will only see fields with an exact Integer data type. You must select the subject from the tree of subjects that belong to the current Input Data Model and Field.
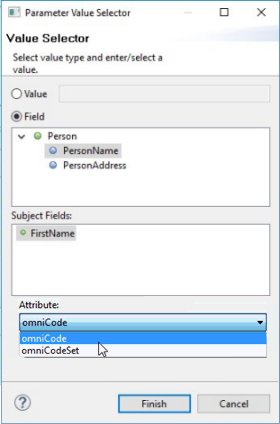
If you select a Reference-type field, a drop-down list containing the attributes omniCode and omniCodeSet appears below the Subject fields section. You can select one of these attributes to enable the Finish button.
Mapping Simple Parameters Without Collections
All mapped values must be from a single branch of the Input Data Model subject tree.
You can set the Value in the following ways:
- By selecting the Value radio button (which enables the text field but disables the Value Selector field) and entering the corresponding data.
- By selecting the Field radio button (selected by default, which disables the value text field but enables the Value Selector field). You will need to select a subject from the tree of subjects of the current Input Data Model and Field. All fields of the Input Data Model subjects from the Instance Model and corresponding data types can be selected.
If you open the Value Selector for the String parameters type and select a subject, then it will not matter what the field type is.
If you open the Value Selector for the Integer/Long/Float/Boolean/Day/Daytime parameters type, you will only see fields that have the same data type that were selected by the parameters type.
Only one validation rule is applied for format. The length should be less than 255 characters.
The Attribute drop-down list will be enabled for selected fields with the Reference data type. However, it is not enabled for Field data types containing String, Integer, Long, Float, Boolean, Day, and Daytime.
Mapping Complex Parameters With Collections
You can only select subjects from the Input Data Model that contains the following criteria:
- Collection depth. The number of '/' occurrences in the column name or the depth of the collection on the DQ service request.
- Subject depth. The depth of the subject in the Data Model
tree with a root subject having the depth 0.
- At least one item in every collection is mapped from the same depth (for example, collection depth = subject depth of the mapped column).
- Mappings on the collection cannot be from subjects with greater depth than the collection depth.
- Values can be mapped only from a single branch of the data model (for example, values can be mapped from parents of the subject used in the first rule).
- The collection branches and data model branches must match. When mapping a collection value where either the parent collection or child collection value is already mapped (for example, mapping values for an address/src_street while address/bells/src_order is already mapped or vice-versa), the Data Model branch selected by the already mapped service is considered pre-selected for the value being mapped, and must be accounted for.