Using the Promotions Tab
|
Topics: |
|
How to: |
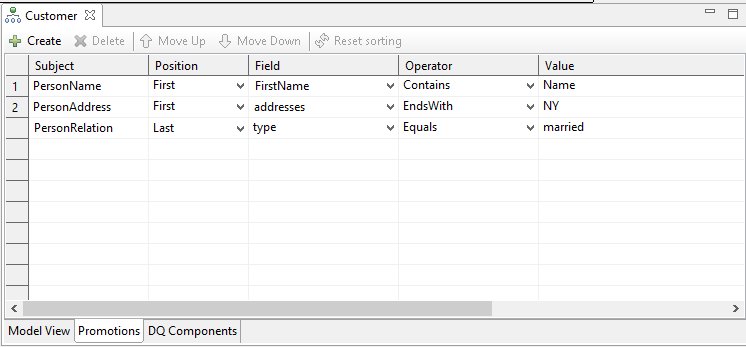
The Promotions tab allows you to promote individual records from a sub-collection to the parent node.
The following table describes the columns that are available in the Promotions tab.
|
Column Name |
Description |
|---|---|
|
Subject |
When you click on this field, a dialog box appears asking you to select a subject from a list of available subjects available in an Input Data Model project. |
|
Position |
A drop-down list where you must select one of the following values (Required):
|
|
Field |
A drop-down list of fields containing subject promotions. Required. |
|
Operator |
A drop-down list containing the following values (Required):
|
|
Value |
The Value column consist of a text field where you are required to input a value that must contain up to 255 characters in length and may consist of alphabetical characters, numbers, and special symbols. The value can only be one word since extra spaces are removed before, between, and after words. Required. |
The following image shows the Promotions tab.
Procedure: How to Add a Promotion
To add a Promotion:
- Click Create.
The Subject Selection dialog box appears where a list of all subjects of the current Input Data Model is displayed by default in the Matching Items field, as shown in the following image.
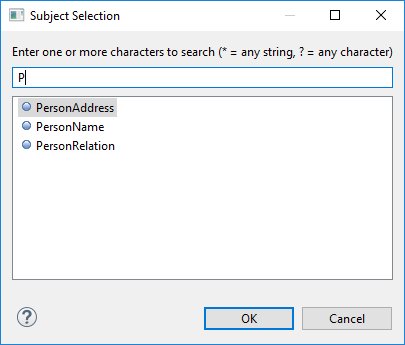
- Enter the first character(s) to search for subjects to select.
You can use the " ? " (any character) and " * " (any string) to search as well. Searching is case insensitive. Subjects that match the search query are displayed in the Matching items list. The matched string is in bold for subjects that it finds. If you have already created a Promotion for a subject, this subject will not be searchable on the list.
- Select a subject and then click OK.
The new line is added to Promotions table with the selected subject. The Position and Operator columns now contain the first values from the available list. You will need to provide the information in the Field and Value columns.
- To edit a Promotion, click on any field and change it accordingly.
- To delete a Promotion, select a row and click Delete.
Automatically Updating Promotions After Making Changes
When changes are made to subjects that have promotions or fields selected in promotions, changes are reflected in the Promotions table immediately (without reopening the Input Data Mode Editor).
If a subject is deleted or renamed from the project promotions, it is also deleted or renamed respectively in the Promotions table.
When a field is renamed or deleted from a subject promotion (which has the field selected), it is also automatically renamed or removed respectively in the Promotions table.