Installing iWay Trading Partner Manager on Linux
On Linux, the iWay Trading Partner Manager (TPM) installer is packaged as a binary (.bin) file (for example, tpm-installer-1.5.x-Linux.bin).
Before continuing with the iWay TPM installation, create a directory in your root for your JDBC driver .jar files. For example:
/jdbcjars
Copy your JDBC driver .jar files to this directory.
In addition, create a directory in your root where you would like to install iWay TPM. For example:
/iway_tpm
To install and run iWay TPM:
- Ensure you have the proper permissions (read/write/execute) on the target Linux system where you are installing iWay TPM.
- Enter the following command at the prompt:
./tpm-installer-1.5.x-Linux.bin
The iWay TPM installer loads and displays an Introduction screen, as shown in the following image.
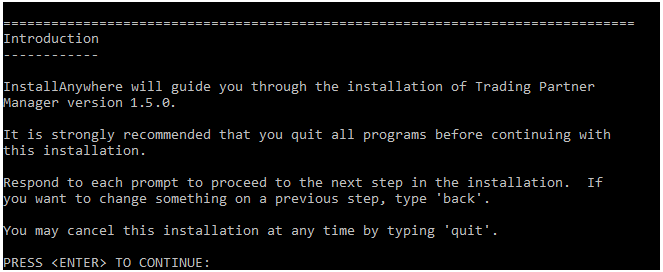
- Press Enter to continue.
The Choose Installation Folder screen is displayed, as shown in the following image.

- Type an absolute path to an existing folder you have created for your iWay TPM installation, or press Enter to accept the
default.
If you specify a path to an existing folder, you will be prompted to confirm the path, as shown in the following image.
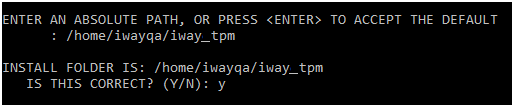
- Confirm your installation folder.
- Press Enter to continue.
The Choose Java Virtual Machine screen is displayed, as shown in the following image.
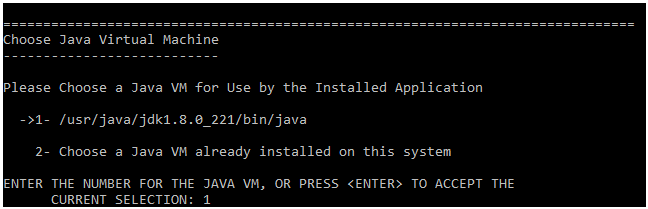
- Select a specific version of Java that is installed on your system, or accept the default version that is automatically detected by the installer.
- Press Enter to continue.
The Specify Location of JDBC .jar Files screen is displayed, as shown in the following image.
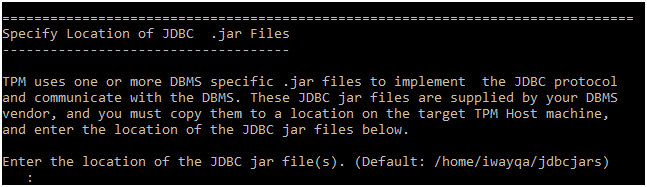
- Specify the directory on your system you created earlier, which contains your JDBC driver .jar files (for example, /jdbcjars).
- Press Enter to continue.
The Specify TPM Server Port Number screen is displayed, as shown in the following image.
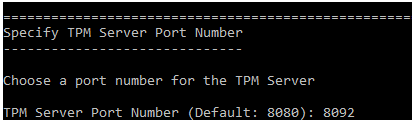
- Specify an available port number on your system to be used by the iWay TPM server.
Note: The older versions of iWay TPM used port 8080 as default port number. To avoid any conflicts with your previous version of iWay TPM, it is recommended to use a different port number (for example, 8092) with the new version of iWay TPM.
- Type a port number and press Enter to continue.
The Enter TPM Database Choice screen is displayed, as shown in the following image.
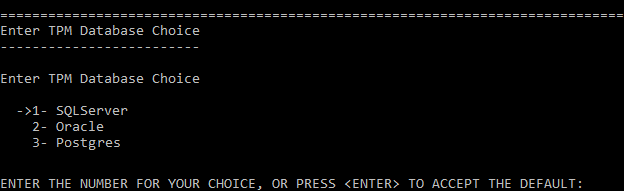
- Select SQL Server (1, default), Oracle (2), or Postgres (3) as the database type.
- Press Enter to continue.
The Enter TPM Database Parameters screen is displayed, as shown in the following image.
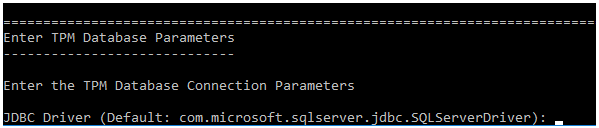
- Enter the JDBC driver class name, connection URL string, and user name for the database you are configuring with iWay TPM.
JDBC Driver Classes
SQL Server:
com.microsoft.sqlserver.jdbc.SQLServerDriver
Oracle:
oracle.jdbc.driver.OracleDriver
Postgres:
org.postgresql.Driver
Connection URLs
SQL Server:
jdbc:sqlserver://[HOST][INSTANCE][:PORT][;databaseName=[DB]]
Oracle:
jdbc:oracle:thin:@[HOST][:PORT]:[SID]
Postgres:
jdbc:postgresql://[host]:[port]/[databasename]
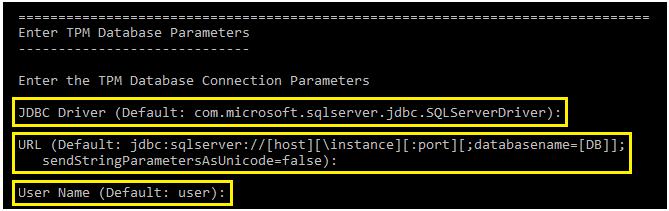
- Press Enter to continue.
The Enter Password screen is displayed, as shown in the following image.
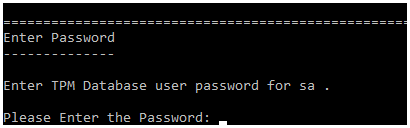
- Enter the password for the database you are configuring with iWay TPM.
- Press Enter to continue.
The TPM database connection test results screen is displayed, which shows the results of a connection test to your database, as shown in the following image.

- If the connection test is successful, press Enter to continue. If you encounter any issues, adjust your database connection parameters and retest your connection.
Note any messages regarding running SQL scripts to create database tables or update an existing database. If you are required to run any SQL scripts, then see Using SQL Scripts for more information.
The Pre-Installation Summary screen is displayed, as shown in the following image.
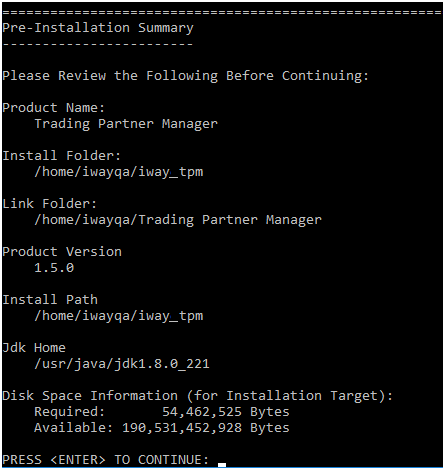
- Review the iWay TPM installation summary and press Enter to continue if all of the information is correct.
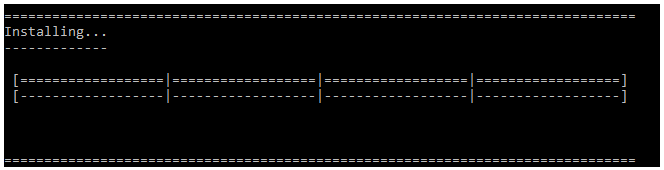
A progress indicator is displayed during the iWay TPM installation, as shown in the following image.
When the installation has finished, a prompt to start the iWay TPM server is displayed, as shown in the following image.

- Select Yes (1) or No (2, default), and then press Enter to continue.
If you selected Yes, iWay TPM will automatically start and run in the background.
The Installation Complete screen is displayed, as shown in the following image.
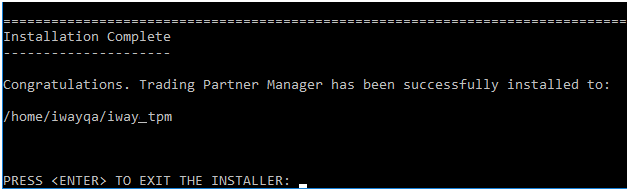
- Press Enter to exit the installer.
You are now ready to run iWay TPM and verify your installation.
- Open your browser and enter the following URL:
http://hostname:port_number
where:
- hostname
- Is the name of the system hosting iWay TPM.
- port_number
- Is the port number that you specified for the iWay TPM server during the installation. For example:
http://localhost:8092
The iWay TPM login page opens in your browser, as shown in the following image.
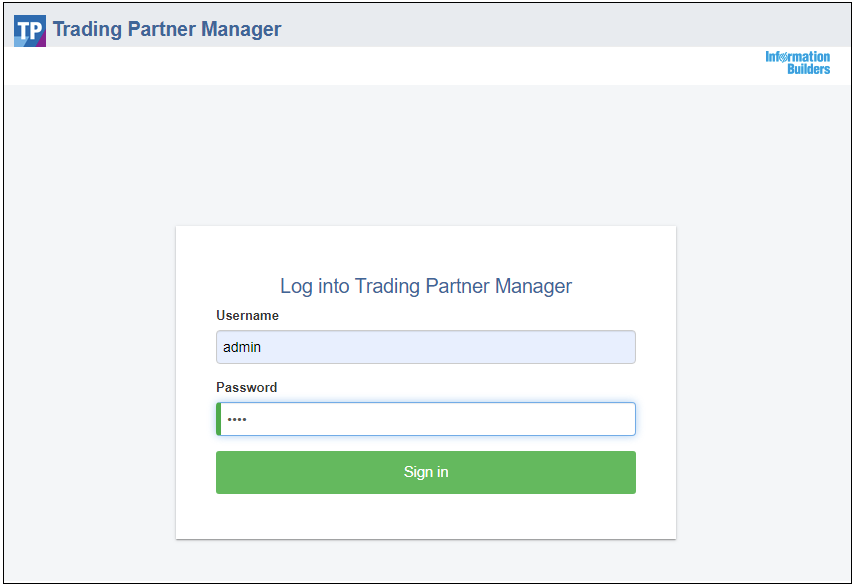
- Enter the following default login credentials:
- Username: admin
- Password: iway
- Click Sign in to begin using iWay TPM.
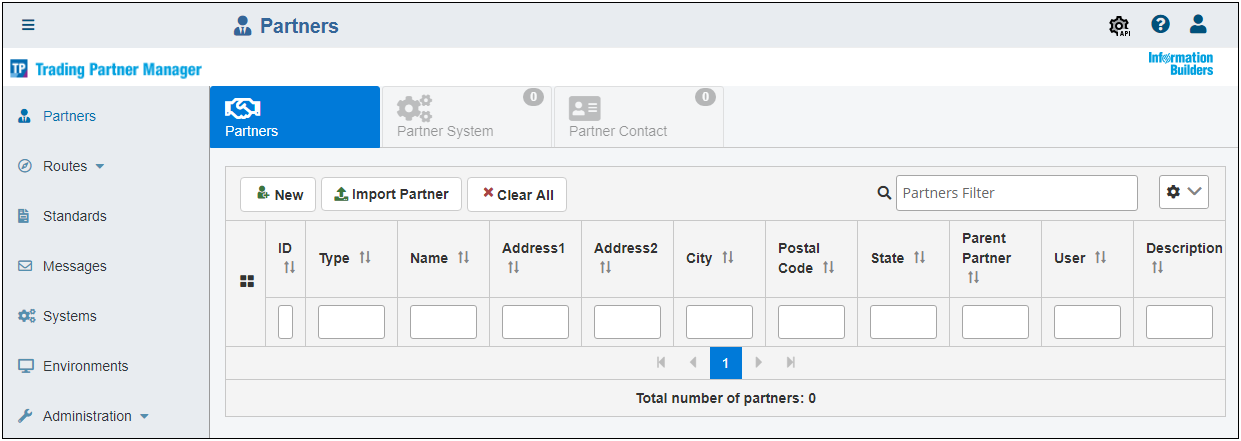
The iWay Trading Partner Manager console opens, as shown in the following image.