Creating, Editing, or Deleting an Event Port
|
Topics: |
The following topics describe how to create, edit, or delete an event port using iWay Explorer.
Creating an Event Port From the iWay Events Tab
|
How to: |
The following procedures describe how to create an event port from the iWay Events tab for various dispositions. You can switch to an iBSP by using the drop-down menu in the upper right of iWay Explorer.
The following dispositions are available when using iWay Explorer in conjunction with an iBSP deployment:
- File
- iBSP
- MSMQ
- JMSQ
- SOAP
- HTTP
- MQSeries
Note: The MAIL disposition option will be supported in a future release.
Procedure: How to Create an Event Port for File
To create an event port for File:
- Click the iWay Events tab.
- In the left pane, expand the RDBMS node.
- Select the ports node.
- In the
right pane, move the pointer over Operations and
select Add a new port.
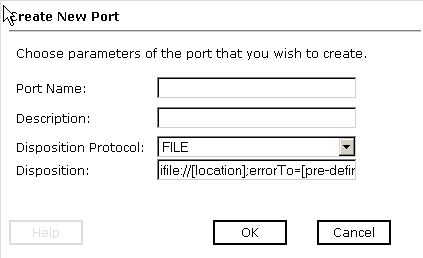
The Create New Port pane opens on the right as shown in the following image.
- In the Name field, type a name for the event port.
- In the Description field, type a brief description.
- From the Disposition Protocol drop-down list, select FILE.
- In the Disposition field, specify a destination file to which
the event data is written.
When pointing iWay Explorer to an iBSP deployment, specify the destination file using the following format:
ifile://[location];errorTo=[pre-defined port name or another disposition url]
The following table lists and defines the parameters for the File disposition.
Parameter
Description
location
Destination and file name of the document where event data is written, for example:
D:\in\x.txt
errorTo
Location to which error logs are sent. Optional.
Predefined port name or another disposition URL. The URL must be complete, including the protocol.
- Click OK.
The port appears under the ports node in the left pane. In the right pane, a table appears that summarizes the information associated with the event port you created.
You are ready to associate the event port with a channel. For more information, see Creating, Editing, or Deleting an Event Channel.
Procedure: How to Create an Event Port for iBSP
To create an event port for iBSP:
- Click the iWay Events tab.
- In the left pane, expand the RDBMS node.
- Select the ports node.
- In the
right pane, move the pointer over Operations and
select Add a new port.
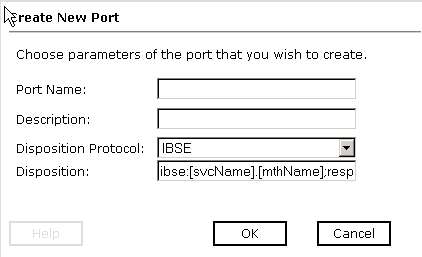
The Create New Port pane opens on the right as shown in the following image.
- In the Name field, type a name for the event port.
- In the Description field, type a brief description.
- From the Disposition Protocol drop-down list, select iBSP.
- In the Disposition field, type an iBSP destination using the
following format:
ibse:[svcName].[mthName];
responseTo=[pre-defined port name or another disposition url];
errorTo=[pre-defined port name or another disposition url]
The following table lists and defines the parameters for the iBSP disposition.
Parameter
Description
svcName
Name of the service created with iBSP.
mthName
Name of the method created for the web service.
responseTo
Location to which responses are posted. Optional.
A predefined port name or another disposition URL. The URL must be complete, including the protocol.
errorTo
Location to which error logs are sent. Optional.
Predefined port name or another disposition URL. The URL must be complete, including the protocol.
- Click OK.
The port appears under the ports node in the left pane. In the right pane, a table appears that summarizes the information associated with the event port you created.
You are ready to associate the event port with a channel. For more information, see Creating, Editing, or Deleting an Event Channel.
Procedure: How to Create an Event Port for MSMQ
To create an event port for MSMQ:
- Click the iWay Events tab.
- In the left pane, expand the RDBMS node.
- Select the ports node.
- In the
right pane, move the pointer over Operations and
select Add a new port.
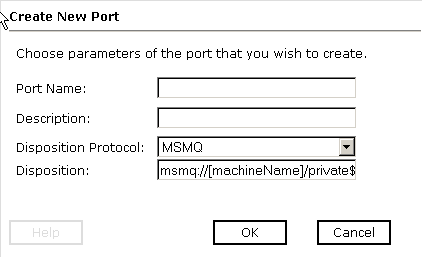
The Create New Port pane opens on the right as shown in the following image.
- In the Name field, type a name for the event port.
- In the Description field, type a brief description.
- From the Disposition Protocol drop-down list, select MSMQ.
- In the Disposition field, type an MSMQ destination using the
following format:
msmq:/[machineName]/private$/[qName];
errorTo=[pre-defined port name or another disposition url]
Note: This syntax is for a private queue. Private queues are queues that are not published in Active Directory. They appear only on the local computer that contains them. Private queues are accessible only by Message Queuing applications that recognize the full path name or format name of the queue.
The following table lists and defines the parameters for the MSMQ disposition.
Parameter
Description
machineName
Machine name where the Microsoft Queuing system is running.
qName
Name of the private queue where messages are placed.
errorTo
Location to which error logs are sent. Optional.
Predefined port name or another disposition URL. The URL must be complete, including the protocol.
- Click OK.
The port appears under the ports node in the left pane. In the right pane, a table appears that summarizes the information associated with the event port you created.
You are now ready to associate the event port with a channel. For more information, see Creating, Editing, or Deleting an Event Channel.
Procedure: How to Create an Event Port for JMSQ
To create an event port for JMSQ:
- Click the iWay Events tab.
- In the left pane, expand the RDBMS node.
- Select the ports node.
- In the
right pane, move the pointer over Operations and
select Add a new port.
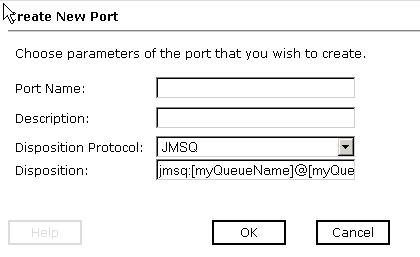
The Create New Port pane opens on the right as shown in the following image.
- In the Name field, type a name for the event port.
- In the Description field, type a brief description.
- From the Disposition Protocol drop-down list, select JMSQ.
- In the Disposition field, type a JMS destination.
When pointing iWay Explorer to an iBSP deployment, specify the destination using the following format:
jmsq:[myQueueName]@[myQueueFac];jndiurl=[myurl];
jndifactory=[myfactory];user=[user];password=[xxx];
errorTo=[pre-defined port name or another disposition url]
The following table lists and defines the parameters for the JMSQ disposition.
Parameter
Description
myQueueName or jmsqueue
JNDI name of a queue to which events are emitted.
myQueueFac or jmsfactory
Resource that contains information about the JMS Server.
jndiurl
URL to use to contact the JNDI provider. The syntax of this URL depends on the JNDI provider being used. This value corresponds to the standard JNDI property,
java.naming.provider.url
jndifactory
Is JNDI context.INITIAL_CONTEXT_FACTORY and is provided by the JNDI service provider.
user
Valid user name required to access a JMS server.
password
Valid password required to access a JMS server.
errorTo
Location to which error logs are sent. Optional.
A predefined port name or another disposition URL. The URL must be complete, including the protocol.
- Click OK.
The port appears under the ports node in the left pane. In the right pane, a table appears that summarizes the information associated with the event port you created.
You are now ready to associate the event port with a channel. For more information, see Creating, Editing, or Deleting an Event Channel.
Procedure: How to Create a Port for SOAP
To create a port for SOAP:
- Click the iWay Events tab.
- In the left pane, expand the RDBMS node.
- Select the ports node.
- In the
right pane, move the pointer over Operations and
select Add a new port.
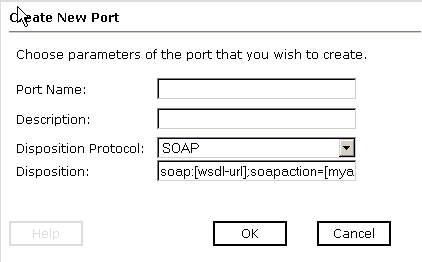
The Create New Port pane opens on the right as shown in the following image.
- In the Name field, type a name for the event port.
- In the Description field, type a brief description.
- From the Disposition Protocol drop-down list, select SOAP.
- In the Disposition field, type a SOAP destination using the
following format:
soap:[wsdl-url];soapaction=[myaction];
method=[web service method];namespace=[name space];
responseTo=[pre-defined port name or another disposition url];
errorTo=[pre-defined port name or another disposition url]
The following table lists and defines the parameters for the SOAP disposition.
Parameter
Description
wsdl-url
The URL to the WSDL file that is required to create the SOAP message. For example:
http://localhost:7001/ibse/IBSEServlet/test/webservice.ibs?wsdl
where:
- webservice
-
Is the name of the web service you created using iWay Explorer.
This value can be found by navigating to the iWay Business Services tab and opening the Service Description link in a new window. The WSDL URL appears in the Address field.
You can also open the WSDL file in a third party XML editor (for example, XMLSpy) and view the SOAP request settings to find this value.
soapaction
The method that will be called by the SOAP disposition. For example:
webservice.method@test@@
where:
- webservice
-
Is the name of the web service you created using iWay Explorer.
- method
-
Is the method being used.
- test
-
Is the license that is being used by the web service.
This value can be found by navigating to the iWay Business Services tab and opening the Service Description link in a new window. Perform a search for soapAction.
You can also open the WSDL file in a third party XML editor (for example, XMLSpy) and view the SOAP request settings to find this value.
method
Web service method you are using. This value can be found in the WSDL file.
namespace
XML namespace you are using. This value can be found in the WSDL file.
responseTo
Location to which responses are posted. Optional.
A predefined port name or another disposition URL. The URL must be complete, including the protocol.
errorTo
Location to which error logs are sent. Optional.
A predefined port name or another disposition URL. The URL must be complete, including the protocol.
- Click OK.
The port appears under the ports node in the left pane. In the right pane, a table appears that summarizes the information associated with the port you created.
You are now ready to associate the event port with a channel. For more information, see Creating, Editing, or Deleting an Event Channel.
Procedure: How to Create an Event Port for HTTP
To create an event port for HTTP:
- Click the iWay Events tab.
- In the left pane, expand the RDBMS node.
- Select the ports node.
- In the
right pane, move the pointer over Operations and
select Add a new port.
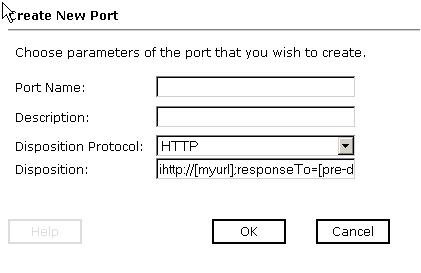
The Create New Port pane opens on the right as shown in the following image.
- In the Name field, type a name for the event port.
- In the Description field, type a brief description.
- From the Disposition Protocol drop-down list, select HTTP.
- In the Disposition field, type an HTTP destination.
When pointing iWay Explorer to an iBSP deployment, specify the destination using the following format:
ihttp://[myurl];responseTo=[pre-defined port name or another disposition url];
The following table lists and defines the parameters for the HTTP disposition when using an iBSP deployment.
Parameter
Description
myurl
URL target for the post operation, for example,
http://myhost:1234/docroot
responseTo
Location to which responses are posted. Optional.
Predefined port name or another disposition URL. The URL must be complete, including the protocol.
- Click OK.
The port appears under the ports node in the left pane. In the right pane, a table appears that summarizes the information associated with the event port you created.
You are now ready to associate the event port with a channel. For more information, see Creating, Editing, or Deleting an Event Channel.
Procedure: How to Create an Event Port for MQSeries
To create an event port for MQSeries:
- Click the iWay Events tab.
- In the left pane, expand the RDBMS node.
- Select the ports node.
- In the
right pane, move the pointer over Operations and
select Add a new port.
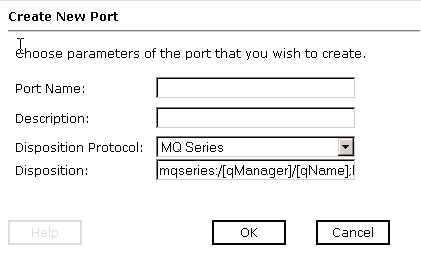
The Create New Port pane opens on the right as shown in the following image.
- In the Name field, type a name for the event port.
- In the Description field, type a brief description.
- From the Disposition Protocol drop-down list, select MQSeries.
- In the Disposition field, type an MQSeries destination.
When pointing iWay Explorer to an iBSP deployment, specify the destination using the following format:
mqseries:/[qManager]/[qName];
host=[hostname];port=[port];
channel=[channnelname];
errorTo=[pre-defined port name or another disposition url]
The following table lists and defines the parameters for the MQSeries disposition.
Parameter
Description
qManager
Name of the queue manager to which the server must connect.
qName
or
respqueue
Name of the queue where messages are placed.
host
Host on which the MQ server is located (for the MQ Client only).
port
Number to connect to an MQ server queue manager (for the MQ client only).
channel
Case-sensitive name of the channel that connects with the remote MQ server queue manager (for the MQ client only). SYSTEM.DEF.SVRCONN is the default channel name for MQSeries.
errorTo
Location to which error logs are sent. Optional.
Predefined port name or another disposition URL. The URL must be complete, including the protocol.
- Click OK.
The port appears under the ports node in the left pane. In the right pane, a table appears that summarizes the information associated with the event port you created.
You are now ready to associate the event port with a channel. For more information, see Creating, Editing, or Deleting an Event Channel.
Editing and Deleting an Event Port
|
How to: |
The following procedures describe how to edit and delete an event port.
Procedure: How to Edit an Event Port
To edit an event port:
- In the left pane, select the event port you want to edit.
- In the
right pane, move the pointer over Operations and
select Edit.
The Edit Port dialog box opens.
- Make the required changes and click OK.
Procedure: How to Delete an Event Port
To delete an event port:
- In the left pane, select the event port you want to delete.
- In the
right pane, move the pointer over Operations and
select Delete.
A confirmation dialog box opens.
- To delete
the event port you selected, click OK.
The event port disappears from the list in the left pane.