Creating an Event Port
|
Topics: |
|
How to: |
The following procedures describe how to create an event port using iWay Explorer.
When you use iWay Explorer with an iWay Business Services Provider (iBSP) implementation, the following port dispositions are available:
- File. The File disposition uses a file URL to specify the destination file name or directory where the event document will be written. During run time, the destination file name may require indexing to avoid overwriting.
- iBSP. The iBSP disposition enables an event to launch a business service method.
- MSMQ. The Microsoft Message Queue disposition supports public and private queues.
- JMSQ. The JMSQ disposition allows an event to be enqueued to a JMS queue.
- SOAP. The SOAP disposition allows an event to launch a business service specified by a WSDL file. A SOAP action is optional; "" is the default value.
- HTTP. The HTTP disposition uses an HTTP URL to specify an HTTP end point to which the event document is posted.
- MQSeries. The MQSeries disposition enables an event to be enqueued to an MQSeries queue. Both queue manager and queue name may be specified.
Procedure: How to Create a Port for the File Disposition
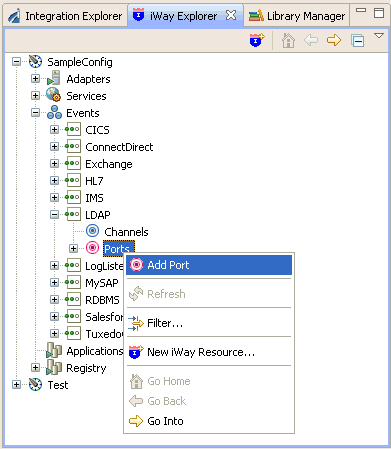
- Connect to the Events node in iWay Explorer and expand the LDAP node.
- Right-click the Ports node, and
click Add Port from the menu.
The following image shows the Add Port dialog box where you can supply information about the port.
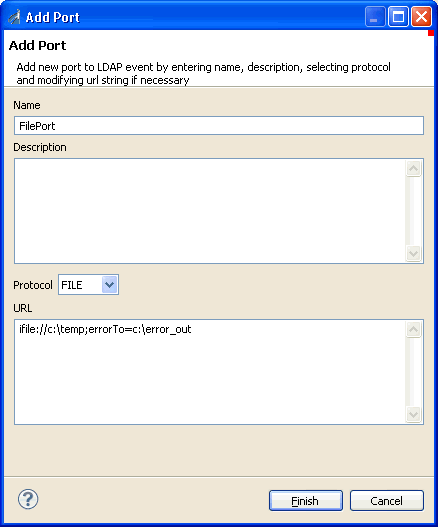
- In the Name field, type a name for the port.
- In the Description field, optionally type a brief description.
- From the Protocol drop-down list, select FILE.
- In the URL field, type a File destination to which
event data is written.
When pointing the Events node in iWay Explorer to an iBSP deployment, specify the File destination using the following format:
ifile://[location];errorTo=[pre-defined port name or another disposition url]
The following table describes the parameters for the File disposition.
Parameter
Description
location
Destination and file name of the document where event data is written.
errorTo
Predefined port name or another disposition URL where error logs are sent. Optional.
For example:
ifile://D:\in\x.txt;errorTo=ifile://D:\error
- Click Finish when you have supplied
the values on the Add Port dialog box.
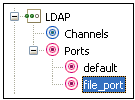
The following image shows the port that you added, which appears beneath the Ports node in the Events area of iWay Explorer. In this example, the port is named file_port.
Procedure: How to Create a Port for the IBSE Disposition
- Connect to the Events node in iWay Explorer and expand the LDAP node.
- Right-click the Ports node, and
click Add Port from the menu.
The Add Port dialog box opens.
- Supply the values for the fields on the dialog box as
follows.
- In the Name field, type a name for the port.
- In the Description field, optionally type a brief description.
- From the Protocol drop-down list, select IBSE.
- In the URL field, type an iBSE destination using the
following format:
ibse:[svcName].[mthName];responseTo=[pre-defined port name or
another disposition url];errorTo=[pre-defined port name or another
disposition url]
The following table describes the parameters for the IBSE disposition.
Parameter
Description
svcName
Name of the business service created with iBSE.
mthName
Name of the method created for the business service.
responseTo
Location where responses to the business service are posted. Predefined port name or another full URL. Optional.
errorTo
Location where error documents are sent. Predefined port name or another full URL. Optional.
- Click Finish when you have supplied
the values on the Add Port dialog box.
The port that you added is displayed beneath the Ports node.
Procedure: How to Create a Port for the MSMQ Disposition
- Connect to the Events node in iWay Explorer and expand the LDAP node.
- Right-click the Ports node, and
click Add Port from the menu.
The Add Port dialog box opens.
- Supply the values for the fields on the dialog box as
follows.
- In the Name field, type a name for the port.
- In the Description field, optionally type a brief description.
- From the Protocol drop-down list, select MSMQ.
- In the URL field, type an MSMQ destination in the
following format:
msmq://[machineName]/private$/[qName];errorTo=[pre-defined port
name or another disposition url]
The following table describes the parameters for the MSMQ disposition.
Parameter
Description
machineName
Name of the machine on which the Microsoft Message Queuing system is running.
queue type
For private queues, type Private$. Private queues are queues that are not published in the Active Directory. They appear only on the local computer that contains them. Private queues are accessible only by Microsoft Message Queuing applications that recognize the full path name or format name of the queue.
qName
Name of the private queue where messages are placed.
errorTo
Location where error documents are sent. Predefined port name or another full URL. Optional.
- Click Finish when you have supplied
the values on the Add Port dialog box.
The port that you added is displayed beneath the Ports node.
Procedure: How to Create a Port for the JMSQ Disposition
- Connect to the Events node in iWay Explorer and expand the LDAP node.
- Right-click the Ports node, and
click Add Port from the menu.
The Add Port dialog box opens.
- Supply the values for the fields on the dialog box as
follows.
- In the Name field, type a name for the port.
- In the Description field, optionally type a brief description.
- From the Protocol drop-down list, select JMSQ.
- In the URL field, type a Java Message Service (JMS) destination.
When pointing the Events node in iWay Explorer to an iBSP deployment, use the following format:
jmsq:[myQueueName]@[myQueueFac];jndiurl=[myurl];jndifactory=
[myfactory];user=[user];password=[xxx];errorTo=[pre-defined port
name or another disposition url]
The following table describes the parameters for the JMSQ disposition.
Parameter
Description
myQueueName or jmsqueue
Name of a queue to which events are emitted.
myQueueFac or jmsfactory
A resource that contains information about the JMS Server.
jndiurl
The URL used to contact the JNDI provider. The syntax of this URL depends on the JNDI provider that is used. This value corresponds to the following standard JNDI property:
java.naming.provider.url
jndifactory
Is JNDI context.INITIAL_CONTEXT_FACTORY, which is provided by the JNDI service provider.
user
User ID associated with this queue.
password
Password for the user ID.
errorTo
Location where error logs are sent. Optional.
Predefined port name or another disposition URL. The URL must be complete, including the protocol.
- Click Finish when you have supplied
the values on the Add Port dialog box.
The port that you added is displayed beneath the Ports node.
Procedure: How to Create a Port for the SOAP Disposition
- Connect to the Events node in iWay Explorer and expand the LDAP node.
- Right-click the Ports node, and
click Add Port from the menu.
The Add Port dialog box opens.
- Supply the values for the fields on the dialog box as
follows.
- In the Name field, type a name for the port.
- In the Description field, optionally type a brief description.
- From the Protocol drop-down list, select SOAP.
- In the URL field, type a SOAP destination, using the
following format:
soap:[wsdl-url];soapaction=[myaction];method=[web service
method];namespace=[namespace];responseTo=[pre-defined port name or
another disposition url];errorTo=[pre-defined port name or another
disposition url]
The following table describes the parameters for the SOAP disposition.
Parameter
Description
wsdl-url
The URL to the WSDL file that is required to create the SOAP message, for example,
http://localhost:7001/ibsp/IBSPServlet/
test/webservice.ibs?wsdl
where:
- webservice
-
Is the name of the web service that you created using Business Service Explorer.
To find this value, navigate to the Business Service Explorer node and open the Service Description hyperlink in a new window. The WSDL URL appears in the Address field.
You can also open the WSDL file in a third-party XML editor (for example, Altova XMLSpy®) and view the SOAP request settings to find this value.
soapaction
The method called by the SOAP disposition, for example,
webservice.method@test@@
where:
- webservice
-
Is the name of the web service that you created using Business Service Explorer.
- method
-
Is the method being used.
- test
-
Is the license that is being used by the web service.
To find this value, navigate to the Business Service Explorer node and open the Service Description hyperlink in a new window. Perform a search for soapAction.
method
The web service method that you are using. You can find this value in the WSDL file.
namespace
The XML namespace that you are using. You can find this value in the WSDL file.
responseTo
The location to which responses are posted, which can be a predefined port name or another URL. Optional.
errorTo
The location to which error logs are posted, which can be a predefined port name or another URL. Optional.
- Click Finish when you have supplied
the values on the Add Port dialog box.
The port that you added is displayed beneath the Ports node.
Procedure: How to Create a Port for the HTTP Disposition With an IBSP Deployment
- Connect to the Events node in iWay Explorer and expand the LDAP node.
- Right-click the Ports node, and
click Add Port from the menu.
The Add Port dialog box opens.
- Supply the values for the fields on the dialog box as
follows.
- In the Name field, type a name for the port.
- In the Description field, optionally type a brief description.
- From the Protocol drop-down list, select HTTP.
- In the URL field, type an HTTP destination, using
the following format
http://[myurl];responseTo=[pre-defined port name or another disposition url]
where:
- myurl
-
Is the URL target for the post operation, for example,
http://myhost:1234/docroot
- responseTo
-
Is the location to which responses are posted, if desired.
- Click Finish when you have supplied
the values on the Add Port dialog box.
The port that you added is displayed beneath the Ports node.
Procedure: How to Edit a Port
After you create a port, you can edit the information that you provided during the creation procedure.
- Expand the Ports node in the Events area of iWay Explorer to locate the name of the port that you want to edit, for example, file_port.
- Right-click the port, and click Edit from
the menu.
The Edit Port dialog box opens. It displays the values that you supplied when you created the port.
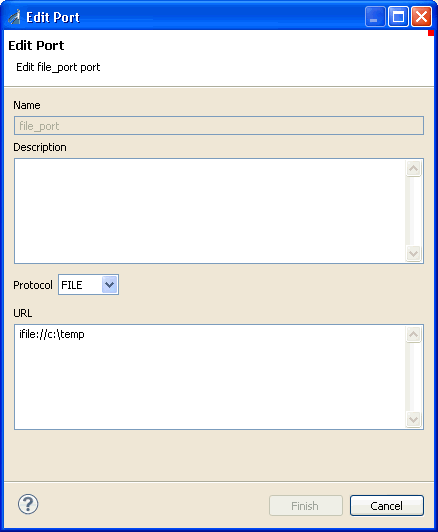
- Use the fields on the dialog box to modify the properties as desired. You cannot change the name of the port.
- Click Finish when you have completed
your edits.
The modified properties are applied to the port.
Procedure: How to Delete a Port
- Expand the Ports node in the Events area of iWay Explorer to locate the name of the port that you want to delete, for example, file_port.
- Right-click the port, and click Delete from
the menu.
iWay Explorer displays a prompt, asking you to confirm the deletion of the selected port, as shown in the following image.
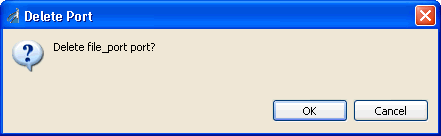
- Click OK to proceed with the deletion.
Using the Default Port
|
How to: |
When using iWay Explorer to connect to an application system and listen for events, a default port is available.
You can use the default port for testing purposes or when you do not want to route event data to a specific port that you have configured. The default port is enabled when you start a channel that does not have a specific port assigned to it.
The default event data is a file disposition that writes to an out.xml file in the following output directory:
ifile://./eventOut/out.xml
Procedure: How to Modify the Default Port Output Directory
- In the ibse\WEB-INF\lib directory, open the ibse.jar file, and locate the dispositioninfo.xml file.
- Using a text editor, locate the following lines in the
dispositioninfo.xml file:
<?xml version="1.0" encoding="UTF-8"?>
<dispositioninfo pref="built-in" defaultPortURL="ifile://./eventOut/out.xml">
- Change the default output directory to a new location
of your choice.
You can also change the name and type of the default output file.
- Save your changes, and redeploy iBSP.