Creating and Executing a Flume Configuration
|
How to: |
This section describes how to create and execute a Flume configuration.
Procedure: How to Create a Flume Configuration
- Expand an available iBDI project node
in the Project Explorer tab, right-click the Flumes folder,
select New, and then click Other from
the context menu.
The New dialog opens.
- Type flume in the field to filter
the selection, select Flume, and then click Next.
The New Flume dialog opens.
- Type a name for the new Flume in the Name field and click Next.
The Select Source pane opens.
The following table lists and describes the available Source types that you can select for the Flume configuration.
Source
Description
Avro
Listens on an Avro port and consumes Avro client streams.
HTTP
Accepts Flume events through HTTP POST. The default implementation has a JSON handler.
Exec
Runs a Linux command on startup and expects that process to continually produce data on standard output. If the process exits for any reason, then the source exits and will produce no further data.
SpoolDirSource
Listens for files in a spooling directory and parses events out of the files. The files are renamed or deleted after input into the source. All file names must be unique for this Source type.
JMS
Reads messages from a JMS destination, such as a queue or topic. Flume vendor JMS dependencies must be resolved before using this Source type. Data may require a converter from JMS format to Flume event format.
- Select a Source type and click Next.
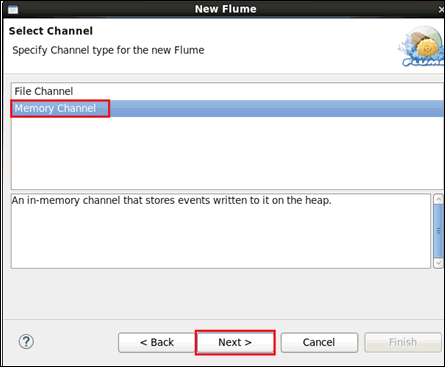
The Select Channel pane opens, as shown in the following image.

Only the File Channel has recovery and data loss recovery possibilities. Durable channels persist the data so it can be restored if a machine or disk failure occurs. Memory channels can be faster.
- File Channel. Used when the data must be protected against loss. File channels lock the directories, so each Flume channel should have an explicit path, preferably on different disk drives.
- Memory Channel. Designed for high throughput and no backup in case of failures.
- Select a channel type and click Next.
The Select Sink pane opens.
The HDFS sink writes data to HDFS as text or sequence file. The files can be rolled (close current and open new) at periodic intervals. Compression is also supported. The HDFS path name can contain escape sequences that will be replaced by the sink to generate the directory and file name to store events.
- Select HDFS, Avro,
or Kafka, and then click Finish.
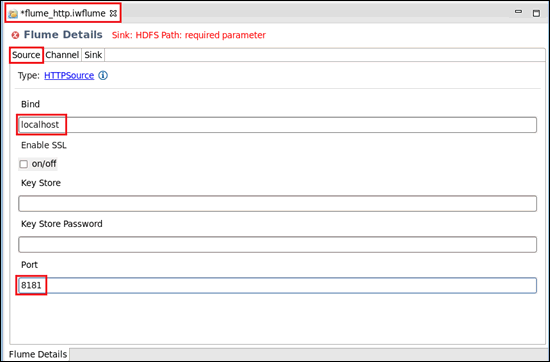
The Flume opens as a new tab (for example, flume_http.iwflume) in the iBDI workspace where specific Flume details can be configured, as shown in the following image.

Three tabs are provided in the Flume Details pane (Source, Channel, and Sink), which can be configured. The Source tab is selected by default.
- Click the Save icon or use the
Ctrl+S shortcut to save your work.

Procedure: How to Execute a Flume Configuration
Once you have created a Flume configuration, a Flume file with a .iwflume extension is added to your Flumes directory in your iWay Big Data Integrator (iBDI) project.
Note: When executing a Flume configuration, ensure that you are selecting and right-clicking the iWay Big Data Integrator Publish option and selecting New from the context menu in the Run Configurations facility, and not the iWay Big Data Integrator Deploy option.
For more information, see Defining Run Configurations.