Using the Generate DDL Wizard
The Generate DDL (data definitions) wizard allows you to export a model from any RDBMS and iBDI will translate it to HQL and create the tables in Hive. When Generate DDL is selected from the context menu in the Data Source Explorer, the Generate DDL wizard (Options pane) opens, as shown in the following image.
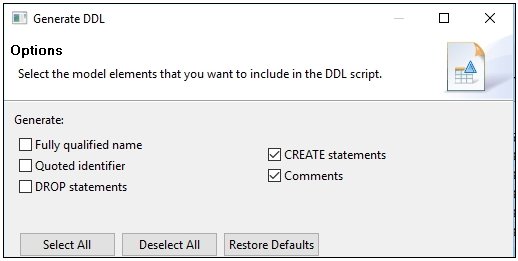
The following table lists and describes the supported model elements that you can select to include in the DDL script.
|
Model Element |
Description |
|---|---|
|
Fully qualified name |
Use fully qualified names, including database, owner, and object. |
|
Quoted identifier |
Enable the quoted_identifier option that allows the interpretation of delimited strings to be changed. |
|
DROP statements |
Generate SQL DROP statements, which remove an existing object from the database. |
|
CREATE statements |
Generate SQL CREATE statements. Select the options associated with the DDL to CREATE or DROP, fully qualified names, quoted identifiers (special characters or character combinations matching SQL key words or non standard column names). |
|
Comments |
Generate comments. |
After selecting the model elements, click Next at the bottom of the Generate DDL wizard to continue.
The Objects pane opens, as shown in the following image.
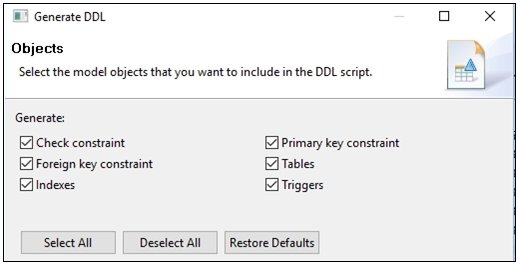
The following table lists and provides the scope of the supported model objects that you can select to include in the DDL script.
|
Model Object |
Scope |
|---|---|
|
Check constraint |
Database, Table |
|
Foreign key constraint |
Database, Table |
|
Indexes |
Database, Table |
|
Primary key constraint |
Database, Table |
|
Tables |
Database, Table |
|
Triggers |
Database, Table |
|
Views |
Database Note: The Views model object is shown only when you are using Hive database connections. |
Select the model objects to include in the DDL script, which can be all or only one of the objects in this pane. Click Next at the bottom of the Generate DDL wizard to continue.
The Save and Run DDL pane opens, as shown in the following image.

Perform the following steps:
- In the Folder field, enter a project folder or click Browse to select the folder.
- In the File name field, accept the default or enter a unique name.
- In the Preview DDL area you can preview the generated DDL script.
- In the Statement terminator field, accept the default terminator character or specify a different character to use.
- Selecting the Run DDL on server checkbox allows you to run the DDL script against a connection profile.
- Selecting the Open DDL file for editing checkbox allows you to open the DDL script in SQL Scrapbook.
The current project name is automatically entered in the Folder field. You can select a different project by clicking Browse.
Running the DDL script will create the table in the current schema. Since the DDL is based on a current table, this can cause loss of data. Use the Open DDL file for editing checkbox to modify the DDL script by changing the name or other components (add or remove columns, change the field name or type).
Select the Open DDL file for editing checkbox and then click Next at the bottom of the Generate DDL wizard.
The Summary pane opens, which provides a summary of all the settings you configured in the Generate DDL wizard.

Click Finish at the bottom of the Generate DDL wizard.
The DDL script opens as a new tab in the iBDI perspective, as shown in the following image.

The data source Type and Name fields are initially blank. Select a connection profile that exists in the Data Source Explorer from the Type drop-down list.

If a connection profile does not have defined connection, then the Name and Database fields are blank. Select a valid type to continue.
The DDL script is saved in the DDL subfolder of the current iBDI project. Right-click the DDL script and select Execute SQL Files from the context menu to execute the script.
Note: The Generate DDL wizard creates standard ANSI SQL. Many database systems will not accept this dialect. As a result, the SQL must be edited before saving or executing to correctly format the SQL to the database standard.